
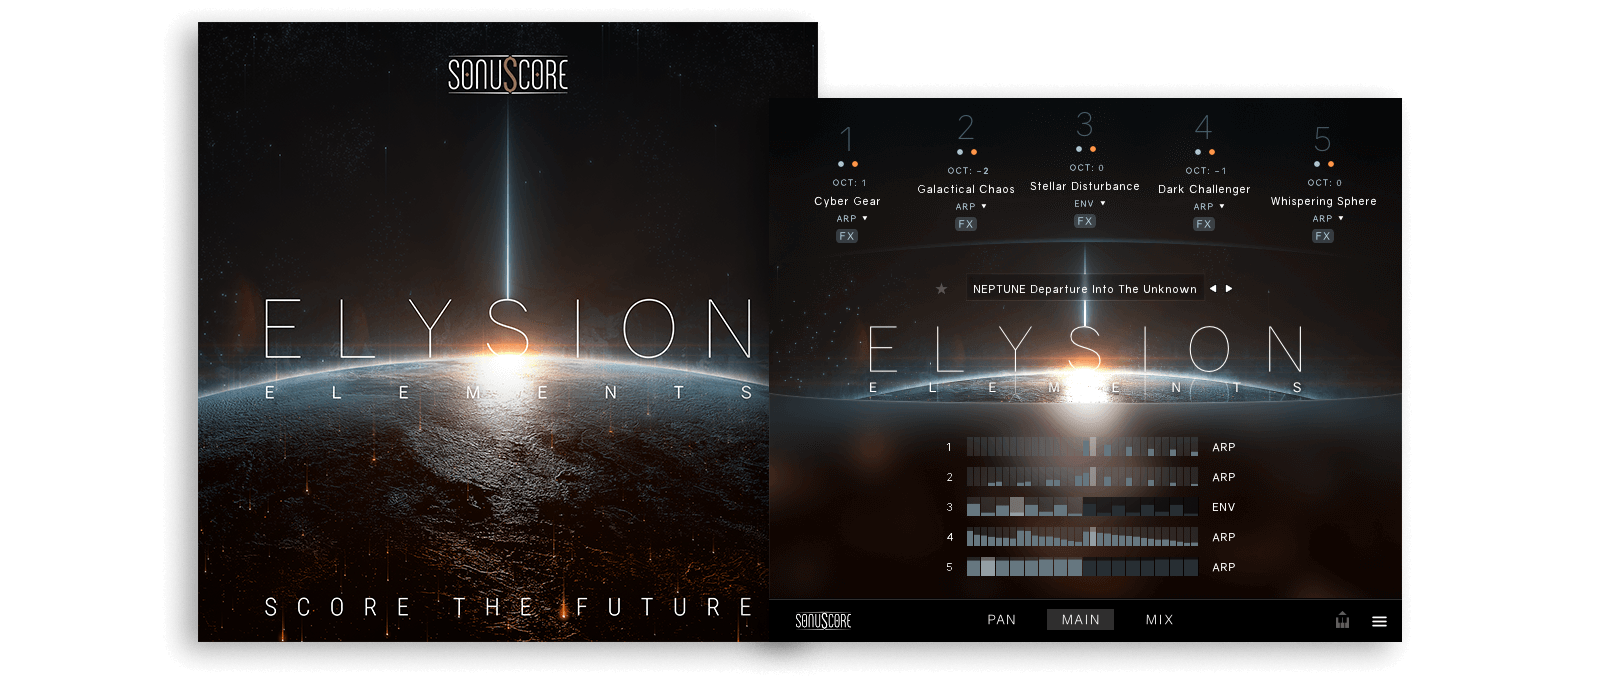
MANUAL
Document Version 1.0.0
Product Version 1.0.0
© by SONUSCORE
SYSTEM REQUIREMENTS
For latest system requirements, please visit www.sonuscore.com, or your trusted dealer's website.
Welcome to Elysion Elements
Thank you very much for choosing Sonuscore software.
Congratulations on your brand-new instrument Elysion Elements by Sonuscore. We hope you will enjoy this instrument as much as we do. This manual will help you to get started and explains the features and functions of your new software.
Welcome to Elysion Elements by SONUSCORE. This Kontakt instrument is a hybrid scoring instrument designed to support your productions in an organic way and breach the gap between orchestra and synthesizer.
The sounds are derived from synthesizers, traditional instruments and sound design recordings.
However every sound is playable like a real instrument with multiple velocities and round robins.
For deeper understanding of all the possibilities of this instrument make sure to check out our tutorials and walkthroughs.
Best regards and enjoy,
Sonuscore
SETUP
Loading Elysion Elements via KONTAKT
Elysion Elements is not an independent plug-in, so you will first need to open an instance of Native Instrument's free KONTAKT PLAYER before you can start playing.
- 1. Download and install Native Instrument’s FREE KONTAKT PLAYER.
- 2. Open KONTAKT PLAYER as a plug-in in your host software (DAW), or as a stand-alone application.
- 3. Click "Library" at the top.
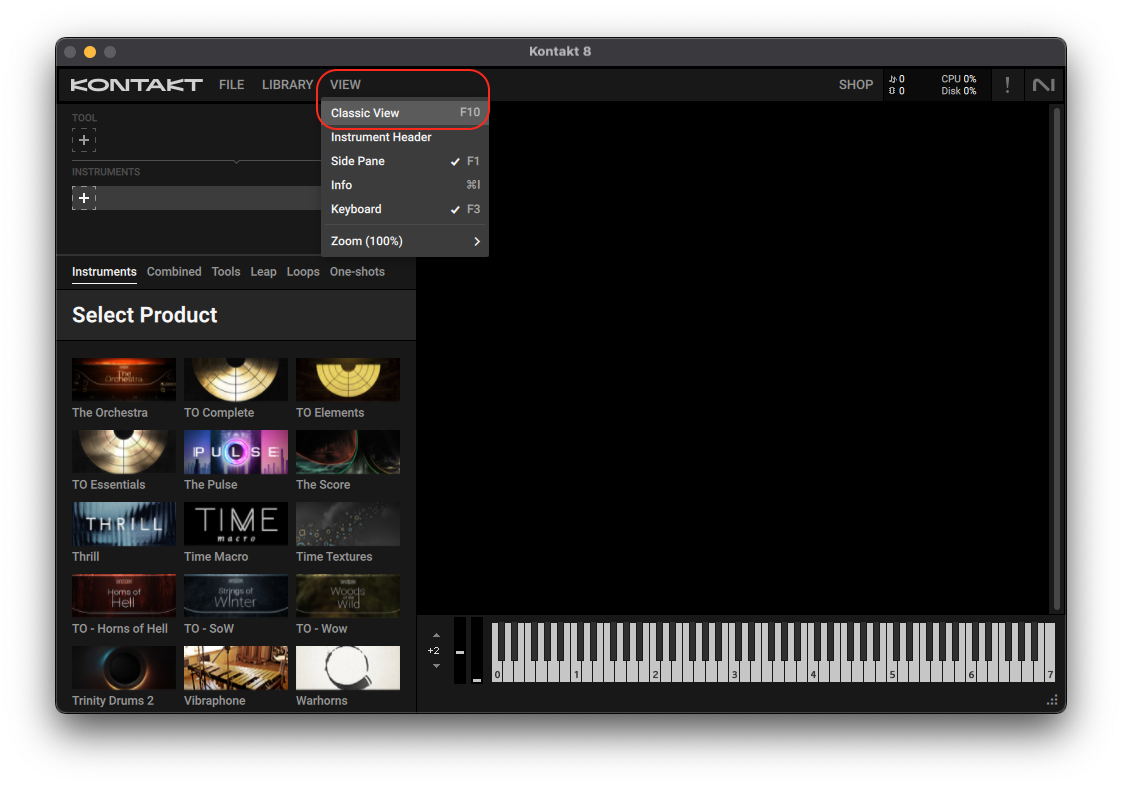
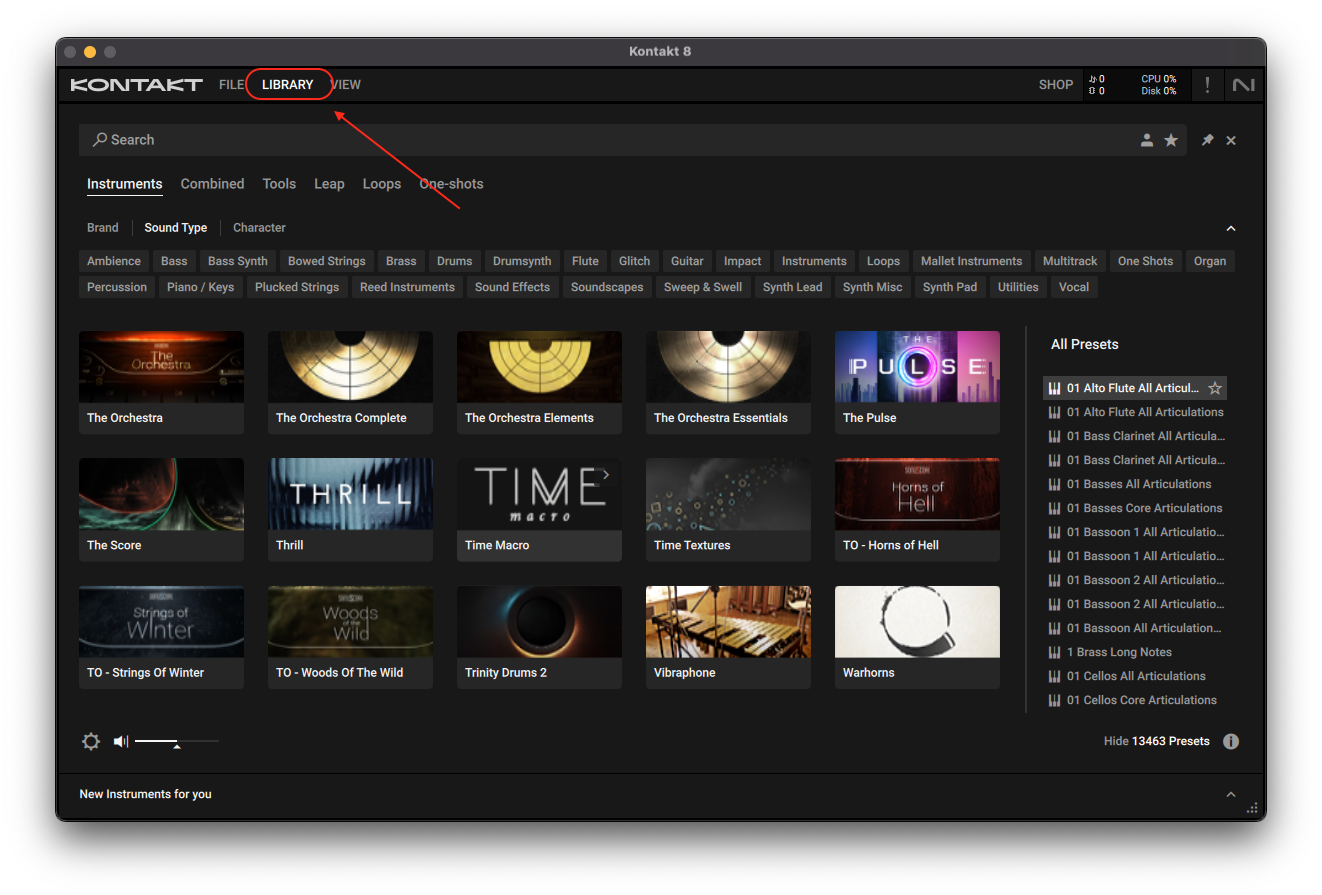 If you don't see the Libraries Browser to the left, click "view" and select "classic view".
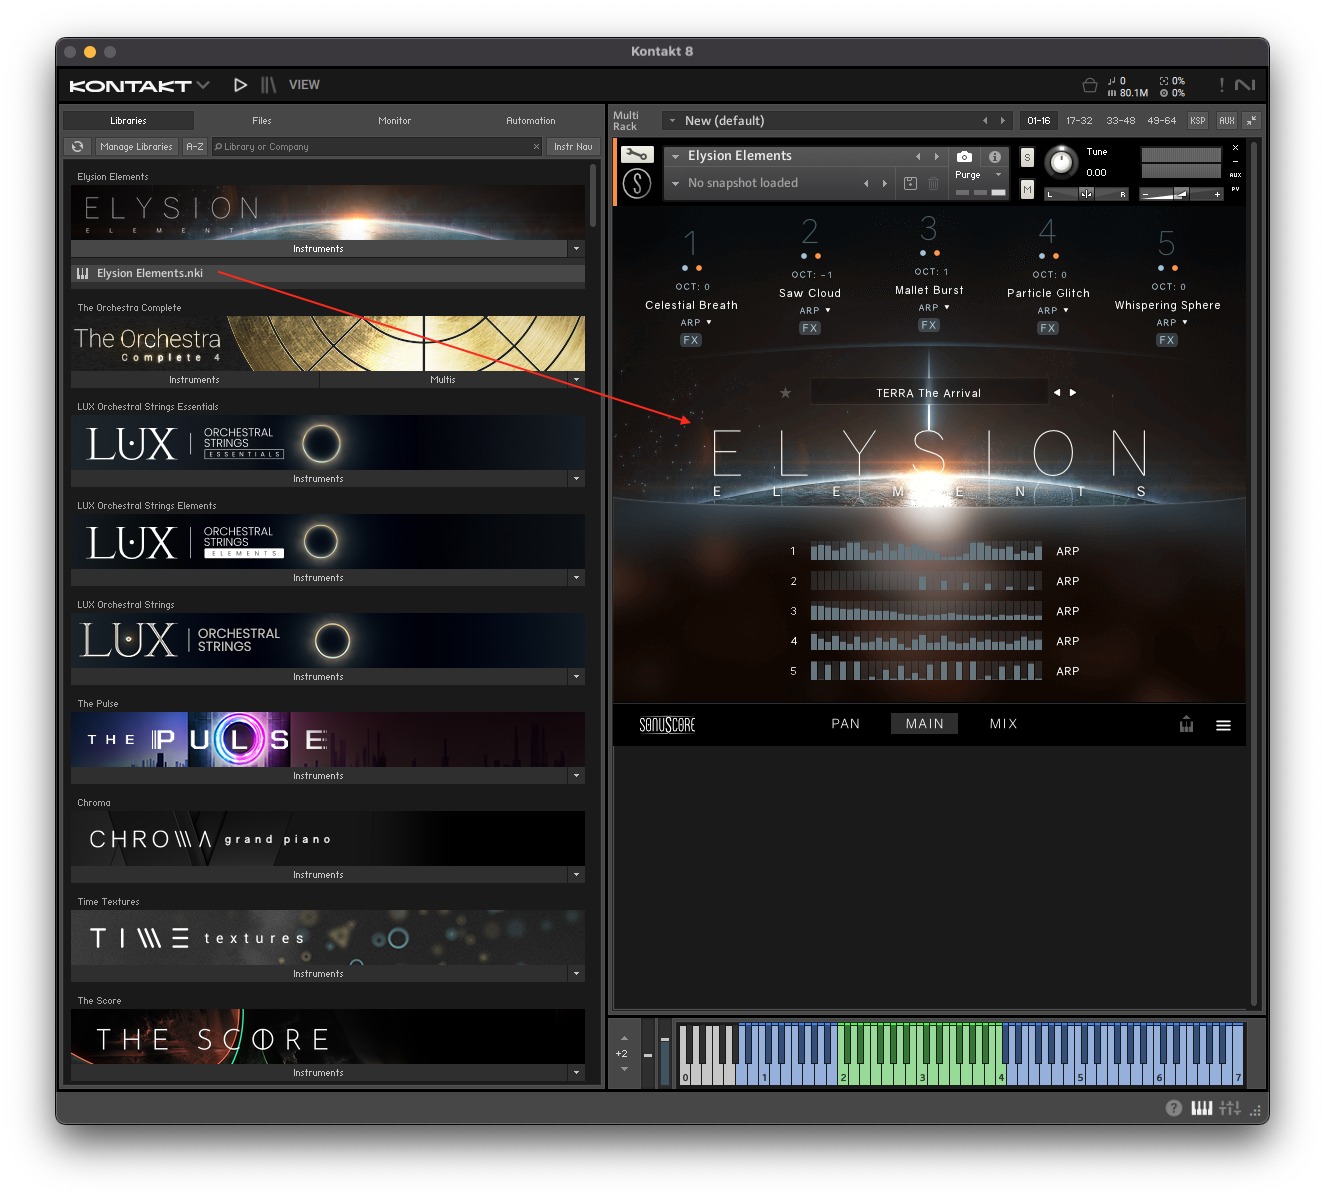
 Locate Elysion Elements in the Browser, on the left side of the user interface.
 - 4. Click Instruments to open the product’s content.
- 5. Double-click for example the Elysion Elements.nki file, or drag the .nki to the open space to the right, to load the instrument.
THE PLANETS
Every theme in ELYSION ELEMENTS has been assigned to one of the following planets and phenomena depending on its sound, rhythm and overall feel. Use those to get a quick idea of the sound of a theme.
• Mercury „The Nimble Racer“
• Venus „The Soulful“
• Terra „Source Of Live“
• Mars „The Warmonger“
• Jupiter „Illusionary Giant“
• Saturn „The Guardian“
• Uranus „The Magician“
• Neptune „The Planet Of Ice“
• Sagittarius „The Black Hole“
• Antares „Red Supergiant“
• Sirius „The Bright Star“
• Orion „Mysterious Nebula“
—> Animated, Lively, Diverse
—> Inspired, Tranquil, Emotional
—> Earthly, Familiar, Intimate
—> Aggressive, Powerful, Violent
—> Contentful, Pleasant, Funny
—> Wise, Stable, Melancholic
—> Enchanted, Shining, Wonderful
—> Mysterious, Sinister, Obscure
—> Violent, Brute, Dark
—> Bombastic, Pompous, Modern
—> Mighty Positive, Energetic
—> Mystic, Eerie, Indecisive
ELYSION ELEMENTS.NKI
The Ensemble Engine is the heart of the library. Here you can freely combine multiple instruments and play them together. You can load up to five instruments into independent slots which can be transposed and even animated with one of five arpeggiators and envelopes. This instrument was designed to both inspire your original compositions and to quickly give you what you need to fill out your hybrid arrangement.
On the Main Page you find all the instruments that are loaded in your theme. You can access all controls to edit your theme or choose different themes directly from here.
MAIN PAGE
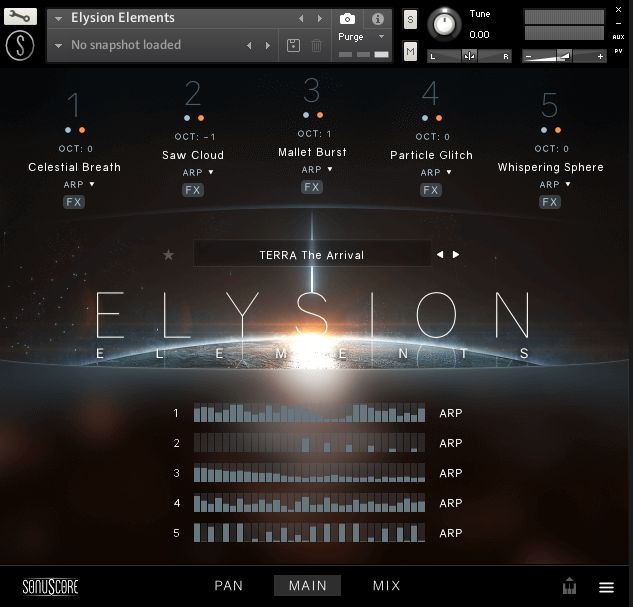
On the top of the main page you can see the five instrument slots.
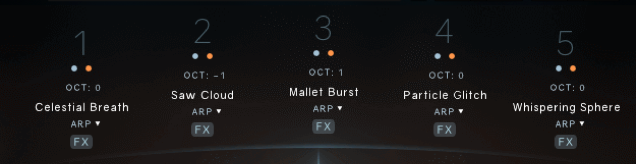
Clicking on one of the numbers will activate this slot and guide you directly to the corresponding arp/envelope engine. See 4.1.10. for further information on the Arp/Envelope Tab. You can use the numbers to activate different instrument slots when editing the FX or editing the arp/envelopes as well.
SOLO & MUTE
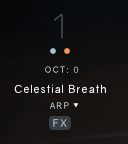
Right beneath the instrument slot number you can solo (blue) or mute (orange) the instrument. Shortcut: „Ctrl+Click/Cmd+Click“ will solo one slot and mute all the others. Even if there are multiple activated solo buttons.
OCTAVE SHIFT

Under the solo/mute button is the octave shift control. By clicking and dragging up or down you can transpose the instrument in the slot one or multiple octaves up or down.
INSTRUMENT BROWSER
This feature is not available in this version. To learn more, please visit www.sonuscore.com.
ARP / ENVELOPE SELECTION
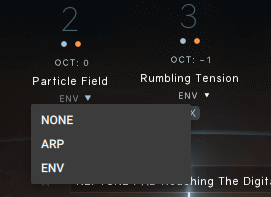
Under the instrument name you can select an envelope or arpeggiator for the chosen instrument. The envelope can only be chosen for Sustain instruments. However the arpeggiator can not only be selected for Hits but also for Sustain instrument. If “None” is selected, the sound doesn’t react to an ARP or Envelope but still to velocity and the motion engine To edit the arpeggiator or envelope continue reading at see 4.1.10.
THEME BROWSER

Right in the middle of the main page you will find the enhanced preset strip with extensive controls for changing and loading themes. The arrow buttons to the left of the strip allow for quickly skipping through the filtered theme selection. To the right you will find a star icon for marking your favorite themes.
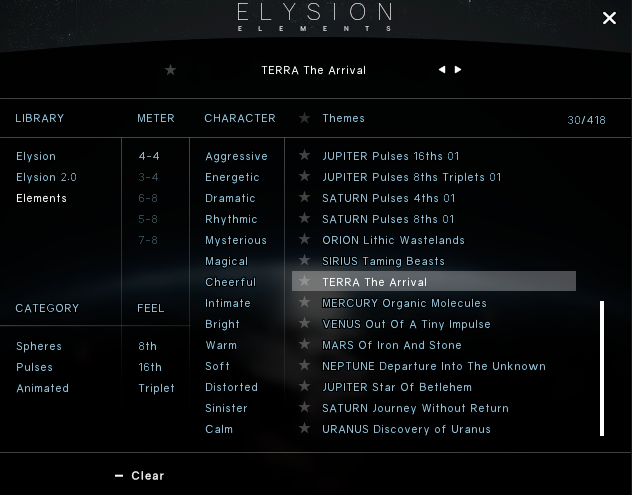 By clicking on the title of the currently selected theme, you will enter the theme browser. Elysion Elements consists of a limited selection of 30 themes. To learn more, please visit www.sonuscore.com.
The Theme Browser page contains 28 tags to help you filter all themes by different characteristics and keywords as well as an option to scroll through the filtered selection. To simplify the search the tags are organized into different categories:
Library: These tags can be used to search for themes in the context of the various libraries included in Elysion Elements. This category can be used to additively filter for multiple tags.
Category: In general, all themes in Elysion Elements are created with three main categories in mind, applicable in different compositional scenarios. Here you can switch between the following three types:
Spheres are divided in HIT and PAD themes. The hits are shorter sounds whereas pads are much longer and developing over time. Both react to different velocities similar to a real instrument and evolve in combination with the mod wheel and our Motion Engine.
Pulses contain very basic rhythmical patterns.
Animated Themes are the most complex themes available, making use of the engine modules to create complex arrangements.
Meter: Each theme has a time signature assigned to it, which can be filtered with the tags located in this category. Note: Only one time signature can be selected simultaneously.
Feel:The Feel category allows for searching themes with eighth, sixteenth or triplet focus.
Character:In order to quickly find suitable themes for your score, you can narrow down your search further in this category using various types of characteristics. You can choose from 14 selected attributes, ranging all the way from »Aggressive« to »Calm«.
The Clear button in the lower section of the Theme Browser will reset your tag selection allowing you to start over. To exit the theme browser, click on the X on the top right, or double click on your selected theme.
MIDI DRAG & DROP
In the lower right corner of the Main Page you can find the Export MIDI icon.

You are able to export your theme performance to different midi channels within your DAW simply by dragging and dropping the icon into your DAW.
To use this feature you can follow these steps. Open up „Elysion Elements.nki“. Choose a theme that you like and record a performance into your DAW.The Engine registers that your DAW is playing and starts recording all generated MIDI Data even if you don’t record onto a midi channel.
You can now drag and drop the recorded data into your DAW.
But be careful: Once your DAW is stopped and ELYSION ELEMENTS gets triggered again, the cache will be cleared and the previously recorded data will be overwritten with new data.To be safe you can record a performance onto a midi channel of your DAW, edit this performance, play that section again to write that changed data into the Midi cache of ELYSION ELEMENTS and drag and drop into your DAW.
If your theme file consists of five instrument groups five midi tracks will be created. You can use those to layer different instruments of ELYSION ELEMENTS or any other sample library.
GLOBAL SETTINGS

At the bottom right corner you can find the little button that brings you to the global control settings.

Control: In this menu you can choose between three standard MIDI-Controllers (CC1, CC2 and CC11) to control the overall dynamics of the engine. This control is used for scaling the velocity and envelope values of the engine modules and also for direct control of unassigned sustained articulations.
By default this function is assigned to the mod wheel (CC1).
Motion: In this menu you can choose between three standard MIDI-Controllers (CC1, CC2 and CC11) to control the motion engine. By default this function is assigned to the mod wheel (CC1).
THEME RANGES / GREEN AND BLUE KEYS

With our engine we provide an easy way to play full sounding arrangements even with just one hand on the keyboard and one on the mod wheel.
The green keys indicate the range where the themes will sound the fullest. We optimized our themes for that range. The blue keys indicates the normal combined range of the loaded instruments.
FX TAB
When clicking on the FX button on one of the instruments the FX TAB will open.
INSTRUMENT CONTROLS
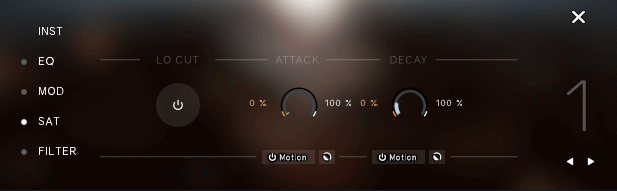
Lo Cut: This button toggles a fixed low cut at 80hz on and off.
Attack: Set the attack time in ms.
Decay: Set the decay time in ms.
Under attack and decay you can see the motion button. When activated the mod wheel will control this parameter and move between the min and max value. The little reverse icon will reverse the movement. Thus giving the maximal mod wheel value the min value of the control. For more information see 4.2.4. Motion Engine.
Note: The INSTRUMENT CONTROLS can only be accessed on a slot with an instrument selected.
EQUALIZER
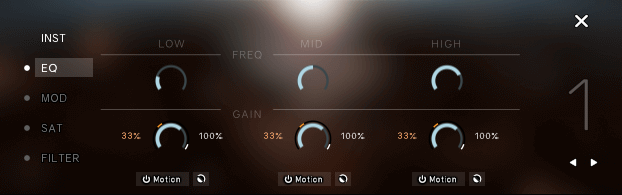
EQ On/Off: Click on the dot next to „EQ“ to switch the EQ on or off.
Low Frequency: Select the frequency for the low band of the equalizer.
Low Gain: Select the gain for the low band of the equalizer.
Note: You can activate the Motion Engine for this parameter.
Mid Frequency: Select the frequency for the mid band of the equalizer.
Mid Gain: Select the gain for the mid band of the equalizer.
Note: You can activate the Motion Engine for this parameter.
High Frequency: Select the frequency for the high band of the equalizer.
High Gain: Select the gain for the high band of the equalizer.
Note: You can activate the Motion Engine for this parameter.
MODULATION
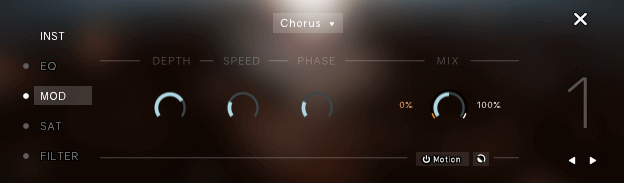
Mod On/Off: Click on the dot next to „MOD“ to switch the modulation on or off.
Effect Selection: Use the dropdown menu at the top of the tab to choose between the Chorus, Flanger or Phaser effect.
Depth: Adjust the DEPTH for the selected effect. This parameter controls the amount of detune the effect uses.
Speed: This parameter controls the SPEED in which the selected effect ist modulated.
Phase/Feedback: This parameter controls the PHASE shifting of the signal or the amount of FEEDBACK for the Phaser.
Mix: Adjust the dry/wet ratio of the effect.
Note: You can activate the Motion Engine for this parameter.
SATURATION
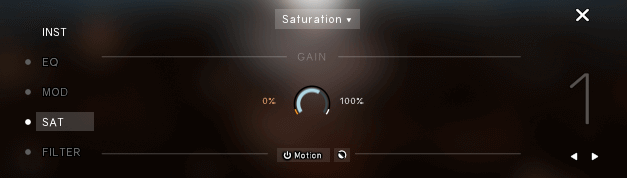
Saturation On/Off: Click on the dot next to „SAT“ to switch the saturation on or off.
Type Selection: Use the dropdown menu at the top of the tab to choose between six different types of saturation and distortion.
Gain: Adjust the Gain setting for the saturation effect.
Note: You can activate the Motion Engine for this parameter.
Tone: Adjust the tone of the saturation. Only supported by three of the six types.
FILTER
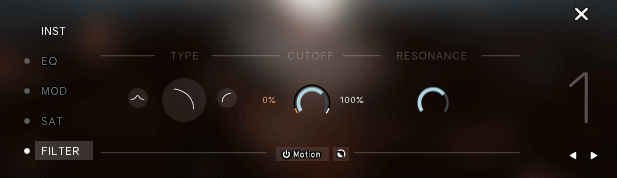
Filter On/Off: Click on the dot next to „FILTER“ to switch the filter on or off.
Type: Select the filter type. You can choose between LowPass, HighPass and BandPass filter types.
Cutoff: Select the CUTOFF frequency for the filter.
Note: You can activate the Motion Engine for this parameter.
Resonance: Adjust the RESONANCE for the filter.
ARP / ENVELOPE TAB
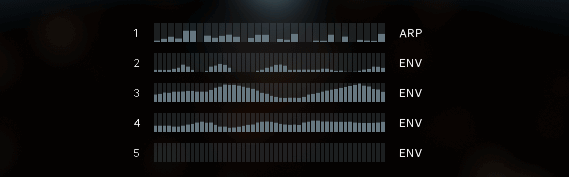
On the main page you can see five moving Arp/Envelope bars. One for each of the instrument slots. Click on one of them to adjust the settings for the arp/envelope.
ARPEGGIATOR
The arpeggiator module consists of two main elements, the general controls and the rhythm stepper. While the general controls help controlling the note repertoire out of the played notes, the rhythm stepper helps arranging them in a recurring rhythmical sequence. The number on the left indicates the instrument slot that is shown. Use the left and right arrow to switch between the instrument slots to quickly adjust several arps/envelopes.
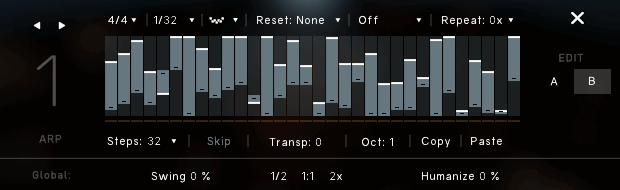
Time Signature: Selects the time signature of the pattern. The selected time signature will affect the reset function, and also the stepper resolution.
Rate:In the arpeggiator-modules it is possible to select even values and three different kinds of triplets as the arpeggiator-rate. If a triplet-rate is selected, the rhythm stepper will adjust the number of steps accordingly. This way, the rhythm stepper will always cover an amount of steps that makes sense within the selected time signature.
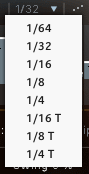
Order: Determines the order, in which the played notes will be arpeggiated. All (Chord) will trigger all played notes in the respective rhythm.
Bar Reset: If „Reset: 1 bar“ is selected in the dropdown menu, the arpeggio will repeat its pattern after one measure of the selected time signature. „Reset: 2 bars“ lets the pattern repeat after two measures. This prevents a random displacement of the note pattern over time.
Note Selection: Selects whether or not all played notes should be heard in this particular module. The different options allow to only play the lowest, highest or middle notes of a played chord. This can be used to prevent a muddy bass section and orchestrate chords carefully with multiple instruments.
Repeat: Repeats every note one or multiple time before moving on to the next one.
STEPS: Adjusts the amount of steps within the selected time signature.
Skip: Steps with the value 0 will be skipped and the respective note will sound at the next active step.
Transpose: Transposes the whole pattern one or multiple semitones up or down.
Octave: Repeats the played notes after the first turn one or two octaves above or below.
COPY/PASTE: COPY and PASTE the step pattern from one module to another.
Swing: Gradually add a swing feeling to the arpeggiators pattern.
Playback Speed: Choose between half, normal and twice the speed.
Humanize: By turning on the humanization and turning up the humanization control, the engine will gradually add imperfections to rhythm and dynamics of the engine modules.
RHYTHM STEP-SEQUENCER
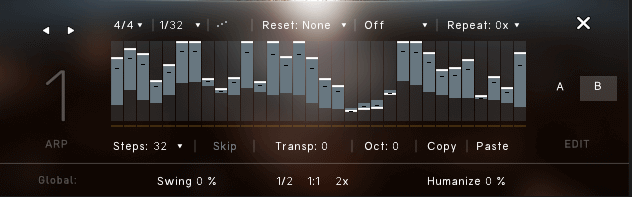
Create your own rhythm for the arpeggiator. Click to set single step values. Click and drag to draw multiple step values.
Right-click and drag to draw a straight line. Use the modulation wheel to control the dynamic of the rhythm.
A: Click on the A to view and adjust the lowest mod wheel position.
B: Click on the B to view and adjust the highest mod wheel position.
Shortcut: Use „Alt+Click“ to adjust all values simultaneously.
ENVELOPE/STUTTER
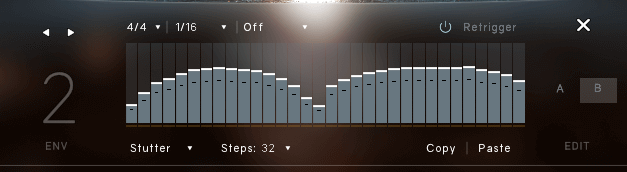
The ENVELOPE allows you to set a recurring dynamic shape to sustained notes. The centerpiece is the envelope shape, which can be drawn freely by left-clicking and dragging the mouse. By right-clicking and dragging the mouse you can draw a straight line. A number of additional controls allow you to adjust the envelope to suit your needs:
Time Signature: Sets the time signature, which directly correlates with the duration of the envelope.
Bar Length/Rate: In the envelope module you can select the BAR LENGTH until the module repeats. In the stutter module it is possible to select even values and three different kinds of triplets as the RATE..
Note Selection: Selects whether or not all played notes should be heard in this particular module. The different options allow to only play the lowest, highest or middle notes of a played chord. This can be used to prevent a muddy bass section and orchestrate chords carefully with multiple instruments.
Retrigger On/Off: If turned on, the sustained note will be triggered again at the beginning of each turn. If turned off, the note will continue in a constant loop.
Steps: Set the amount of STEPS for envelope.
COPY/PASTE: COPY and PASTE the step pattern from one module to another.
Shortcut: Use „Alt+Click“ to adjust all values simultaneously.
MIX PAGE
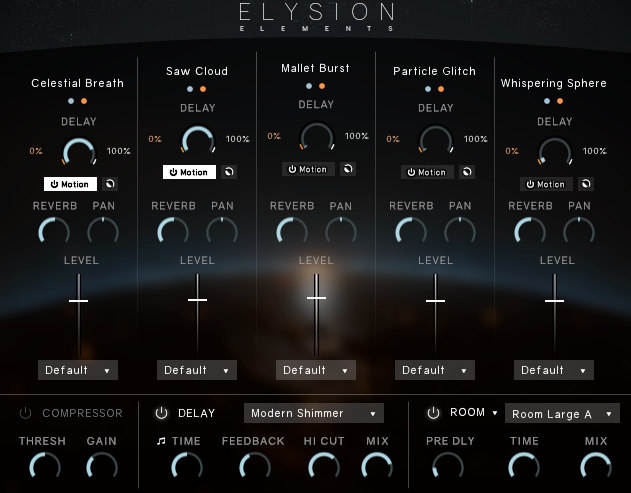
On the Mixer Page you can adjust the balance and sound of the different slots and apply master effects.
CHANNEL STRIP
The name of the loaded instrument is displayed on the very top of every channel strip.
Solo/Mute: Listen to a single slot alone or mute a single slot.
Delay: Sets the send level to the master delay. Use the motion button to activate the Motion Engine for the delay.
Reverb: Sets the send-level to the master reverb. With this control the amount of reverb on each instrument can be adjusted. If set to -infdB, the master reverb will not affect this slot at all.
Pan: Moves this instrument further to the left/right in the stereo field.
Note: If you use the Pan Engine on this channel the PAN setting on the mix page will have no effect.
Fader: Turns the volume of the slot up or down. „Ctrl+Click/Cmd+Click“ to reset the value to 0dB.
OUTPUT ROUTING
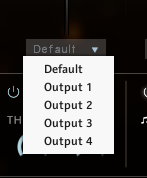
On the mixer page there is a dropdown menu below the channel strip of every instrument slot that assigns specific Kontakt outputs to that particular slot.
If no outputs are displayed, you can create, rename and assign new outputs in the Outputs-Menu of Kontakt (F2). They will be available immediately in the dropdown menu of our mixer page. Consult the documentation of Kontakt 6 and your DAW to learn, how to implement multi-timbral instruments within your particular audio software.
Please note: Even though the dry signals will be split to the separate outputs, the send-reverb /delay will remain on the default channel, as splitting the reverb/delay would be very taxing on your CPU. For best results, we suggest to use this feature with the internal convolution reverb/delay turned off, and add a master reverb/delay in the DAW.
MASTER FX

Compressor: Adjust the dynamics of the instrument by setting the threshold of the compressor and adjust the makeup gain to the right.
Delay: This is the master delay effect. You can choose from over twenty high quality presets and adjust them with the Time, Feedback and Hi Cut controls. Use the mix control to adjust the return level of the delay.
Reverb: This is the master reverb with high quality reverbs from different legendary effect processors and impulse responses. You can choose a reverb category in the menu on the left: IRC, Room, Hall or Plate. Each category has several presets that you can select in the right hand dropdown menu.
Use the mix knob to adjust the send return level of the reverb.
MOTION ENGINE
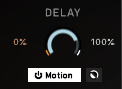
At the heart of our effects lies our MOTION ENGINE that adds movement and depth to the themes. Beneath almost all of the available effects you can find the motion button. When activated the corresponding parameter is controllable with the mod wheel or one of the two other controllers.
Min Value: The red number on the left of the bar sets the minimal value of the selected effect parameter for the MOTION ENGINE. This is the value reached at the lowest position of the mod wheel. Click and drag with the left mouse button to adjust this parameter.
Max Value: The white number on the right of the bar sets the maximum value of the selected effect parameter for the MOTION ENGINE. This is the value reached at the highest position of the mod wheel. Click and drag with the left mouse button to adjust this parameter.
Motion Switch: Toggle the MOTION ENGINE on and off for this effect parameter.
Motion Reverse: This little button on the right of the MOTION SWITCH will reverse the min and max values. The max value is now reached at the lowest position of the mod wheel and the min value at the highest position.
Note: When the MOTION ENGINE is activated you can not set a fixed value for the effect. Instead use the MIN and MAX VALUE to adjust the range of the MOTION ENGINE.
PAN ENGINE
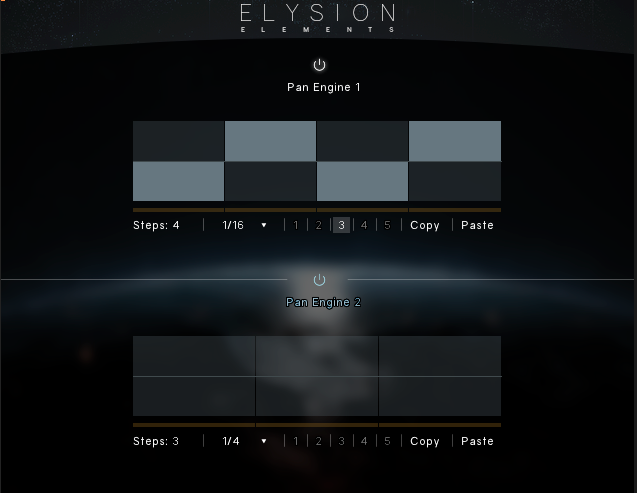
Another feature that greatly creates movement is our PAN ENGINE. Each theme has two different pan engines that each instrument slot can be assigned to. The centerpiece is the panning shape that can be drawn freely by left-clicking and dragging the mouse. By right-clicking and dragging the mouse you can draw a straight line. A number of additional controls allow you to adjust the engine to suit your needs:
Pan Engine On/Off: Use the toggle switch to turn the engine on and off.
Steps: Set the number of steps for the PAN ENGINE.
Rate: It is possible to select even values and three different kinds of triplets as the rate for the PAN ENGINE.
Slot: Select which instrument SLOT is controlled by the PAN ENGINE. You can assign each slot to one of the two PAN ENGINES.
COPY/PASTE: COPY and PASTE the engine pattern from one module to another.
CREDITS
Product Concept and Design: SONUSCORE: Nico Dilz, Tilman Sillescu, Stefan Kemler, Steffen Brinkmann, Simon Schrenk, Pierre Langer, Axel Rohrbach
Project Lead: Nico Dilz, Tilman Sillescu
Sound Design: Simon Schrenk, Mathias Vatter, Andreas Skandy, Christian Hostert, Nico Dilz
Theme Design: Simon Schrenk, Mathias Vatter, Christian Wirtz, Andreas Hammann, André Molkenthin, Johannes Tosta, Jonas Hausotter, Matthias Meeh, Nico Dilz
Theme Naming: Andreas Hammann, Jonas Meyer
Sample Editing: Simon Schrenk, Mathias Vatter, Andreas Skandy, Christian Hostert, Nico Dilz
Kontakt Scripting: Nico Dilz, Stefan Kemler, Mathias Vatter
User Interface Design: Jannic Böhme, Nico Dilz, Stefan Kemler
Artwork: Jannic Böhme, Benedikt Huster
Marketing: Benedikt Huster, Jannic Böhme, Andreas Hammann, Felix Möbius, Tobias Kunz, Louisa Wolf, Russ Hughes, Zoé Friedbacher, Nadja Demmler
Videos: Nadja Demmler, Tilman Sillescu, Steffen Brinkmann, Jannic Böhme, Mathias Vatter, Benedikt Huster
Quality Assurance: Tilman Sillescu, Nico Dilz, Stefan Kemler, Simon Schrenk, Mathias Vatter, Johannes Tosta, Jonas Hausotter, Jonas Meyer
Manual: Christian Wirtz, Nico Dilz, Simon Schrenk