MANUAL
Document Version 1.0.0
Product Version 1.0.0
© by SONUSCORE
SYSTEM REQUIREMENTS
For latest system requirements, please visit www.sonuscore.com, or your trusted dealer's website.
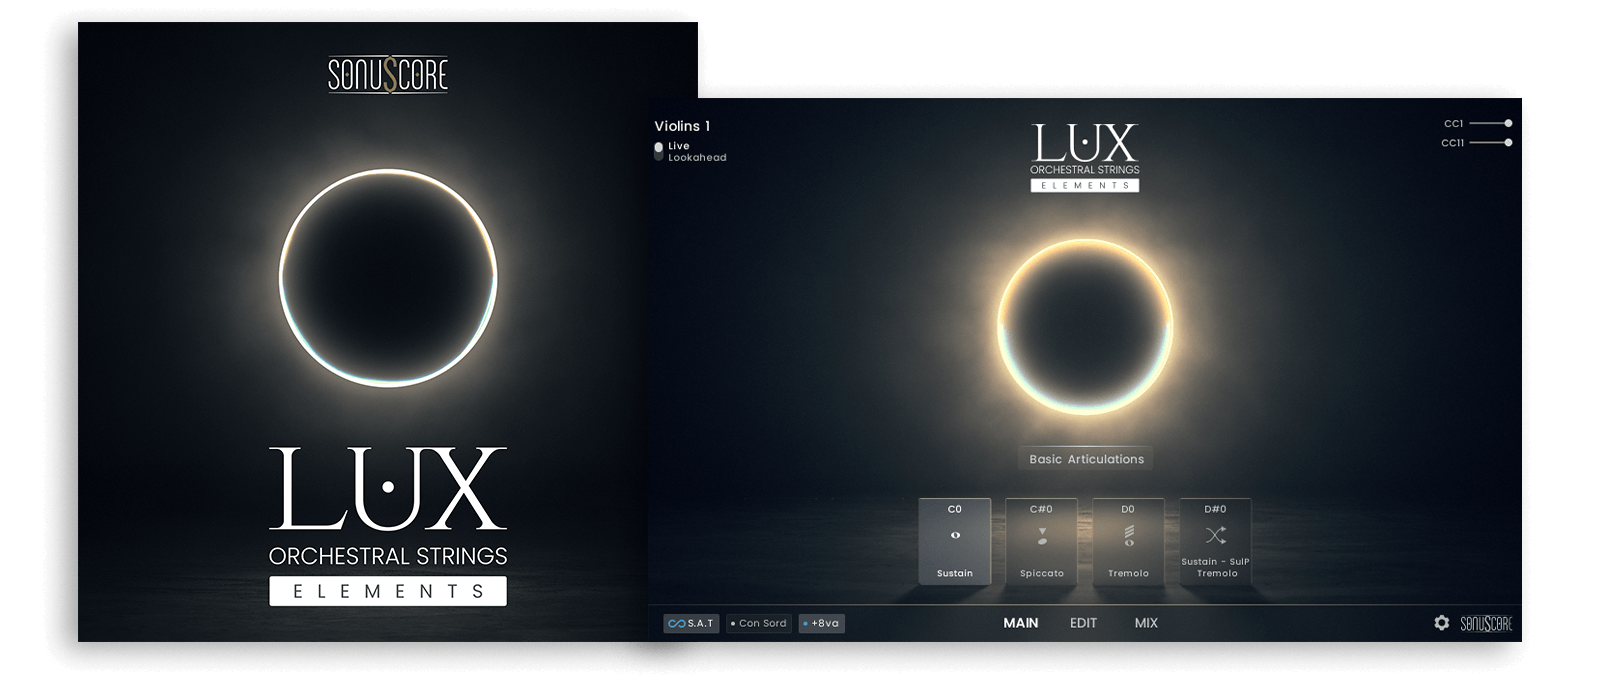
Welcome to LUX Orchestral Strings Elements
Thank you very much for choosing Sonuscore software.
Congratulations on your brand-new instrument LUX Orchestral Strings Elements by Sonuscore. We hope you will enjoy this instrument as much as we do. This manual will help you to get started and explains the features and functions of your new software.
Welcome to LUX Orchestral Strings Elements. This KONTAKT instrument is a deeply multi-sampled string library, that aims to provide all basic articulations for every standard string section as well as extended playing techniques and other unique features. As orchestral libraries have grown more and more complex, we approached this instrument with the goal to make it as easy as possible to create stunning string arrangements whether by programming individual sections or using the ensemble instrument.
To gain a deeper understanding of all this instrument's possibilities, be sure to check out our tutorials and walkthroughs.
Best regards and enjoy,
Sonuscore
SETUP
Loading LUX Orchestral Strings Elements via KONTAKT
LUX Orchestral Strings Elements is not an independent plug-in, so you will first need to open an instance of Native Instrument's free KONTAKT PLAYER before you can start playing.
- 1. Download and install Native Instrument’s FREE KONTAKT PLAYER.
- 2. Open KONTAKT PLAYER as a plug-in in your host software (DAW), or as a stand-alone application.
- 3. Click "Library" at the top.
 If you don't see the Libraries Browser to the left, click "view" and select "classic view".
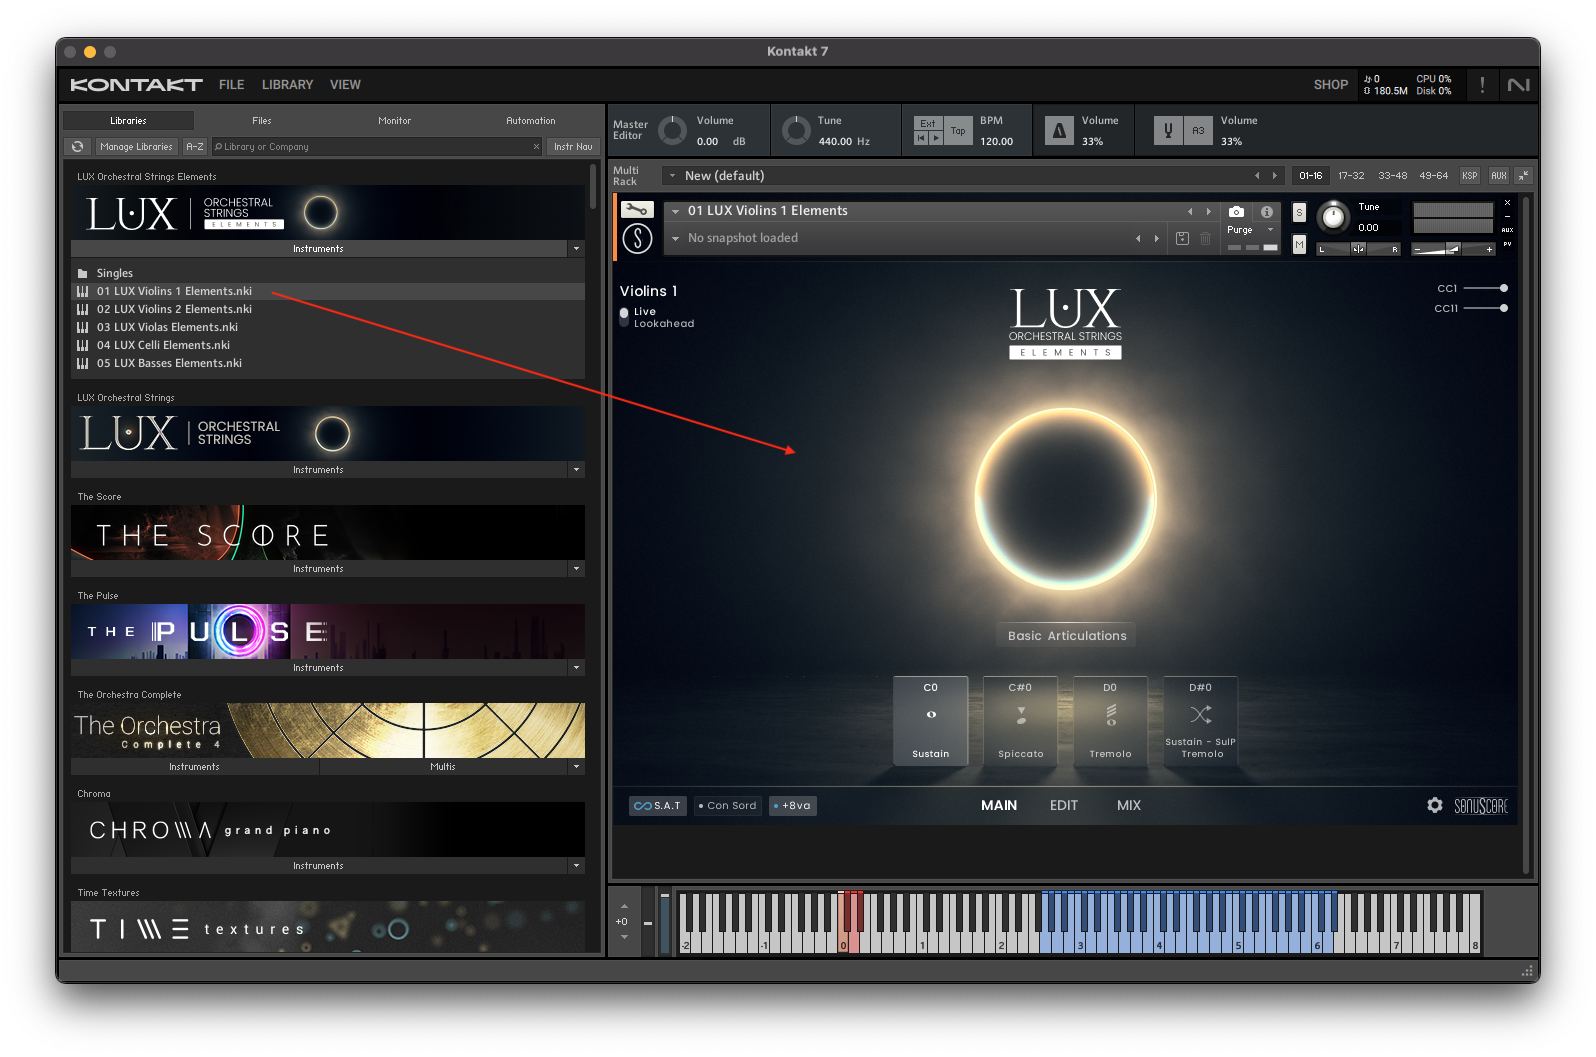
 Locate LUX Orchestral Strings Elements in the Browser, on the left side of the user interface.
 - 4. Click Instruments to open the product’s content.
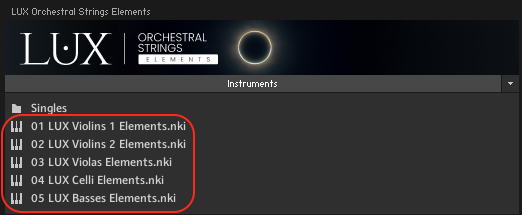
- 5. Double-click for example the 01 LUX Violins 1 Elements.nki file, or drag the .nki to the open space to the right, to load the instrument.
INSTRUMENTS
INSTRUMENT & ARTICULATION LIST
Violins 1 (18 Players)
Classical Articulations
Legato
- Legato - one octave
Sustains
- Sustain
Shorts
- Spiccato
Trills & Tremolos
- Tremolo
- Sul Ponticello Tremolo
Articulation Morphs
Long Morphs
- Sustain - Sul Ponticello Tremolo
Violins 2 (16 Players)
Classical Articulations
Sustains
- Sustain
Shorts
- Spiccato
Trills & Tremolos
- Tremolo
- Sul Ponticello Tremolo
Articulation Morphs
Long Morphs
- Sustain - Sul Ponticello Tremolo
Violas (14 Players)
Classical Articulations
Sustains
- Sustain
Shorts
- Spiccato
Trills & Tremolos
- Tremolo
- Sul Ponticello Tremolo
Articulation Morphs
Long Morphs
- Sustain - Sul Ponticello Tremolo
Celli (12 Players)
Classical Articulations
Sustains
- Sustain
Shorts
- Spiccato
Trills & Tremolos
- Tremolo
- Sul Ponticello Tremolo
Articulation Morphs
Long Morphs
- Sustain - Sul Ponticello Tremolo
Basses (10 Players)
Classical Articulations
Sustains
- Sustain
Shorts
- Spiccato
Trills & Tremolos
- Tremolo
- Sul Ponticello Tremolo
Articulation Morphs
Long Morphs
- Sustain - Sul Ponticello Tremolo
KEY SWITCH INSTRUMENT
The key switch instruments are the main focus of LUX Orchestral Strings Elements. Here you can find a fine selection of articulations functioning as the perfect starting point for your composition. There is a total of five key switch instruments: Violins 1, Violins 2, Violas, Celli and Basses.
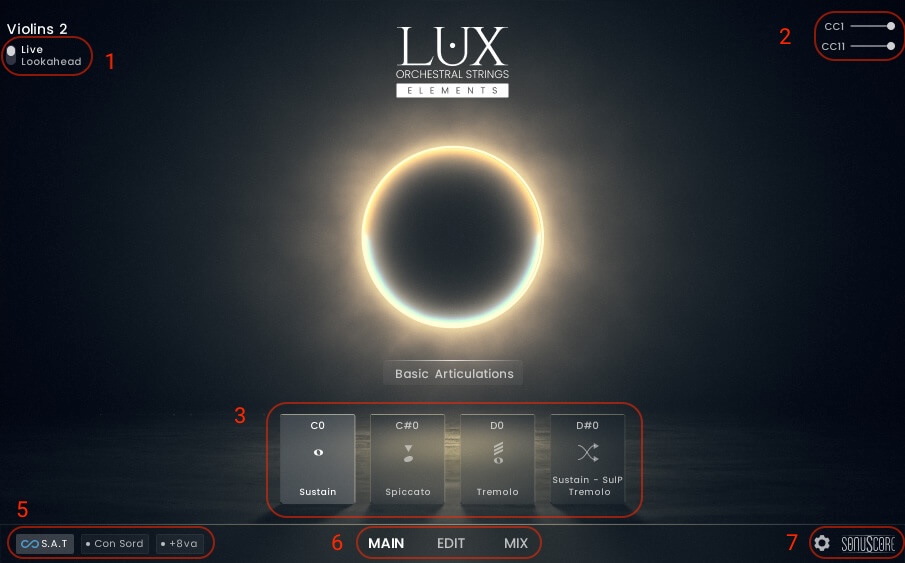
LUX Orchestral Strings Elements has two playing modes: Live Mode and Lookahead.
In Live Mode, all articulations play as they are, with the initial note of the legato having a delay of -150 ms and the rest of the legato reacting to a delay of -250 ms. Use this mode when finding melodies and playing live.
In the Lookahead Mode all sample starts are unified and optimized for a delay of -250ms. Set your track delay to this value and LUX will be perfectly in sync with your other instruments.
Please refer to the relevant documentation for the necessary steps to set a track delay in your digital audio workstation.
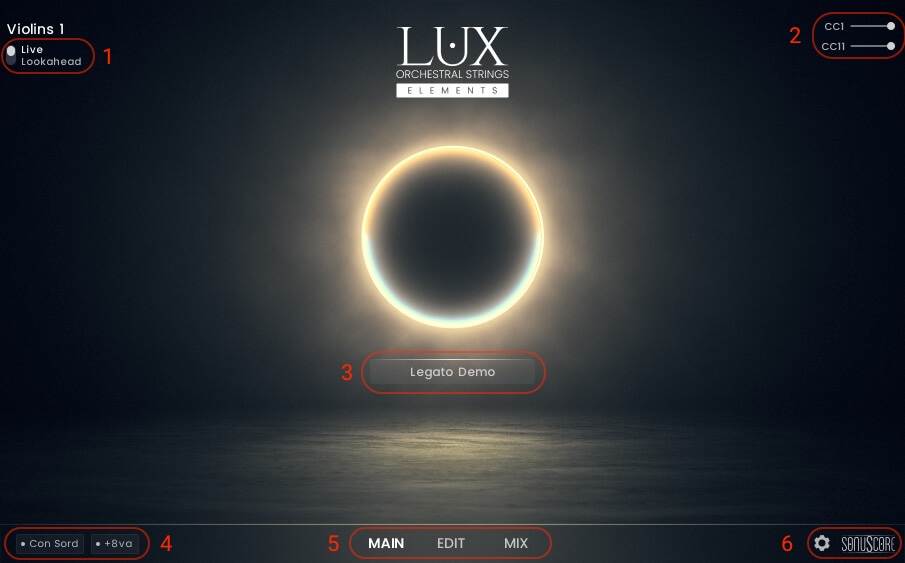
MAIN PAGE
- LUX Orchestral Strings Elements has two playing modes: Live Mode and Lookahead.
In Live Mode, all articulations play as they are, with the initial note of the legato having a delay of -150 ms and the rest of the legato reacting to a delay of -250 ms. Use this mode when finding melodies and playing live.
In the Lookahead Mode all sample starts are unified and optimized for a delay of -250ms. Set your track delay to this value and LUX will be perfectly in sync with your other instruments. - The mod wheel is mapped to CC01 and controls the dynamics.(see 4.3.2.)
Expression is mapped to CC11 and controls the volume. - There are a total of four different articulations. These are mapped from C0 to D#0.
Hovering over a key switch uncovers the purge button at the top left side corner.
The On/Off button in the upper left corner turns the loaded articulation off and purges the samples. Turning it on again will reload the samples.
- Turns the S.A.T. feature on/off.(see 4.1.1.)
Turns the Con Sordino feature on/off.(see 4.1.2.)
Turns the Add Octave feature on/off.(see 4.1.3.) - Page Selection.
- Settings page (see 4.2.) and Credits.
S.A.T. - SEAMLESS ARTICULATION TRANSITIONING
Move between long articulations while holding a note. A key switch note with a lower velocity creates a gradual shift (4 seconds), a higher velocity will produce a quicker change (1.2 seconds). The feature is activated per default.
CON SORDINO
Applies a Con Sordino effect to the instrument.
+ 8va
The Add Octave feature adds an octave above the played note in any articulation.
SETTINGS PAGE
Click the cogwheel at the bottom right of the instrument to access the Settings Page.
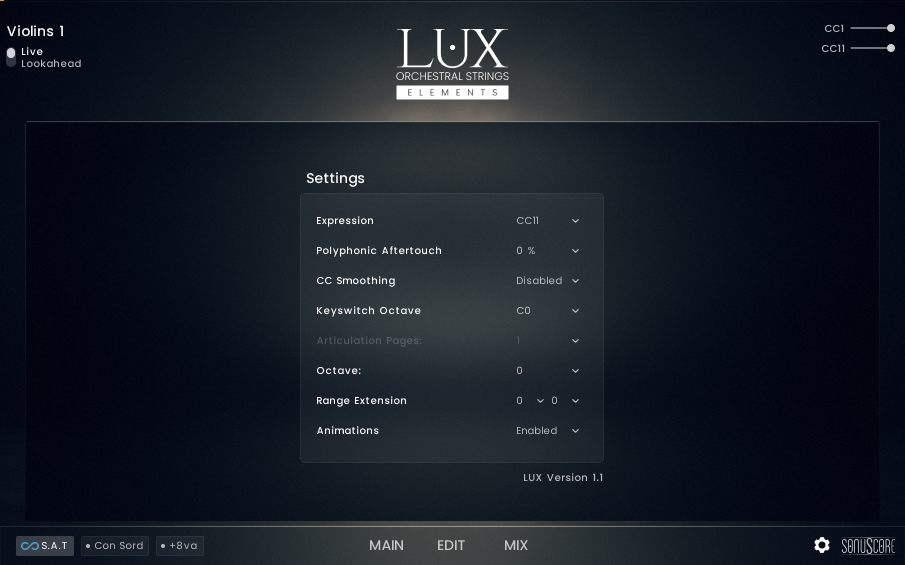
- Expression - Set to CC11. Can be switched off.
- Polyphonic Aftertouch - Set the percentage of how much the polyphonic aftertouch influences CC1 on specific notes.
- CC Smoothing - Off per default. Can be set to Low and High. Influences the behavior of how the instrumt handles sudden CC jumps.
- Keyswitch Octave - Move the key switch range up or down an octave.
- Articulation Page Option to activate more than one articulation page to switch via KS - Option not available in Elements.
- Octave - Move the play range for the keyboard up or down.
- Range Extension - Extend the sonic range of the instrument.
- Animations - Switch background animations on or off. Turning animations off will save system resources.
This can be helpful for tracks with very delicate melodies in the softer dynamic range. It smoothes out the velocity changes leading to a very even performance without sudden velocity drops.
In traditional notation the Basses are notated one octave higher than they actually sound. In LUX Orchestral Strings they are mapped the same way. This means that you can copy and paste the cello part to the basses, creating an easy workflow for basic orchestration with the bass in octaves, while making minimal effort by simply copying the MIDI. In some cases it might be easier to have the Basses in their actual playing range. This can be set on the settings page by moving the playing range of the Basses down by one octave (along with the Keyswitch Octave).
It sometimes happens that during a composition you face a situation where you only would need a semitone more range to finish your melody line. The Range Extension at the settings page lets you easily adjust this range. The nearest base sample is pitched in this case. This means extension beyond a whole tone might start to sound distorted and unauthentic.
EDIT PAGE
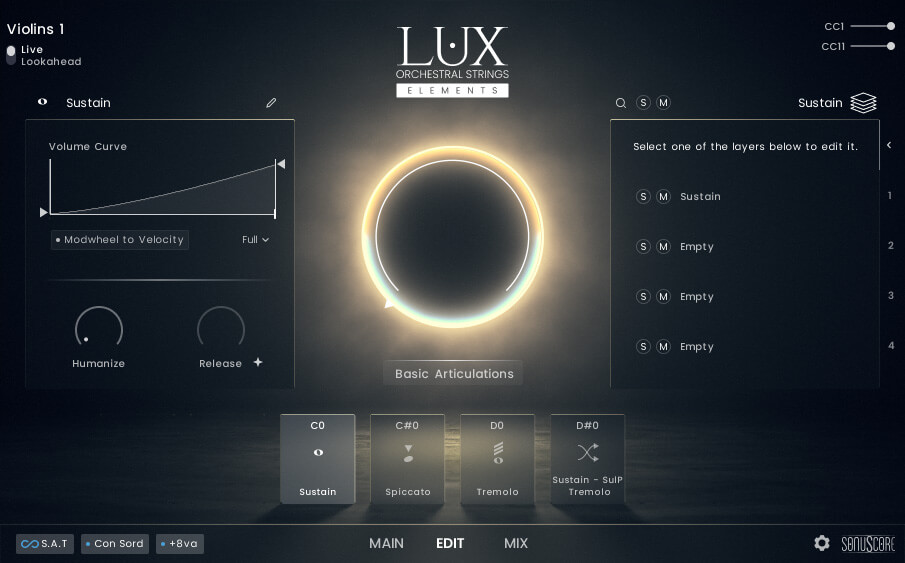
Open the edit page to alter existing articulations or create new ones.
SUBARTICULATION OVERVIEW

Each Articulation consists of up to four different layers of Subarticulations.
Subarticulations are the foundation of the library and can be edited, morphed or layed individually via the Subarticulation Editor.
In this overview you can see all the Subarticulations loaded in the selected Articulation and Solo/Mute individual slots.
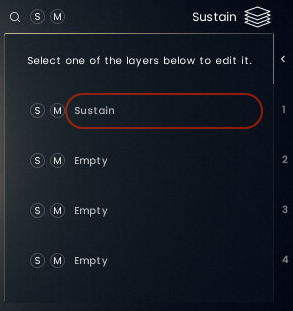
SUBARTICULATION BROWSER
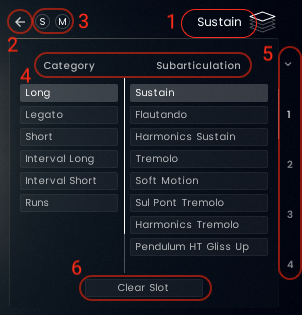
- Click on the Subarticulation name when the desired layer is selected to enter the Subarticulation Browser.
- Clicking the arrow will close the Subarticulation Browser.
- Solo/Mute the current Subarticulation slot.
- Choose a category and click on a Subarticulation to load it into the selected Subarticulation slot.
- The down arrow closes the Subarticulation Browser and changes to the Subarticulation Overview. Click on one of the four slots to change Subarticulations for that slot. Use the scroll bar to scroll through the available Subarticulations.
- Clicking "Clear Slot" will unload the currently loaded Subarticulation.
The Subarticulation Browser offers the following categories and articulations:
Violins 1
Long
- Sustain
- Tremolo
- Sul Pont Tremolo
Short
- Spiccato
Violins 2
Long
- Sustain
- Tremolo
- Sul Pont Tremolo
Short
- Spiccato
Violas
Long
- Sustain
- Tremolo
- Sul Pont Tremolo
Short
- Spiccato
Celli
Long
- Sustain
- Tremolo
- Sul Pont Tremolo
Short
- Spiccato
Basses
Long
- Sustain
- Tremolo
- Sul Pont Tremolo
Short
- Spiccato
SUBARTICULATION EDITOR
To enter the Subarticulation Editor click on the Subarticulation you want to edit.
Longs
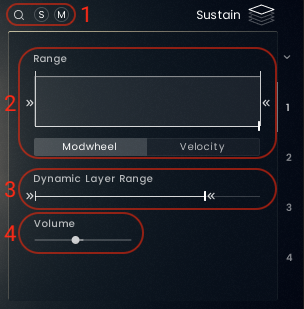
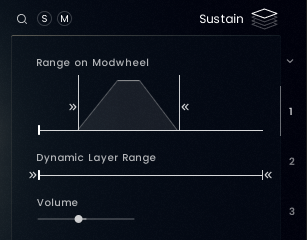
- Enter the Subarticulation Browser and as Solo/Mute Buttons.
- Edit how the Subarticulation behaves when moving the mod wheel or based on note velocity.(see 4.3.1.3.)
- Dynamic Layer Range - Move the slider to exclude dynamic layers from playing.
- Adjust the volume of the Subarticulation.
Shorts
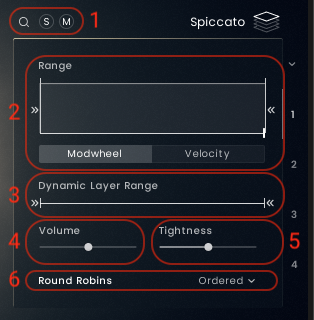
- Enter the Subarticulation Browser and as Solo/Mute Buttons.
- Edit how the Subarticulation behaves when either moving the mod wheel or based on note velocity.(see 4.3.1.3.)
- Dynamic Layer Range - Move the slider to exclude dynamic layers from playing.
- Adjust the volume of the Subarticulation.
- Adjust the tightness of the subarticulation. Bringing up the slider will shorten the fade out previously pressed notes. This leads to a clearer sound when playing fast rhythms.
- Adjust the Round Robin order from ordered to random.
RANGE TO MODWHEEL
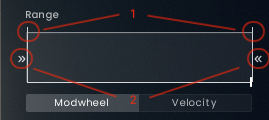
- Adjust the fade in/fade out for the Subarticulation.
- Adjust the starting and ending CC1 value for the Subarticulation.
RANGE TO VELOCITY
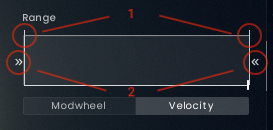
- Adjust the fade in/fade out for the Subarticulation based on note velocity.
- Adjust the starting and ending velocity value for the Subarticulation.
Examples
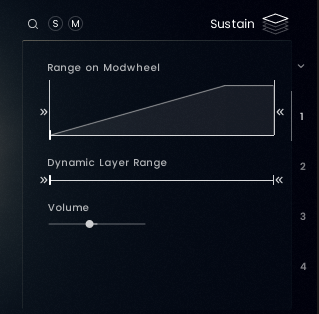
The Subarticulation is slowly fading in as the mod wheel moves up in relation the the volume curve set in the Articulation Settings until CC01 = 100. From this point on the Subarticulation behaves exactly as set in the Articulation Settings. (see 4.3.2.)

From CC01 = 50 the Subarticulation is slowly fading out as the mod wheel moves up in relation the the volume curve set in the Articulation Settings. (see 4.3.2.)
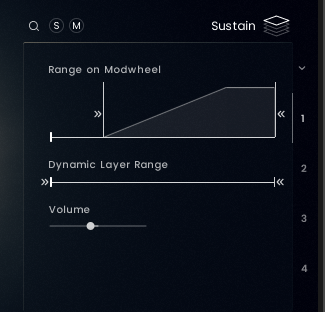
The Subarticulation is not playing from CC01 = 0 to CC01 = 30 and then slowly fading in as the mod wheel moves up in relation the the volume curve set in the Articulation Settings until CC01 = 100. From there the Subarticulation behaves exactly as set in the Articulation Settings. (see 4.3.2.)
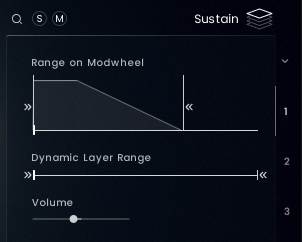
The Subarticulation is slowly fading out as the mod wheel moves up in relation the the volume curve set in the Articulation Settings until CC01 = 70. For CC01 values higher than 70 the Subarticulation is inaudible.
The Subarticulation is not playing from CC01 = 0 to CC01 = 20 and then fading in as the mod wheel moves up, but already fading out after CC01 =80 and remains inaudible for CC01 values higher than 80.
ARTICULATION SETTINGS
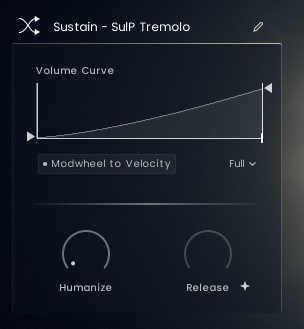
VOLUME CURVE SETTINGS
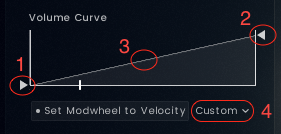
- Adjust the min volume.
- Adjust the max volume.
- Adjust the slope of the Volume Curve.
- Select one of the pre designed Volume Curve Presets.
VOLUME CURVE PRESETS

Full - Uses the full range with a slight slope. The Full (0) preset is the al niente variant.
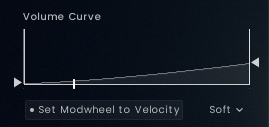
Soft - Uses a softer max velocity with a slight slope. The Soft (0) preset is the al niente variant.
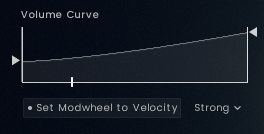
Strong - Uses a louder min velocity with a slight slope.

Constant - Uses a constant min and max velocity.
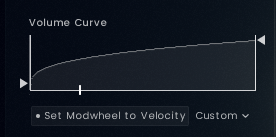
Custom - This is shown, when the initial preset was manually altered to a custom setting.
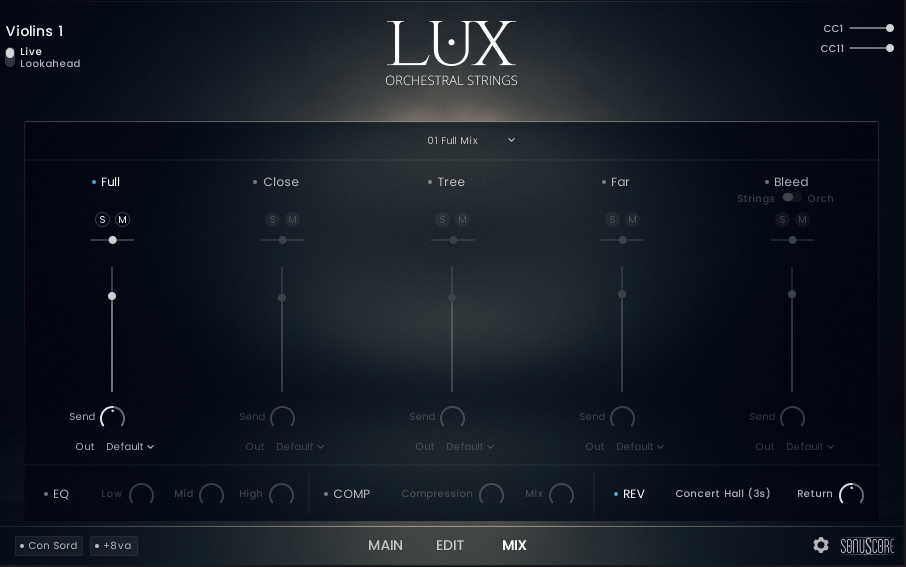
MIXER PAGE
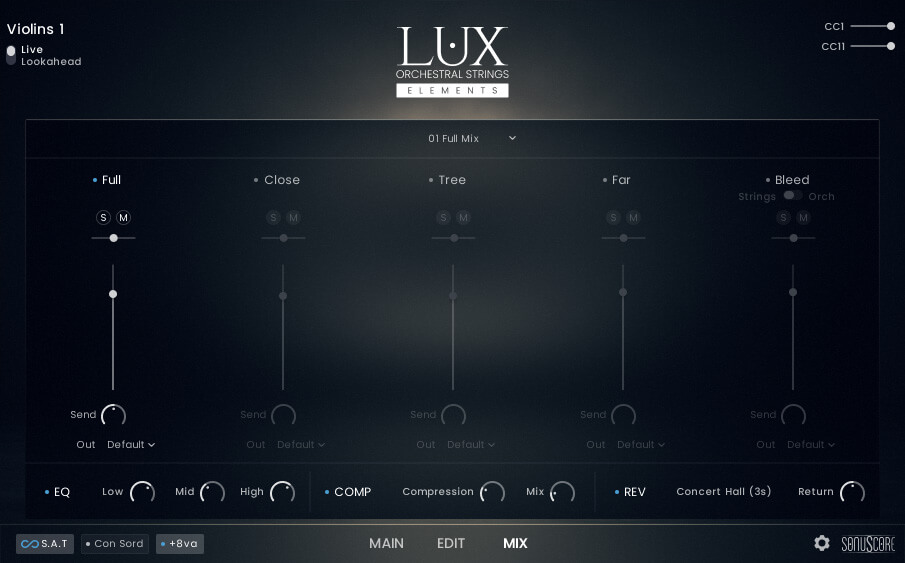
On the Mixer Page you can adjust the sound by choosing different mic positions, applying EQ, compression and reverb.
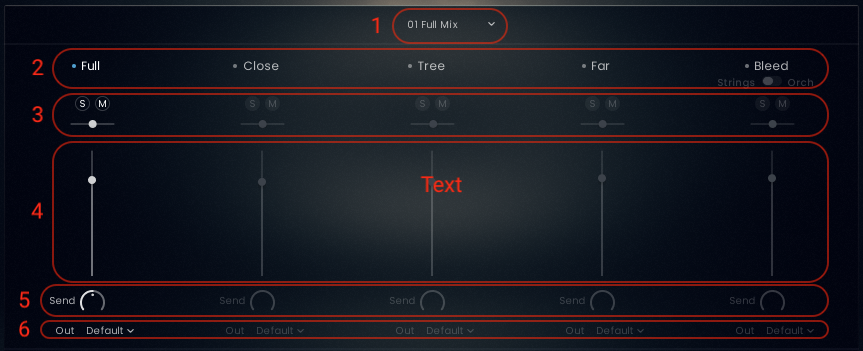
- Shows the currently selected Mic Mix. In Elements only the Full Mix is available. (see 4.4.2.)
- Load and unload the Mic Position. The Bleed Mics can be switched from only Strings Bleed Mics to Orchestral Bleed Mics. In Elements only the Full Mix is available.
- Solo/Mute Buttons and a Pan Slilder to adjust the panorama for each Mic Position.
- Volume Slider - Adjust the volume of each Mic Position.
- Send - Adjust the level of the send into the Reverb Bus.
- Out - Each Mic Potition can be routed to a different output.
MICROPHONE POSITIONS
In LUX Orchestral Strings Elements there is one Mic Position Mix:
- Full Mix - This is the full mix by mixing engineer Peter Fuchs.
MIC MIXES
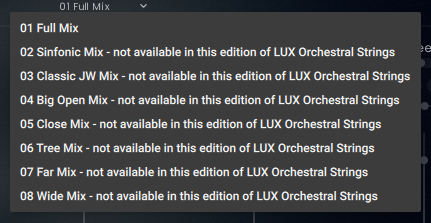
Elements only offers the Full Mix by Peter Fuchs. The dropdown menu also shows the other mixes:
- Full Mix: Mixed by Peter Fuchs. (No use of the Bleed Mics).
- Sinfonic Mix: Full Mix + Bleed Orch Mics to give the Full Mix a wider image.
- Classic JW Mix: Classic wide Hollywood sound.
- Big Open Mix: Big Sound with a defined tail.
- Close Mix: Detailed sound with a bit of space through the Tree Mics.
- Tree Mix: Just the Tree Mics with a nuance of definition from the Close Mics.
- Far Mix: Very lush and reverbant mix.
- Wide Mix: Focus on a wide stereo image and a long defined reverb tail.
EQUALIZER

- Activate/de-activate the Equalizer.
- Adjust Low, Mid and High frequencies.
Add higher frequencies for more brilliance - 13kHz/wide Q.
Add upper mid frequencies for more presence - 2.5kHz/narrow Q.
Add lower mid and low frequencies for more warmth and impact - 527Hz/wide Q for VL1, VL2 and Violas. 250Hz/wide Q for Celli and Basses.
COMPRESSOR

- Activate/de-activate the Compressor.
- Compression: Determines the amount of compression applied to the input signal. The higher the value, the more compression is applied to the input signal.
Mix: Controls the dry/wet mix of the compressor. This can be used to create a parallel compression style routing, which increases the quieter signals rather than reducing the louder ones. When the Mix control is set to 0%, only the uncompressed (dry) signal will be heard, and at 100%, only the compressed signal will be heard. Settings between the 0% and 100% are a mix of both signals.
REVERB
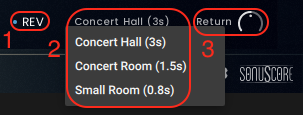
- Activate/de-activate the Reverb.
- Choose one of the three reverb settings with different decay times.
- Adjust the return volume.
SINGLE INSTRUMENT
MAIN PAGE
- The single instrument like the key switch instrument has two playing modes: Live Mode and Lookahead.
In Live Mode all articulations play as they are and the initial note of the legato has a -150ms delay, while the rest of the legato reacts to a -250ms delay. Use this mode when finding melodies and live playing.
In the Lookahead Mode all sample starts are unified and optimized for a delay of -250ms. Set your track delay to this value and LUX will be perfectly in sync with your other instruments. - The mod wheel is mapped to CC01 and controls the dynamics.
Expression is mapped to CC11 and controls the volume. - Shows the currently loaded single articulation.
- Turns the Con Sordino feature on/off.(see 4.1.2.)
Turns the add octave feature on/off.(see 4.1.3.) - Page selection.
- Settings page (see 4.2.) and Credits.
EDIT PAGE

SUBARTICULATION EDITOR
Legatos

- Enter the Subarticulation Browser and as Solo/Mute Buttons.
- Edit how the Subarticulation behaves when moving the mod wheel.(see 4.3.1.2.)
- Dynamic Layer Range - Move the slider to exclude dynamic layers from playing.
- Adjust the volume of the Subarticulation.
- Adjust the speed of the transition. Clicking the + symbol will adapt the transitions speed to your playing.
- Adjust the volume of the transition.
ARTICULATION SETTINGS

VOLUME CURVE SETTINGS
- Adjust the min volume.
- Adjust the max volume.
- Adjust the slope of the Volume Curve.
- Select one of the pre designed Volume Curve Presets.
VOLUME CURVE PRESETS
Full - Uses the full range with a slight slope. The Full (0) preset is the al niente variant.
Soft - Uses a softer max velocity with a slight slope. The Soft (0) preset is the al niente variant.
Strong - Uses a louder min velocity with a slight slope.
Constant - Uses a constant min and max velocity.
Custom - This is shown, when the initial preset was manually altered to a custom setting.
MIXER PAGE
Please see 4.4.
CREDITS
Product Concept and Design: SONUSCORE: Tilman Sillescu, Jonas Meyer, Simon Schrenk, Luka Swoboda
Project Lead: Tilman Sillescu, Jonas Meyer
Orchestra: Czech Stellar Ensemble
Recording: StarRecrdings Production in Brno Besední dům
Orchestrator, Session Manager, Production: David Christiansen
Recording Manager, Postpro: Christian Wirtz
Mixing: Peter Fuchs
Sample Editing: Matthias Meeh, Luka Swoboda, Jonas Hausotter, Steffen Luetke, Nicolai Patricio, Jonas Oehlenschlaeger, Gregor Schmitz, Martin Hopfengart, Marit Schmitt, Jonas Schüsselin, Stefan Kemler
Reaper Scripting: Nico Dilz, Joshua Hank
Kontakt Scripting: Jonas Meyer, Mathias Vatter (Built with cksp)
NKS Implementation: Stefan Kemler
User Interface Design: Benedikt Huster, Jannic Böhme, Jonas Hausotter (Figma's Simple Design System UI Kit)
Artwork: Jannic Böhme, Benedikt Huster
Marketing: Benedikt Huster, Tobias Kunz, Jannic Böhme, Felix Möbius, Louisa Wolf, Zoé Friedbacher, Russ Hughes
Web Programming: Lukas Ruschitzka, Benedikt Huster
Videos: Nadja Demmler, Jannic Böhme, Russ Hughes, Benedikt Huster, Luka Swoboda, Trent Martin
Quality Assurance: Tilman Sillescu, Simon Schrenk, Luka Swoboda, Lukas Ruschitzka
Manual: Simon Schrenk
Special Thanks
Bleed Mic Idea: Russ Hughes
Consulting, Sourcing: Robin Hoffmann, Steffen Brinkmann