
MANUAL
Document Version 1.0.0
Product Version 1.0.0
© by SONUSCORE
SYSTEM REQUIREMENTS
For latest system requirements, please visit www.sonuscore.com, or your trusted dealer's website.
Welcome to The Pulse
Thank you very much for choosing Sonuscore software.
Congratulations on your brand-new instrument THE PULSE by Sonuscore. We hope you will enjoy this instrument as much as we do. This manual will help you to get started and explains the features and functions of your new software.
Best regards and enjoy,
Sonuscore
SETUP
Loading The Pulse via Kontakt
THE PULSE is not an independent plug-in, so you will first need to open an instance of Native Instrument's free KONTAKT PLAYER before you can start playing.
- 1. Download and install Native Instrument’s FREE KONTAKT PLAYER.
- 2. Open KONTAKT PLAYER as a plug-in in your host software (DAW), or as a stand-alone application.
- 3. Click "Library" at the top.
 If you don't see the Libraries Browser to the left, click "view" and select "classic view".
 Locate THE Pulse in the Browser, on the left side of the user interface.
 - 4. Click Instruments to open the product’s content.
- 5. Double-click the THE PULSE.nki file, or drag the .nki to the open space to the right, to load the instrument

INSTRUMENTS & SOUNDS LIST
DRUMS

Acoustic
- Epic Trailer Kit
- Wood and Wild Kit
- Tiny Kit
- ShakeShake
- Percussion Kit
- Rim Hits
Drum Machine
- Punchy Kit
- Nine o Nine Kit
- Bunker Kit
- Tekno Kit
- Hacker Kit
- Deep 909 Kit
- Naughty Kit
- Future Kit
- 808 Kit
- Gangster Kit
- Xhard Kit
- Future Punk Kit
- Psy Kit
- Power Kit
Hybrid
- Smack Kit
- Hyb Kit
- Raw Drums
- Chasing Kit
- Slam Kit
- Underground Kit
- Cyberpunk Kit
- Synth Wave Kit
- Hybrid Kit
- Sick Kit
- Tight Kit
- Super Tight Kit
Experimental
- Industrial Percussion
Mixed
- PHONK Kit
- Energy Kit
- Break Kit
- HipZter Kit
- Neon Kit
BASS

Deep
- Berlin Bass
- DuhBass (Sus)
- Hipster Bass
- Deep Pluck
- Rotor Bass
- Drone Bass (Sus)
Hot
- Brutal Bass (Sus)
- Bad Bass (Sus)
- Boiling Bass (Sus)
- Extreme Heat (Sus)
- Lava Bass (Sus)
- BurningPolonium (Sus)
Dirty
- Dirty Bass
- Boah Bass
- Sub Bass (Sus)
- Wobble Heat (Sus)
- Acid Bass
- Psybass
Smooth
- Smooth Bass (Sus)
- Soft Bass (Sus)
- Infra Bass (Sus)
- Fifth Heat (Sus)
- Glide Bass (Sus)
Hard
- Kick Bass
- Hard Bass (Sus)
- Rude Bass
- Nasty Bass
- Error Bass
- Anarchy Bass
PLUCKS

Stabs
- Night Stabs
- Happy Stabs
- Stabs Forward
- Saw Swipes
- Neon Swipe
Percussive
- Noise Pluck
- Doppler Plucks
- The Block
- Punch Pluck
- Noise Toms
- Siren Pluck
Dirty
- Detuned Pluck
- Acid Shorts 1
- Acid Shorts 2
- Acid Shorts 3
- Dope Arps
- Micro Tonics
- Acid Attack
- Broken Arps
Melodic
- 80s Plucks
- VHS Plucks
- Soft Pluck
- Poly Plucks
- 1984s
- Neon Pluck
- Shiny Plucks
Poly
- Pluck 5
LEAD

Soft
- Singing Worm (Sus)
- Retro Flute (Sus)
Hard
- Angry Lead (Sus)
- Boiling Lead (Sus)
- Boil Over Lead (Sus)
- Sassy Saw (Sus)
Epic
- Heroic Lead
- Club Anthem (Sus)
- Fat Beast (Sus)
- Poly Armor (Sus)
- Game Master (Sus)
- Father Of Unisons (Sus)
- Hyper Lead (Sus)
PAD

Dark
- Dark Shimmer (Sus)
- Simple Pad (Sus)
- Aurora Borealis (Sus)
- Reflections (Sus)
Light
- Hypnotic Pad (Sus)
- Far Light (Sus)
- Airy Synth (Sus)
- Hollow Pad (Sus)
- Misty Organ (Sus)
- Electric Shimmer (Sus)
Retro
- Super 8 Pad (Sus)
- LA 2019 (Sus)
- Synth Wave Surfing (Sus)
- Tape Pad (Sus)
- Soaring Synths (Sus)
- Synthrise (Sus)
Drones
- Come Into The Light (Sus)
- Dystopia (Sus)
- Illusions (Sus)
- Land Of Hope (Sus)
- Shimmering Light
- Strange And Dark (Sus)
- Nuclear Cluster 1 (Sus)
- Nuclear Cluster 2 (Sus)
- Nuclear Cluster 3 (Sus)
FX/HITS

Hits
- Industrial Hits
- Low Booms
- Noise Hits
Noise FX
- Whooshs
- Whoap
- Glitches
- Casette Noise (Sus)
- Glitchy Noise (Sus)
- Kaputt Noise (Sus)
- Psy FX
Tonal FX
- BomBom
- BeepBeep
- Techno Chords
- BonBon
- PsyTrip1 (Sus)
- PsyTrip2 (Sus)
- PsyTrip3 (Sus)
- Error404
MISC

Keys
- Intimate Piano
- E-Piano
- Toy Celesta
Guitar
- E-Guitar Oct Lead
- E-Guitar Muted
- Muted Power Chords
- Noise Strum
- E Bass
Orchestral
- Tight Strings High
- Tight Strings Low
- High Brass Long (Sus)
- High Brass Marcato
- Low Brass Long (Sus)
- Low Brass Marcato
- Intense Strings (Sus)
- Snap Strings High
- Snap Strings Low
The Pulse.nki
The centerpiece of THE PULSE is the powerful Ensemble Instrument, featuring 80+ multi-layered arrangement presets ("Sessions") with 10 instrument slots and 4 key switch variations: Intro, Main A, Main B, and Main C. This engine allows you to create dynamic and fully-realized arrangements effortlessly.
The Pulse engine works with a delay of 48ms so that received MIDI information can be processed. To precisely synchronize the audio output of The Pulse with your DAW project, you can use a track delay of -48ms for the corresponding track.
Please refer to the relevant documentation for the necessary steps to set a track delay in your digital audio workstation.
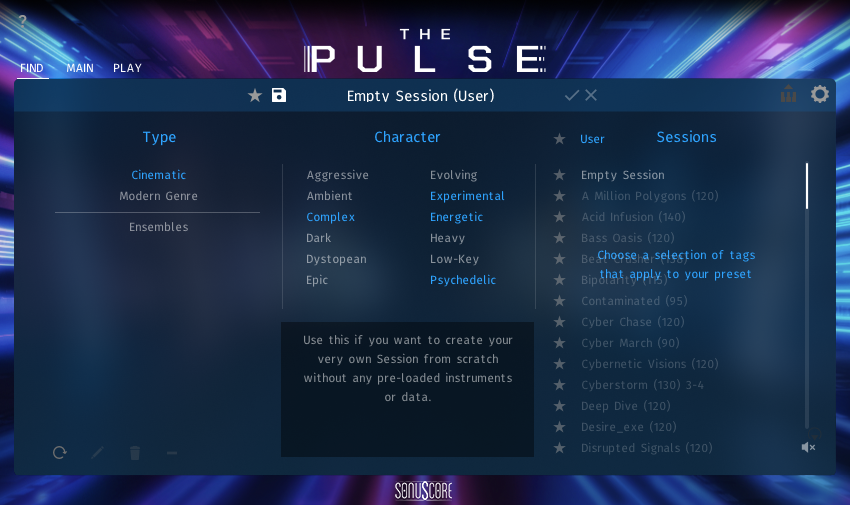
FIND PAGE

Positioned on the Find Page, you can access the Session Browser.
Each Session is categorized into different Types and Characters. Simply click the Type and Character you are searching for and see all Sessions that fall under these categories.
At the bottom right you can see the speaker symbol. Clicking and dragging up with increase the session preview volume and dragging down will lower the colume and at last mute the session preview function.
SESSION BRWOSER
TAGS
The Session Browser page contains 15 tags to help you filter all Sessions by different characteristics and keywords as well as an option to scroll through the filtered selection.
To simplify the search the tags are organized into three categories:
TYPE: Choosing either "Cinematic" or "Modern Genre" will provide you with fitting Sessions useful in these genre types. This category can be used to additively filter for multiple tags.
CHARACTER: Here you can choose different characters to narrow down the Session selection.
ENSEMBLE: Utilizing the FREE MODE, these Sessions can be played freely without the engine (see 4.4.1.).
SESSIONS
- The Favorites button lets you filter by your cutoms Session list. You can add sessions to this list by clicking the "star" icon next to each Session.
- Under the User tag you will find all you own saved Sessions.
- Each Session name has its intended tempo in the brackets. Of course you can play all Sessions in any tempo you want. Please keep in mind that certain styles deeply correlate with the intended tempo to achieve the intended impact.
If a Session is designed in an odd meter this is also written into the Session name. If there is nothing specifically written about the meter, the Session is in 4/4.
USER SESSIONS

THE PULSE has a simple solution to save, organize and share user Sessions for the Ensemble Engine.

A User Session can be saved or edited from the Find Page as well as from the Session Menu. On both pages this is achieved by clicking on the file icon next to the star, entering the new session name and clicking the tick icon on the right. The x icon cancels the save function without saving the Session.
Before clicking the check symbol you can also alter the tags of the Sessions by clicking or de-clicking a Type or Character.
The individual User Sessions are saved as single *.nka files into the Data folder under the installation path you chose in Native Access. Since each story is accessible as a single file, it is easy to transfer and share them between multiple systems.

The lower section of the Session Browser consists of a number of other control that can help facilitate working with User Sessions.
- The Scan button searches the User Data folder of your THE PULSE installation for .nka files and enables you to import User Sessions e.g. from different devices.
- The Edit button enables you to assign tags to your User Preset. Press the Confirm button (tick icon) to save your settings, or the Close button (x icon) to cancel the process.
- The Delete button removes the User Session from the Session Browser.
- The Clear button will reset your tag selection allowing you to start over.
EXPORT MIDI FUNCTION

In the upper right corner of the Find Page you can find the Export MIDI icon. You are able to export your Session performance to different midi channels within your DAW simply by dragging and dropping the icon into your DAW. To use this feature you can follow these steps. Open up »THE PULSE.nki«. Choose a Session that you like and record a performance in your DAW. The Engine registers that your DAW is playing and starts recording all generated MIDI Data even if you don’t record onto a midi channel. You can now drag and drop the recorded data into your DAW.
But be careful: Once the playback gets started again, the cache will be cleared and the previously recorded data will be overwritten with new data. To be safe you can record a performance onto a midi channel of your DAW, edit this performance, play that section again to write that changed data into the Midi cache of THE PULSE and drag and drop into your DAW. If your Session file consists of ten instrument groups ten midi tracks will be created. You can use those to layer different instruments of THE PULSE or any other sample library. You can also access this feature over the same icon from the Shape Page.
SETTINGS PAGE

On the settings page the dynamic controller can be mapped to CC01 or CC02.
You can also choose the octave where the key switches are located to better fit your MIDI hardware and playing style.
EXTERNAL MODE

With External Mode enabled, each slot of THE PULSE can be addressed individually using different MIDI channels. The External Mode bypasses the internal engine. Additionally, the octave shifts for each slot are disabled to prevent doubling the transposition of notes when the MIDI export has already altered the octaves. Each Track in the DAW has to be routed back the THE PULSE Kontakt instance with each having a different midi channel corresponding with the slot number inside the engine (Track 1 = midi channel 1; Track 2 = midi channel 2; aso...).
This comes in handy when working with the export MIDI function (4.2.4). Sometimes you want to use the exact same instruments as used in your The Pulse.nki. Instead of loading the instruments individually to each track of the exported midi files, each track can now be routed back into your The Pulse instance and you then have full control over each slot of The Pulse with altering the individual exported MIDI files.
MAIN PAGE
On the Main Page you can adjust basic parameters for every slot as well as mix the overall sound. With the individual fader controls the balance between each layers is easily adjustable.

- Shows information about the currently visible page.
- By clicking the arrows left and right to the five slots you get access to the other five slots. Meaning the engine consists of ten individual slots in total.
Clicking on the instrument name at each slot will open the instrument browser (see 4.3.1.). - You can see the current value of the mod wheel displayed here.
- Solo and Mute functions for each slot as well as a specific FX Section for each slot (see 4.3.2.).
TIP:You can automate the Solo/Mute buttons to create even more variety. To automate the Mute button, go to the list of automatable parameters in your DAW and find the Mute parameters for the different slots. Now you can add them to your track and add automation points.
Alternatively, you can also right-click on the mute buttons in THE PULSE and select "Learn MIDI CC Automation". Then move a fader or knob on your MIDI controller or send a MIDI CC command from your DAW, for example CC2, and the button will be controlled by that MIDI CC. - Volume fader for each slot with adjustable min and max setting to react to the mod wheel.
- You can independently set the octave, panorama and the global reverb as a send effect. (Global Reverb Setting can be adjusted in the Global FX Section see 4.3.4.)
- Clicking here opens the Global FX Page.
- Route the instrument slots to different Kontakt outputs.
INSTRUMENT BROWSER

By double clicking on an instrument slot, a browser will guide you through the selection of an instrument. To quickly load instruments for the different slots, you can navigate through the slots by clicking on them above the browser view. You can delete the loaded instrument from the current slot by clicking on the “trash can” symbol on the bottom left. To exit the browser, click on the X on the upper left, or double click on your selected instrument. The „Load with default FX“-Button is active per default. If you want to keep your current FX settings for this slot you can deactivate the button and the default FX chain that comes with each instrument will not be loaded.
SLOT FX SECTION

- Overview over the FX chain for the slot. First module is always Attack and Release as well as a three band Equalizer. The other three slots can be filled with numerous different FX modules (see 4.3.3..).
- Link icon: When activated you can link the slider to the mod wheel and decide where it should be at the min value of the mod wheel and where at the max value. Alternatively, you can link the slider to the LFO in the Global FX Section (see 4.3.4.).
- These are the different FX types that are available for each of the three slots.
You can also change the order of the three individual FX slots by dragging them to a different slot.
FX MODULES
SOUND MODULE
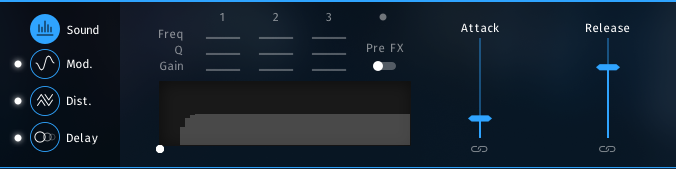
Attack: Adjusts the attack time for the loaded instrument.
Release: Adjusts the release time for the loaded instrument.
Please keep in mind that it is only possible to adjust the attack and release times in the first instance of any loaded instrument.
With the link button at the bottom you can link the attack and release slider to react to the mod wheel. The left handle represents the lowest position of the mod wheel while the right handle represents the highest position of the mod wheel. Alternatively, you can link the slider to the LFO in the Global FX Section (see 4.3.4.).
Right next to the Attack and Release controls you’ll find a three band EQ. Each band comes with three controls for Frequency, Volume und Q Factor. Additionally, you can decide whether you want to have the EQ before or right after the Channel FX Chain with this drop-down menu.
You can also use the visualization to adjust the frequency and the volume of the three band EQ. Simply drag one of the handles to the desired frequency and adjust the volume by dragging up and down.)
FILTER
This module lets you apply a filter to the instrument loaded to the slot.

You can choose between nine different filter types:
Low Pass -12dB
The State Variable (SV) filters have a clean characteristic that can be used for all kinds of audio signals. The LP2 is a 2- pole low-pass, which attenuates frequencies above the cutoff at a rate of -12 dB/octave.
Cutoff: Adjusts the frequency above which signals will be attenuated.
Resonance: With a value greater than 0, this control will boost a small frequency range around the cutoff frequency.
(Note: Each slider can be linked to react to the mod wheel or the LFO in the General FX Section see 4.3.4.)
Low Pass -24dB
The State Variable (SV) filters have a clean characteristic that can be used for all kinds of audio signals. The LP4 is a 4- pole low-pass, which attenuates frequencies above the cutoff at a rate of -24 dB/octave.
Cutoff: Adjusts the frequency above which signals will be attenuated.
Resonance: With a value greater than 0, this control will boost a small frequency range around the cutoff frequency.
(Note: Each slider can be linked to react to the mod wheel or the LFO in the General FX Section see 4.3.4.)
Low Pass Vintage
This is the same filter section that is provided by Native Instruments’ PRO-53 software synthesizer. It’s similar in nature to the 4-pole lowpass filter but has a different and more distinctive signature sound.
Cutoff: Adjusts the frequency above which signals will be attenuated.
Resonance: With a value greater than 0, this control will boost a small frequency range around the cutoff frequency.
(Note: Each slider can be linked to react to the mod wheel or the LFO in the General FX Section see 4.3.4.)
High Pass -12dB
The State Variable (SV) filters have a clean characteristic that can be used for all kinds of audio signals. The HP2 is a 2- pole high-pass, which attenuates frequencies below the cutoff at a rate of -12 dB/octave.
Cutoff: Adjusts the frequency above which signals will be attenuated.
Resonance: With a value greater than 0, this control will boost a small frequency range around the cutoff frequency.
(Note: Each slider can be linked to react to the mod wheel or the LFO in the General FX Section see 4.3.4.)
High Pass -24dB
The State Variable (SV) filters have a clean characteristic that can be used for all kinds of audio signals. The HP4 is a 4- pole high-pass, which attenuates frequencies below the cutoff at a rate of -24 dB/octave.
Cutoff: Adjusts the frequency above which signals will be attenuated.
Resonance: With a value greater than 0, this control will boost a small frequency range around the cutoff frequency.
(Note: Each slider can be linked to react to the mod wheel or the LFO in the General FX Section see 4.3.4.)
Band Pass -12dB
The State Variable (SV) filters have a clean characteristic that can be used for all kinds of audio signals. The BP4 is a 4- pole band-pass, which attenuates frequencies above and below the cutoff at a rate of -12 dB/octave.
Cutoff: Adjusts the frequency above which signals will be attenuated.
Resonance: With a value greater than 0, this control will boost a small frequency range around the cutoff frequency.
(Note: Each slider can be linked to react to the mod wheel or the LFO in the General FX Section see 4.3.4.)
Band Pass -24dB
The State Variable (SV) filters have a clean characteristic that can be used for all kinds of audio signals. The BP4 is a 4- pole band-pass, which attenuates frequencies above and below the cutoff at a rate of -24 dB/octave.
Cutoff: Adjusts the frequency above which signals will be attenuated.
Resonance: With a value greater than 0, this control will boost a small frequency range around the cutoff frequency.
(Note: Each slider can be linked to react to the mod wheel or the LFO in the General FX Section see 4.3.4.)
Notch
The State Variable (SV) filters have a clean characteristic that can be used for all kinds of audio signals. The Notch 4 is a 4-pole notch filter, which attenuates frequencies at the cutoff.
Cutoff: Adjusts the frequency above which signals will be attenuated.
Resonance: With a value greater than 0, this control will boost a small frequency range around the cutoff frequency.
(Note: Each slider can be linked to react to the mod wheel or the LFO in the General FX Section see 4.3.4.)
Talk
This is a formant filter type. Formants are acoustic resonances. The term often applies to the phonetics of human speech, as such, the formant filters are designed to mimic the frequency response of the human vocal tract. These filters can be used to emulate the “talk box” effect.
Talk: Controls the frequency response of the filter. Can be used to morph between vowel-sounds.
Resonance: Increases and decreases the peaks and notches in the response respectively, analogous to the resonance control of the other filters.
Size: Controls the center of the frequency response, analogous to the cutoff control of the other filters.
(Note: Each slider can be linked to react to the mod wheel or the LFO in the General FX Section see 4.3.4.)
DYNAMICS
This module lets you process the dynamics of the instrument loaded to the slot.

Supercharger GT
The Supercharger GT offers high-end tube compression emulation, inspired by boutique hardware. It is a particularly musical compressor, with different flavors of saturation and spectral shaping that allow you to apply subtle harmonic and spatial enhancement as well as heavy and aggressive tube drive.
Input: Adjusts the input gain to the compressor in dB.
Saturation: Applies saturation to the signal. Turn the control right to apply more saturation to the signal.
Output: Sets the output level of the compressor in dB. You can use it as a make-up gain control that allows you to bring the output signal up to the same peak level as the input signal after compression.
(Note: Each slider can be linked to react to the mod wheel or the LFO in the General FX Section see 4.3.4.)
Compressor
Compressors are dynamic tools which automatically reduce the level of loud passages in a signal, thereby affecting the signal’s dynamic range. The Solid Bus Comp is modeled after a classic analog bus compressor.
Threshold: Sets a level threshold above which the compressor starts working. Only levels that rise above this threshold will be reduced by the compression; signals that stay below it will be left unprocessed.
Ratio: Controls the amount of compression, expressed as a ratio of “input level change” against “output level change”. A Ratio of 1:1 means that no compression will be happening. For example, a Setting of 4 represents the ration 4:1, which means for every 4 decibel increase of amplitude above the threshold, the output will increase by only 1 decibel.
(Note: Each slider can be linked to react to the mod wheel or the LFO in the General FX Section see 4.3.4.)
Transient Master
The Transient Master is an easy to use compressor designed to control the attack and sustain of a sound. Instead of following the amplitude of the sound like a traditional compressor, it follows the general envelope and is thus not as susceptible to changes of input gain. It is best used on sounds with fast attacks, like percussion, pianos or guitars. The Transient Master can also be quite extreme in some cases, so use it with caution.
Input: Controls the input gain to the effect.
Attack: Adjusts the scaling of the attack portion of the input signal’s volume envelope. Turning the knob right (0% to 100%) will add more punch, and turning the knob left (0% to -100%) will reduce sharp attacks.
Sustain: Controls the scaling of the sustain portion of the input signal’s volume envelope. Increasing this parameter will add more body to the sound and decreasing it will reduce the sound’s tail.
(Note: Each slider can be linked to react to the mod wheel or the LFO in the General FX Section see 4.3.4.)
Limiter
Limiters are actually a special form of compressors with a ratio of one to infinity, a threshold just below the maximum level, and a very short attack time. They act as a “safety net” to keep short signal peaks from overloading the system, which would result in audio clipping. While compressors have a range of artistic applications, limiters are usually used for technical reasons — they can tame signals with peaks which would otherwise overload the output, without requiring you to turn the signal’s overall volume down.
Input: Sets the gain of the input signal. The Limiter is different from the Compressor in that it has a fixed threshold; to achieve a sensible peak reduction, use this control to adjust the input gain until you see the Attenuation meter responding only to occasional level peaks.
Release: Just like the Compressor’s control of the same name, this knob adjusts the time it takes the Limiter to return to an unprocessed signal after the input level falls below the threshold.
Output: Adjusts the module’s output level.
(Note: Each slider can be linked to react to the mod wheel or the LFO in the General FX Section see 4.3.4.)
Distortion
This module lets you saturate and distort the instrument loaded to the slot.

Tape Saturation
This module causes distortion by clipping or rounding off high sample values. It thereby simulates the behavior of overloaded tube circuits, adding artificial harmonics to a sound.
Gain: Controls the input gain of the effect. This will increase the amount of tape distortion and compression.
Warmth: Controls the low frequency boost/cut of the effect.
Output: Controls the output gain of the effect.
(Note: Each slider can be linked to react to the mod wheel or the LFO in the General FX Section see 4.3.4.)
Tube Saturation
The Tape Saturator emulates the soft compression and distortion of recording to tape. It can be used lightly to add warmth and coloring to the sound, or heavily to add aggressive distortion.
Drive: Adjusts the amount of distortion.
Damping: Turning this knob clockwise attenuates high frequencies in the output signal, thereby counteracting the brightness caused by the artificial harmonics.
Output: Adjusts the module’s output level. Since distortion boosts the gain considerably, it’s often necessary to attenuate the signal at the output stage.
(Note: Each slider can be linked to react to the mod wheel or the LFO in the General FX Section see 4.3.4.)
Black Distortion
Black Distortion simulates a guitar distortion pedal, ideal for blues and rock tones.
Distortion: Controls the amount of distortion applied.
Filter: For a darker sound, turn clockwise to enhance the low fre quency range; turn counter-clockwise for a brighter, sharper sound.
Volume: The master volume control for the effect.
(Note: Each slider can be linked to react to the mod wheel or the LFO in the General FX Section see 4.3.4.)
Clean Amp
Clean Amp simulates the rich tube sound of classic guitar amps from decades ago. It’s ideal for screaming leads and crunchy rhythm guitar sounds, as well as clean sounds with personality.
Gain: Adjusts the input level, or gain. Turning Gain to the right adds saturation and distortion to the signal.
Bass & Treble: These controls adjust the respective levels of the signal’s high and low frequency components.
(Note: Each slider can be linked to react to the mod wheel or the LFO in the General FX Section see 4.3.4.)
Bitcrusher
Bitcrusher adds various digital artifacts, like quantization noise or aliasing, to a clean signal. It’s great for roughing up sounds that would otherwise be too plain and featureless.
Bits: Re-quantizes the signal to an adjustable bit depth.
s. Rate (Sample Rate): Resamples the signal to an adjustable sample rate. The resampling is done without any kind of (usually mandatory) low-pass filtering, which causes all kinds of wonderful aliasing arti- facts.
(Note: Each slider can be linked to react to the mod wheel or the LFO in the General FX Section see 4.3.4.)
Overdrive
Overdrive is an emulation of a classic guitar distortion effect pedal.
Drive: Adds dirt to the sound.
Tone: Turning this control clockwise accents the midrange while dropping the bass. Counterclockwise takes off the highs and boosts the bass for a warmer sound.
Output: Adjusts the module´s output level.
(Note: Each slider can be linked to react to the mod wheel or the LFO in the General FX Section see 4.3.4.)
DELAY
This module lets you delay the signal of the loaded instrument in the slot.

Tape Delay
The Tape Delay reproduces the sound of tape delay, modelled on the physical mechanisms that make up early tape machines.
Time: Adjust the delay time. You can toggle between setting the time in milliseconds or synced to your host tempo by clicking the clock/note symbol.
Feedback: Adjusts the amount of feedback. Turning Feedback to the right increases the amount of delay repetitions.
Mix: Adjusts the respective levels of the original and processed signals. In common scenarios, the delayed signal is mixed in at a lower level than the direct signal.
(Note: Each slider can be linked to react to the mod wheel or the LFO in the General FX Section see 4.3.4.)
Diffuse Delay
Diffusion mode can produce a standard delay effect, but it is best used for its huge, diffusion-based reverb sound. This mode is ideal for ambient music and sound design.
Time: Adjust the delay time. You can toggle between setting the time in milliseconds or synced to your host tempo by clicking the clock/note symbol.
Feedback: Adjusts the amount of feedback. Turning Feedback to the right increases the amount of delay repetitions.
Mix: Adjusts the respective levels of the original and processed signals. In common scenarios, the delayed signal is mixed in at a lower level than the direct signal.
(Note: Each slider can be linked to react to the mod wheel or the LFO in the General FX Section see 4.3.4.)
Analogue Delay
The Analogue Delay offers a Bucket Brigade delay model that replicates the character sound of BBD chips.
Time: Adjust the delay time. You can toggle between setting the time in milliseconds or synced to your host tempo by clicking the clock/note symbol.
Feedback: Adjusts the amount of feedback. Turning Feedback to the right increases the amount of delay repetitions.
Mix: Adjusts the respective levels of the original and processed signals. In common scenarios, the delayed signal is mixed in at a lower level than the direct signal.
(Note: Each slider can be linked to react to the mod wheel or the LFO in the General FX Section see 4.3.4.)
Digital Delay
Clean Digital Delay without coloration.
Time: Adjust the delay time. You can toggle between setting the time in milliseconds or synced to your host tempo by clicking the clock/note symbol.
Feedback: Adjusts the amount of feedback. Turning Feedback to the right increases the amount of delay repetitions.
Mix: Adjusts the respective levels of the original and processed signals. In common scenarios, the delayed signal is mixed in at a lower level than the direct signal.
(Note: Each slider can be linked to react to the mod wheel or the LFO in the General FX Section see 4.3.4.)
Psyche Delay
Psyche Delay is a stereo delay effect that produces a range of atmospheric ambient echoes and reverse effects reminiscent of the "backwards tape" sound of the 1960s.
Time: Adjust the delay time. You can toggle between setting the time in milliseconds or synced to your host tempo by clicking the clock/note symbol.
Feedback: Adjusts the amount of feedback. Turning Feedback to the right increases the amount of delay repetitions.
Detune: Fine-tunes the pitch of the echo repeats in the range of -50 to +50 cents.
Mix: Adjusts the respective levels of the original and processed signals. In common scenarios, the delayed signal is mixed in at a lower level than the direct signal.
(Note: Each slider can be linked to react to the mod wheel or the LFO in the General FX Section see 4.3.4.)
MODULATION
This module lets you delay the signal of the loaded instrument in the slot.

Chorus
Choruses are used to enrich sounds by adding spatial movement and giving them an ensemble-like quality. They are based on short delays, with built-in modulation of the delay time. The delays produce copies of the original sound that vary in timing and, as a side-effect of the delay time modulation, pitch. This way a chorus adds space and body to the sound as if it was played from multiple sources at the same time. The results range from subtle shifts in timbre to extremely lively textures with a wide stereo image.
Rate: Adjusts the speed of modulation, from slow pitch changes to fast vibratos. This becomes more pronounced as the amount is increased.
Depth: Adjusts the range of modulated detuning. Higher values give a more pronounced chorusing effect.
Mix (Dry/Wet Knob): Adjusts the respective levels of the original and processed signals. Note that the typical chorus effect is created by the combination of both signals, so setting this knob to the midpoint results in the most pronounced effect.
(Note: Each slider can be linked to react to the mod wheel or the LFO in the General FX Section see 4.3.4.)
Flanger
The Flanger splits the audio signal up and delays one version in relation to the original signal. By modulating the delay time, as well as feeding an adjustable amount of the output signal back into the input, the Flanger creates a characteristic “whooshing” sound.
Speed: Adjusts the LFO speed. To synchronize the speed to your host or Master Editor tempo, click the Sync Button.
Depth: The amount of LFO modulation. Higher values cause the flanging effect to sweep over a wider range.
Mix (Dry/Wet Knob): Adjusts the respective levels of the original and processed signals. Note that the typical chorus effect is created by the combination of both signals, so setting this knob to the midpoint results in the most pronounced effect.
(Note: Each slider can be linked to react to the mod wheel or the LFO in the General FX Section see 4.3.4.)
Phaser
The Phaser effect continually changes the phase relationships in your signal with an all-pass filter. This results in a comb filtering effect, which attenuates some frequencies while boosting others.
Speed: The LFO modulation speed. To synchronize the speed to your host or Master Editor tempo, click the Sync Button.
Depth: The amount of LFO modulation. Higher values cause the Phaser effect to sweep over a wider frequency range.
Mix (Dry/Wet Knob): Adjusts the respective levels of the original and processed signals. Note that the typical chorus effect is created by the combination of both signals, so setting this knob to the midpoint results in the most pronounced effect.
(Note: Each slider can be linked to react to the mod wheel or the LFO in the General FX Section see 4.3.4.)
Flutter
Flutter emulates the sound of analog tape machines, characterized by wow and flutter, saturation, noise, and a limited high-frequency response. You can use it to apply classic lo-fi effects, particularly when playing sustained notes, pads and melodies.
Scrape: Adjusts the amount of high-frequency scraping, which occurs when the tape vibrates as it passes over the playback head.
Wow: Adjusts the amount of wow, a slow fluctuation in pitch caused by sticky tape and worn-out tape transport.
FlutterAdjusts the amount of flutter, a fast fluctuation in pitch caused by a bent capstans and faulty motor parts.
Mix: Blends between the input signal and the effect signal.
(Note: Each slider can be linked to react to the mod wheel or the LFO in the General FX Section see 4.3.4.)
Freak
Freak combines different amplitude modulation techniques and is based on a model of an analog diode ring circuit that produces rich harmonic overtones and textures. The Freak is set to Oscillator mode, in this mode you can explore the pure sound of the three different amplitude modulation techniques available via the Type control. This mode uses a sine wave signal as the modulation source.
Type: The Type control smoothly morphs between basic amplitude modulation (0%), ring modulation (50%), and frequency shifting (100%).
Frequency: Adjusts the rate of the internal sine wave modulation used by the three different amplitude modulation techniques available via the Type control. When Type is set to amplitude (0%) and ring (50%) modulation, this allows you to change the frequency of the sidebands created in the frequency spectrum. When Type is set to frequency shifting (100%), the modulation rate equals the amount by which the input signal’s frequency content is shifted in the frequency spectrum. The Frequency control is bipolar, meaning that both positive (non-inverted) and negative (inverted) modulation can be applied.
Stereo: Creates a wide stereo image by adding a phase offset to the modulation applied to the left and right stereo channels.
Mix: Blends between the dry signal and the wet signal.
(Note: Each slider can be linked to react to the mod wheel or the LFO in the General FX Section see 4.3.4.)
REVERB
This module lets you reverberate the signal of the loaded instrument in the slot.

Plate Reverb
Plate reverb was developed as an early method of generating an artificial reverb effect. A vibrating sheet of metal is employed to simulate reflection patterns in acoustical spaces. Since the sheet of metal vibrates across a two- dimensional plane, the echo density is higher and more evenly distributed than in a three-dimensional space. It is a good choice if you want to brighten a sound source. Plate reverb has a smooth reverb tail, allowing you to lengthen a sound without pushing it back in the mix. For this reason plate reverbs are most commonly used on vocals and snare drums.
Pre Delay: Introduces a short amount of delay before the reverb takes effect.
Decay: Adjusts the duration of the reverb effect.
Mix Blends between the input signal and the effect signal.
(Note: Each slider can be linked to react to the mod wheel or the LFO in the General FX Section see 4.3.4.)
Reverb
This is an algorithmic hall reverb.
Time: Adjusts the duration of the reverb effect.
Damping: Adjusts the amount of absorption in the room simulated by the reverb effect. Higher values result in more absorption.
Mix Blends between the input signal and the effect signal.
(Note: Each slider can be linked to react to the mod wheel or the LFO in the General FX Section see 4.3.4.)
Raum
Raum is a reverb algorithm for airy halls.
Time: Adjusts the duration of the reverb effect.
Modulation: Adjusts the amount of movement added to the reverb sound by changing internal parameters of the reverb over time. Turning the control to the right changes the movement of the reverb from lush to strongly detuned sounds.
Damping: Adjusts the amount of absorption in the room simulated by the reverb effect. Higher values result in more absorption.
Mix Blends between the input signal and the effect signal.
(Note: Each slider can be linked to react to the mod wheel or the LFO in the General FX Section see 4.3.4.)
DUCKER
With the Ducker module you can dynamically duck instruments by using the input of other instruments.

- Clicking the dot will activate/deactivate the ducker.
- Source: Select the source for the ducker. If the selected slot is a drum instrument. The lane specifies which instrument of the drum kit is the source.
- Volume: Adjust the amount of the volume drop when the ducking is applied
- Attack: Adjust the attack time of the ducking effect.
- Release: Adjust the release time of the ducking effect. This can also be synced to host tempo via the symbol to the right.
THRESHOLD
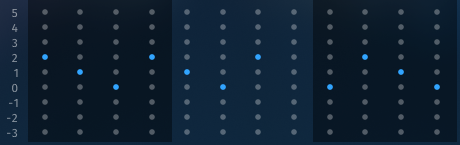
The lower section of the ducker shows the settings of the selected source with all the available bars to click through. You can set the threshold by grabbing the blue line at the bottom.

In this example all events are above the threshold which means the ducker reacts to all of the events.

In this example only the three events above the threshold will trigger the ducker.
GLOBAL FX SECTION
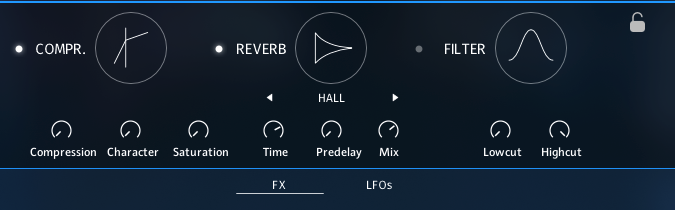
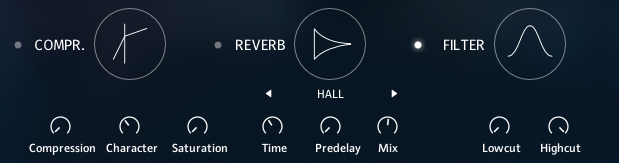
COMPRESSOR
Compressors are dynamic tools which automatically reduce the level of loud passages in a signal, thereby affecting the signal’s dynamic range. This Solid Bus Comp is modeled after a classic analog bus compressor.
Compression: Determines the amount of compression applied to the input signal. The higher the value, the more compression is applied to the input signal.
Character: Changes the sound characteristic of the compression effect by applying equalization to the signal. The Character Mode is set to fat which emphasizes the low and high frequncies.
Saturation: Adds mild coloration to the signal whilst retaining a clean sound.
REVERB
Hall
This is an algorithmic hall reverb.
Time Adjusts the length of the decay time.
Predelay Introduces a short amount of delay before the reverb takes effect.
Decay Adjusts the duration of the reverb effect.
Plate Reverb
Plate reverb was developed as an early method of generating an artificial reverb effect. A vibrating sheet of metal is employed to simulate reflection patterns in acoustical spaces. Since the sheet of metal vibrates across a two- dimensional plane, the echo density is higher and more evenly distributed than in a three-dimensional space. It is a good choice if you want to brighten a sound source. Plate reverb has a smooth reverb tail, allowing you to lengthen a sound without pushing it back in the mix. For this reason plate reverbs are most commonly used on vocals and snare drums.
Time: Adjusts the duration of the reverb effect.
Predelay: Introduces a short amount of delay before the reverb takes effect.
Mix Blends between the input signal and the effect signal.
Raum
Raum is a reverb algorithm for airy halls.
Time Adjusts the length of the decay time.
Predelay Introduces a short amount of delay before the reverb takes effect.
Decay Adjusts the duration of the reverb effect.
FILTER
Lowcut: Cuts out frequencies below the set value with a slope of - 12dB per octave.
Highcut: Cuts out frequencies above the set value with a slope of -6dB per octave.
GLOBAL LFO SECTION
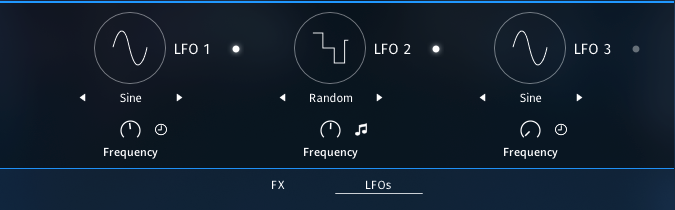
You can modulate the various slot FX sliders via this LFO.
You can choose between Sine, Rectangle, Triangle and Sawtooth and Random waveforms and adjust the frequency either in Hz or with clicking the clock icon in sync to the host tempo at a desired note value.
PLAY PAGE
On the Play Page you’ll find the heart of our ensemble engine. Here you can adjust everything concerning the arps and envelopes for each instrument.

- Indicates the currently shown bar and lets you switch to the other bars, if 1, 2 or 4 bars are chosen.
- Undo & Redo
- Arrows to switch between slots 1-5 and 6-10.
- Shows the currently selected key switch. Each Session contains 4 key switches: C0 Intro, D0 Main A, E0 Main B, F0 Main C. You can adjust the position of the keys witches in the settings menu.
- Copy and paste the content to other key switches.
- Global length settings:
• The available meters are 4/4, 3/4, 6/8, 5/8, 7/8.
• Bar length can be chosen between 1 Bar, 2 Bars and 4 Bars.
• half time, normal time and double time switch. Depending on the host tempo you can set the engine to play in half or double time. Per default this is set to 1:1 so the engine plays exactly the chosen tempo in your DAW.
ARPEGGIATOR
Short articulations always use the arpeggiator. Click at the slot with the loaded short articulation on the play page to enter the editor.
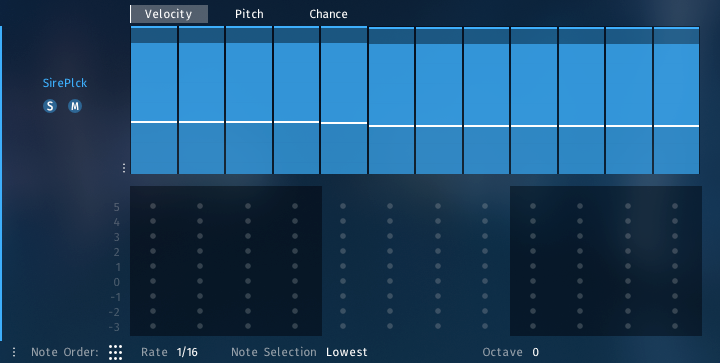
At the top of the arpeggiator module you can create your own rhythms or dynamic progression of the arpeggiation.
Click at the top of each step to drag the max value of each step (mod wheel at 127) to the desired dynamic level. Click at the bottom of each step to drag the min value of each step (mod wheel at 0) to the desired dynamic level.
Note that you can also inverse the dynamic behavior by dragging the min value above the max value. When the mod wheel is at 0 it will play at a louder dynamic then when the mod wheel is at 127. This way you can create interesting movements between different slots where one element is more preset in a lower dynamic range as compared to when it is in a higher dynamic range.
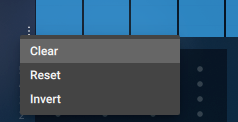
With the menu located at the bottom left of the velocity steps you can set all of them to zero to easily mute a slot in a keyswitch or even invert so current setting.
At the bottom of the arpeggiator module you can find the general controls:

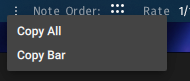
1. Click on the three dots to easily copy the entire slot or just the current bar to a different instrument or key switch.
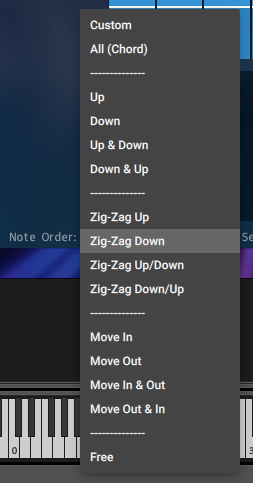
2. The Note Order determains how the arpeggiater works with the incoming midi data.
- Custom: The dot matrix becomes active and you can programm a custom arpeggiation pattern. 0 represents the lowest pressed midi note. 1 represents the second pressed midi note aso.
- All (Chord): All pressed midi notes are played simultaneously according to the set steps and their velocity.
- Arp Pattern: These 16 arp pattern are the basic pattern found in many arpeggiators.
- Free: The Free Mode bypasses the arpeggiator and the instrument will only be played whenever a new midi input is send to this slot.
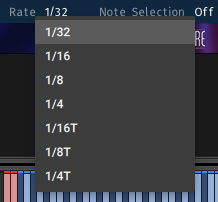
3. The rate determains the smallest rhythmic unit that the arpeggiator uses. You can choose between rates from 1/4T to 1/32.
4. The Note Selection determains which notes will be passed on to this slot.

5. The depth of control is dependend on the other settings in the Arpeggiator.
Note Order = All (Chord) - only the Octave settings are available.
Octave: After playing a chord in the initial octave the chord will be played one octave higher. If set to +2 the chord will be played a third time again one octave higher aso. -1 will repeat the chord one octave lower etc.
Note Order = Up, Down aso. - three settings are available:
Octave: You can also choose to repeat the sequence through the octaves, as explained above.
Repeat:You can also choose to repeat each note more than once. Repeat = 1 will repeat each step one additional time.
Reset:Reset will restart the sequence after one or two bars.
CUSTOM SEQUENCE MODE
With the Custom Sequence Mode, you can even customize the pitch sequence of each step within a rhythmic sequence via clicking at the respective point within the matrix:
Rows: Numeric order of the played notes from bottom to top. The lowest note you play has the value 0, the second lowest note has the value 1 and so on. This also works in the negative direction. If you play for example C-Major, the pitch distribution within the Sequence Customizer would be like that:
0 = C1, 1 = E1, 2 = G1, 3 = C2, 4 = E2, 5 = G2, -1 = G0, -2 = E0, -3 = C0
Columns: Display of the steps and their velocities. This allows you to precisely customize the sequences of notes within the played material and thus pre-design even more realistic passages.
It is also possible to select more than one note per step. This offers rich possibilities for your voicings and arrangements.
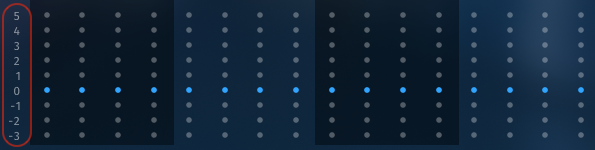
Clicking at one of the numbers in front of the dot matrix will enable all dots in that row.
You can also add repetitions when custom mode is selected.
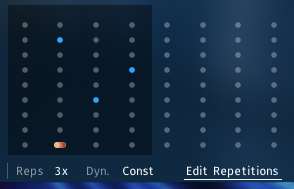
Clicking Edit Repetitions will activate the edit mode. Click a dot in the matrix. The selected dots appear orange (if they are active - white if they are not active). This means you can edit multiple dots at once.
Reps: Sets the repetitions per step.
Example: The Rate is set to 1/8th, if Rep is set to 2x, you would hear 2 16th notes instead of just the one 8th note. Set it to 3x, and you'll hear a 16th triplet. 4x would mean four 32th aso.
Dyn.: You can set a dynamic shape for the repetitions.
- Const - All steps are equally loud.
- Up - Crescendo. Starting with low volume and getting louder each note.
- Down - Decrescendo. Starting with high volume and getting more silent each note.
- Up sfp - Fortepiano. First hit is loud then a ramp up from silent to loud.
- Acc - Accent. First hit is loud then equally silent.
PITCH
Besides the velocity per step you can also alter the pitch of each step relative to the pressed note.

You can offset the pitch for each individual step from -6 semitones to +6 semitones.
The three dots to the left give you additional editing options:
- Reset ALL: This will reset all values from all bars and all tabs (Velocity, Pitch & Chance).
- Clear: This will clear all bars but only the currently active tab.
- Invert: This will invert all bars but only for the currently active tab.
You can use key modifiers to make your life easier editing the different tabs inside the arpeggiator:
- ALT+click - To reset a step.
- SHIFT+click - To alter all steps of the current bar.
- CMD/CTRL+click - To have stepped values for each step. For Velocity that is 10 velocity steps. For Pitch this is one semitone per step. For Chance this is 10% per step.
CHANCE
This parameter defines a percentage at which the step will be played or not. You can introduce programmed randomness into your sessions with this parameter. If a step is at its maximum the percentage is 100% and the step is always played. If the step is at half it will only play with a 50% chance. This is calculated each time seperately.
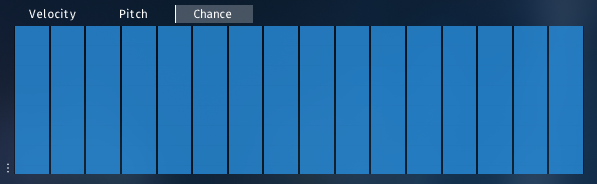
As with the other parameters you can also define ranges that react to the position of the modwheel. Simply click into the step to define a min and max value.

The three dots to the left give you additional editing options:
- Reset ALL: This will reset all values from all bars and all tabs (Velocity, Pitch & Chance).
- Clear: This will clear all bars but only the currently active tab.
- Invert: This will invert all bars but only for the currently active tab.
The chance parameter for example can be very useful to add complexity into your drum grooves. The higher the mod wheel goes the higher the chances for additional ghost notes become. Of course this can be also applied for FX and everything else that can create variation and prevents stiff repetition.
ENVELOPE

The Envelope allows you to set a recurring dynamic shape to sustained notes. The centerpiece is the envelope shape, which can be drawn freely by left-clicking and dragging the mouse. By holding “alt” while doing so you can delete steps. Holding “shift” allows you to scale all min or max values of the envelope by dragging the mouse up and down.
At the top of the envelope module you can create your own dynamic progression of the envelope.
Click at the top of each step to drag the max value of each step (mod wheel at 127) to the desired dynamic level. Click and drag horizontally lets you edit an envelope quite well.
Click at the bottom of each step to drag the min value of each step (mod wheel at 0) to the desired dynamic level. (Note that you can also inverse the dynamic behavior by dragging the min value above the max value. When the mod wheel is at 0 it will play at a louder dynamic then when the mod wheel is at 127. This way you can create interesting movements between different slots where one element is more present in a lower dynamic range as compared to when it is in a higher dynamic range.)
At the bottom of the envelope module you can find the general controls for several functions.
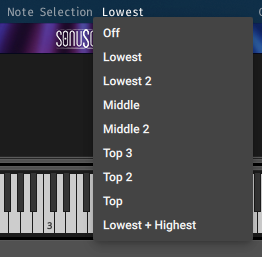
Note Selection: Selects whether or not all played notes should be heard in this particular module. The different options allow to only play specific notes of a played chord. This can be used to prevent a muddy bass section and orchestrate chords carefully with multiple instruments.
The following options are available:
- Off: No note selection is applied so all played notes will be used for the arpeggiation.
- Lowest: Only the lowest note will be used for the arpeggiation.
- Lowest 2: The two lowest notes will be used for the arpeggiation.
- Middle: In a three voiced chord only the middle note will be used for the arpeggiation. If you only play two voices at a time the middle note will use the lowest note for the arpeggiation in this case.
- Middle 2: In a four voiced chord the middle two notes will be used for the arpeggiation. If you play a three voiced chord the highest and middle note will be used for the arpeggiation.
- Top 3: The highest three notes will be used for the arpeggiation.
- Top 2: The highest two notes will be used for the arpeggiation.
- Top: The highest note will be used for the arpeggiation.
- Lowest + Highest: Only the lowest and highest note will be used for the arpeggiation.
Note Order - Two options are available:
- All (Chord): All notes depending on the Note Selection are routed to the envelope.
- Free: In the free mode the dynamics of the sustained notes are controlled by the modwheel. The envelope with its settings is bypassed, but the Note Selection is still applied.
You can use key modifiers to make your life easier editing the the envelope:
- ALT+click - To reset an envelope step.
- SHIFT+click - To alter all steps of the current bar.
- CMD/CTRL+click - To have stepped values for each envelope step.
DRUM RACK
Drum Kits are loaded into the Drum Rack. Here you can program all the rhythmic elements you need.

- A Drum Rack consists of up to nine drum lanes. To edit the rhythm of one instrument in a drum slot click on its name. The selected instrument is now highlighted with a grey background. The solo button next to each instrument name solos the corresponding drum lane.
- As with the arp and envelope you can set velocity values for each step of the currently selected drum lane. (See Chapter 4.4.1.2 & 4.4.1.3 for more information about Pitch and Chance)
- The name of the currently selected instrument is displayed here. The magnifying glass to the right opens the Drum Browser. The third symbol opens the Lane Settings.
DRUM BROWSER
The Drum Browser offers multiple instruments in the following categories:
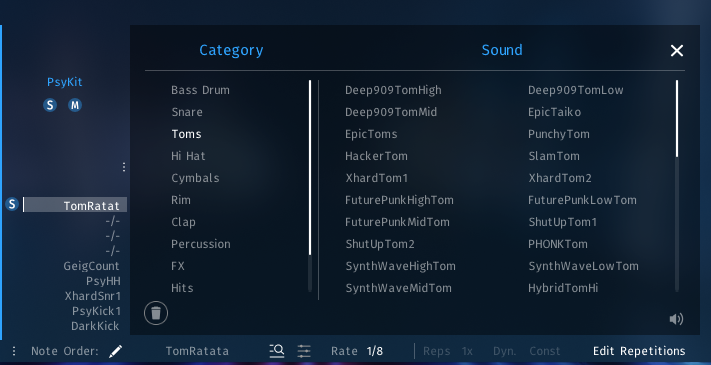
- Bass Drum
- Snare
- Toms
- Hi Hat
- Cymbals
- Rim
- Clap
- Percussion
- FX
- Hits
- Whooshs
- Glitches
Double click on the instrument will load the instrument to the currently selected lane. The trash can will onload the currently loaded instrument.
Per default the preview function is activated. Whenever an instrument is clicked the preview sound of the instrument is played. The volume of the previews can be set by dragging the speaker symbol up or down. By dragging it all the way down the preview function is deactivated.
LANE SETTINGS
In the Lane Settings you can set basic settings for each instrument per lane. The available controls are:
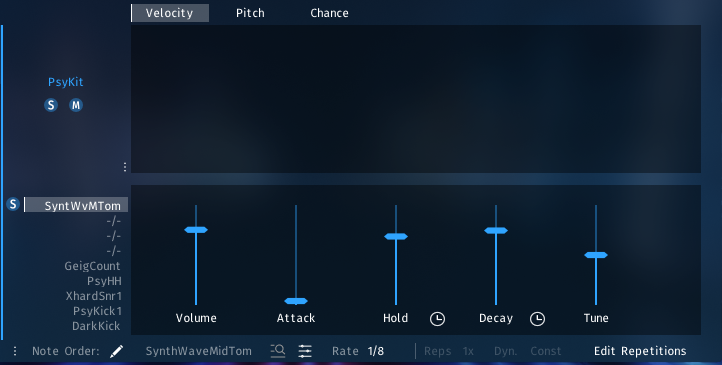
- Volume: Adjusts the basic volume.
- Attack: Adjusts the attack time of the loaded instrument.
- Hold: Adjusts the hold time. Either in ms or sync to host tempo.
- Decay: Adjusts the decay time. Either in ms or sync to host tempo.
- Tune: Adjust the pitch of the instrument.
The Pulse - Drum Kits.nki
Here you can find all the drum and percussion instruments available in The Pulse.KITS BROWSER
You can choose Kits from two categories: Drums & FX/Hits.
In the Drums category you'll find the following Types:
- Acoustic
- Epic Trailer Kit
- Wood and Wild Kit
- Tiny Kit
- Percussion Kit
- Drum Machine
- Puchy Kit
- Nine O Nine Kit
- Bunker Kit
- Tekno Kit
- Hacker Kit
- Deep 909 Kit
- Naughty Kit
- Future Kit
- 808 Kit
- Gangster Kit
- Xhard Kit
- Future Punk Kit
- Psy Kit
- Power Kit
- Hybrid
- Smack Kit
- Hyb Kit
- Raw Drums
- Chasing Kit
- Slam Kit
- Underground Kit
- Cyberpunk Kit
- Synth Wave Kit
- Hybrid Kit
- Sick Kit
- Tight Kit
- Super Tight Kit
- Experimental
- Industrial Percussion
- Mixed
- PHONK Kit
- Energy Kit
- Break Kit
- HipZter Kit
- Neon Kit
In the FX/Hits category you'll find the following Type:
- Hits
- Massive Impacts
- Industrial Hits
- Low Booms

- Random: A random Kit is selected from the Kits Browser.
- Displays the currently loaded Drum Kit. A click will bring you to the Kits Browser. The fowrad backward arrows give you easy access to the previous and next Kit.
- Default FX: The Default FX button is active per default. If you want to keep your current FX settings for this slot you can deactivate the button and the default FX chain that comes with each Kit will not be loaded.
- Preview: Per default the preview function is activated. Whenever an instrument is clicked the preview sound of the instrument is played. The volume of the previews can be set by dragging the speaker symbol up or down. By dragging it all the way down the preview function is deactivated.
- Global FX: Opens the Global FX menu.
MAIN PAGE

- Random: A random Kit is selected from the Kits Browser.
- Displays the currently loaded Drum Kit. A click will bring you to the Kits Browser. The fowrad backward arrows give you easy access to the previous and next Kit.
- Drum Pad: Nine Pads available per Drum Kit. Click on a pad to see the additional functionality.
- The magnifying glass opens the sound browser.
- The Solo Button in the middle solos the currently selected drum pad.
- The right icon opens the pad edit page.
- Global FX: Opens the Global FX menu (see 5.3.3.).
EDIT PAGE
On this page you can edit the currently selected pad. Change the loaded drum sound an apply multiple FX to each pad.

- Shows the currently selected pad. Simply click another pad to switch pads.
- The trash bin unloads the currently loaded drum sound from the selected pad.
- Change between the sound browser and the pad FX.
SOUND BROWSER
You can load one sound to each of the nine drum pads in the The Pulse - Drum Kits.nki.
The available categories are: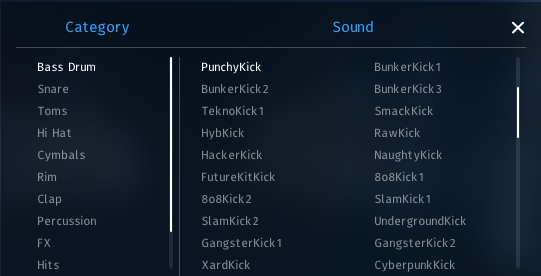
- Bass Drum
- Snare
- Toms
- Hi Hat
- Cymbals
- Rim
- Clap
- Percussion
- FX
- Hits
- Whooshs
- Glitches
FX PAGE
On the FX Page you can shape the loaded sound to your liking. (For more infromation about FX modules, please check 4.3.3..)

- Basic controls to shape your sound:
- Volume: Adjusts the volume of the loaded sound.
- Attack: Adjusts the attack time in ms.
- Hold: Adjusts the Hold time in ms or sync to host tempo. (Switchable via the button next to the control name.)
- Decay: Adjusts the Decay time in ms or sync to host tempo. (Switchable via the button next to the control name.)
- Tune: Ajusts the tuning of the loaded sound in semi tones.
- Per default the first FX slot is always the three band EQ. The other FX slots are freely configurable. By dragging the FX icon you can also change the order of those three FX slots.
- The dot over the Pre FX switch activates or bypasses the EQ module. With the Pre FX switch you can either have the EQ as the first module in your FX chain, or with the switch on, the EQ will be applied after the three FX slots. Each of the three bands has three parameters:
- Freq: Adjusts the Frequency of the EQ band.
- Q: Adjusts the Q factor of the EQ band. Higher Q Factor means wider EQ curves and vice versa.
- Gain: Adjusts the volume of the EQ band. Negative values will reduce the volume of the frequencies under the EQ band, positive values will boost the frequencies under the EQ band.
Frequency and Gain can also be adjusted by grabbing the white dot in the EQ graphic and dragging it to the desired location. The x axis is the frequency sprectrum and the y axis is the gain setting.
- You can route each pad to a different output.
GLOBAL FX
COMPRESSOR
Compressors are dynamic tools which automatically reduce the level of loud passages in a signal, thereby affecting the signal’s dynamic range. This Solid Bus Comp is modeled after a classic analog bus compressor.
Compression: Determines the amount of compression applied to the input signal. The higher the value, the more compression is applied to the input signal.
Character: Changes the sound characteristic of the compression effect by applying equalization to the signal. The Character Mode is set to fat which emphasizes the low and high frequncies.
Saturation: Adds mild coloration to the signal whilst retaining a clean sound.
REVERB
Hall
This is an algorithmic hall reverb.
Time Adjusts the length of the decay time.
Predelay Introduces a short amount of delay before the reverb takes effect.
Decay Adjusts the duration of the reverb effect.
Plate Reverb
Plate reverb was developed as an early method of generating an artificial reverb effect. A vibrating sheet of metal is employed to simulate reflection patterns in acoustical spaces. Since the sheet of metal vibrates across a two- dimensional plane, the echo density is higher and more evenly distributed than in a three-dimensional space. It is a good choice if you want to brighten a sound source. Plate reverb has a smooth reverb tail, allowing you to lengthen a sound without pushing it back in the mix. For this reason plate reverbs are most commonly used on vocals and snare drums.
Time: Adjusts the duration of the reverb effect.
Predelay: Introduces a short amount of delay before the reverb takes effect.
Mix Blends between the input signal and the effect signal.
Raum
Raum is a reverb algorithm for airy halls.
Time Adjusts the length of the decay time.
Predelay Introduces a short amount of delay before the reverb takes effect.
Decay Adjusts the duration of the reverb effect.
FILTER
Lowcut: Cuts out frequencies below the set value with a slope of - 12dB per octave.
Highcut: Cuts out frequencies above the set value with a slope of -6dB per octave.
LFO SECTION
You can modulate the various pad FX sliders via this LFOs.
You can choose between Sine, Rectangle, Triangle and Sawtooth and Random waveforms and adjust the frequency either in Hz or with clicking the clock icon in sync to the host tempo at a desired note value.
SINGLES
All other sounds (except for Drums) can be als found in our Singles folder. (See 3.2 aso for the instrument categories.)

- Rack FX: Shape the sound of the single instrument with the Rack FX.
- Shows the currently loaded Singles instrument along with the category symbol. (See 3.1.-3.7.)
- Global FX: Apply global FX to your single instrument.
RACK FX

- These three FX slots are freely configurable. By dragging the FX icon you can also change the order of those three FX slots. (The available modules and their functions can be found under 4.3.3..)
- Per default the first FX slot is always the three band EQ along with the Attack and Release controls.
The dot over the Pre FX switch activates or bypasses the EQ module. With the Pre FX switch you can either have the EQ as the first module in your FX chain, or with the switch on, the EQ will be applied after the three FX slots. Each of the three bands has three parameters:
- Freq: Adjusts the Frequency of the EQ band.
- Q: Adjusts the Q factor of the EQ band. Higher Q Factor means wider EQ curves and vice versa.
- Gain: Adjusts the volume of the EQ band. Negative values will reduce the volume of the frequencies under the EQ band, positive values will boost the frequencies under the EQ band.
Frequency and Gain can also be adjusted by grabbing the white dot in the EQ graphic and dragging it to the desired location. The x-axis is the frequency sprectrum and the y-axis is the gain setting.
- Basic controls to shape your sound:
- Attack: Adjusts the attack time in ms.
- Release: Adjusts the Release time in ms.
TIP:With the link button at the bottom you can link the attack and release slider to react to the mod wheel, or to the LFOs in the Global FX Section (see 6.2.).
GLOBAL FX
COMPRESSOR
Compressors are dynamic tools which automatically reduce the level of loud passages in a signal, thereby affecting the signal’s dynamic range. This Solid Bus Comp is modeled after a classic analog bus compressor.
Compression: Determines the amount of compression applied to the input signal. The higher the value, the more compression is applied to the input signal.
Character: Changes the sound characteristic of the compression effect by applying equalization to the signal. The Character Mode is set to fat which emphasizes the low and high frequncies.
Saturation: Adds mild coloration to the signal whilst retaining a clean sound.
REVERB
Hall
This is an algorithmic hall reverb.
Time Adjusts the length of the decay time.
Predelay Introduces a short amount of delay before the reverb takes effect.
Decay Adjusts the duration of the reverb effect.
Plate Reverb
Plate reverb was developed as an early method of generating an artificial reverb effect. A vibrating sheet of metal is employed to simulate reflection patterns in acoustical spaces. Since the sheet of metal vibrates across a two- dimensional plane, the echo density is higher and more evenly distributed than in a three-dimensional space. It is a good choice if you want to brighten a sound source. Plate reverb has a smooth reverb tail, allowing you to lengthen a sound without pushing it back in the mix. For this reason plate reverbs are most commonly used on vocals and snare drums.
Time: Adjusts the duration of the reverb effect.
Predelay: Introduces a short amount of delay before the reverb takes effect.
Mix Blends between the input signal and the effect signal.
Raum
Raum is a reverb algorithm for airy halls.
Time Adjusts the length of the decay time.
Predelay Introduces a short amount of delay before the reverb takes effect.
Decay Adjusts the duration of the reverb effect.
FILTER
Lowcut: Cuts out frequencies below the set value with a slope of - 12dB per octave.
Highcut: Cuts out frequencies above the set value with a slope of -6dB per octave.
LFO SECTION
You can modulate the various pad FX sliders via this LFOs.
You can choose between Sine, Rectangle, Triangle and Sawtooth and Random waveforms and adjust the frequency either in Hz or with clicking the clock icon in sync to the host tempo at a desired note value.
TIPS & TRICKS
GENERAL TIPS
- Play Simple Chords for Maximum Impact: Like with THE SCORE, all THE PULSE Sessions are optimized for simple chord progressions that you can play with your right hand only. Hold chords or single notes for long enough time to unlock the full potential of the multi-layered arrangements, ensuring a rich and dynamic sound.
- Use the mod wheel: The mod wheel is your key not only to dynamic expression, but to explore the nuances and different stages of the predesigned arrangements. Keep your left hand on the mod wheel for fluid transitions while playing with your right hand.
- Switch Song Parts Seamlessly with key switches: Use key switches to jump between Intro, Main A, Main B, and Main C sections on the fly. This functionality is perfect when you’re sketching ideas for a new composition.
- Combine Sessions and Individual NKIs: For ultimate versatility and detailed results, blend the multi-layered Sessions with individual NKIs. This approach lets you layer custom elements on top of the preset arrangements, providing both speed and precision in your workflow.
- Adjust Parameters for Unique Sounds: Dive into the individual parameter controls to tweak the Sessions and make the electronic arrangements your own. Change instruments, octaves and effects on the Shape page, experiment with the predesigned steps, arpeggios, and other functions of the individual slots on the Play page. Enjoy how quick and easy you can change whole electronic arrangements and soundscapes with only a few adjustments.
THE PULSE FOR UNDERSCORING
THE PULSE is designed as a versatile tool that bridges the gap between modern scoring techniques and contemporary electronic music. While the included Sessions are on the one hand more rhythmically focused, there are on the other hand numerous ways to use THE PULSE for a more subtle, cinematic underscore style. Below are some expert tips to help you shape THE PULSE to perfectly suit your specific scoring needs.
- Choose the Right Session Types
THE PULSE features a wide variety of multi-layered Sessions. For underscoring, we recommend primarily selecting the Cinematic and Ensembles categories in the Session browser: Cinematic Sessions often contain rhythmic elements but generally work well in film scoring contexts. Ensembles Sessions offer rich, evolving soundscapes without beats. They are highly responsive to the mod wheel, allowing for dynamic and expressive performances. - Use Key Switches to Your Advantage
Each Cinematic & Modern Session in THE PULSE comes with multiple key switch variations. By default, Sessions open with the Main A key switch, which may include rhythmic beats. For a more underscore-friendly approach, we recommend:
C0 (Intro) – Often provides a softer, more atmospheric version of the Session with a subtle pulse but no heavy beats.
F0 (Main C) – Typically includes gentle textures that maintain motion without prominent percussive elements (there may be exceptions to this concept in specific Sessions). - Mute the Drum Slot for a Pure Synth Pulse
One of the fastest ways to remove strong rhythmic elements from a Session is to mute the drum slot. Each Session consists of up to 10 sound layers and muting the percussive layers transforms the Session into an intricate, pulsating underscore texture without beats, perfectly suitable for cinematic underscoring. - Customize Pulse Dynamics with the Mod Wheel
Many layers within THE PULSE respond dynamically to the Modwheel, allowing for expressive shaping of the pulse. Gradually increasing or decreasing modulation can create evolving pulses that seamlessly adapt to your underscore, enhancing dramatic tension or providing subtle movement. - Experiment with Layer Mixing and Soloing for Unique Synth Pulses
If you want a Session to feel less percussive, further refine the sound by selectively muting or adjusting the volume of individual slots. Muting multiple percussive layers reveals an entirely new soundscape, often transforming an energetic beat into a delicate, evolving pulse. Additionally, you can solo specific slots or combinations of slots to create your own unique synth pulses. THE PULSE is designed as a modular scoring toolkit, encouraging users to go beyond using the pre-made Sessions and instead craft their own signature pulses by combining layers creatively. - Use Single NKIs for Full Customization
Beyond the Sessions, THE PULSE includes Single NKIs for each individual sound, allowing you to build your underscore textures from scratch. This provides a hybrid workflow where you can start with a customized Session to lay the foundation of your track and then refine it further by adding unique, individually played elements using the Single NKIs. By combining both methods, you can shape your composition in a truly personalized way, blending structured pulses with freeform elements to achieve the perfect cinematic underscore.
Conclusion
By following these tips, THE PULSE can be used beyond its modern rhythmic roots as a powerful tool for underscoring. Whether you’re crafting suspenseful pulses, atmospheric textures, or evolving cinematic layers, these techniques will help you unlock the full potential of THE PULSE for decent film and TV scoring.
CREDITS
Product Concept and Design: SONUSCORE: Tilman Sillescu, Jonas Schüsselin, Jonas Meyer, Stefan Kemler, Simon Schrenk, Luka Swoboda
Project Lead: Jonas Schüsselin, Stefan Kemler
Recording & Sound Design: Jonas Schüsselin, Moritz Sasowski, Malik Ouambo, Luka Swoboda
KONTAKT Scripting: Jonas Meyer, Stefan Kemler, Mathias Vatter
NKS Integration: Stefan Kemler
Preset Design: Jonas Schüsselin, Luka Swoboda, Tilman Sillescu, Moritz Sasowski, Nicolai Patricio
User Interface Design: Ruslan Rekonvald, Benedikt Huster
Marketing: Benedikt Huster, Tobias Kunz, Felix Moebius, Louisa Wolf, Nadja Demmler, Zoé Friedbacher, Russ Hughes
Web Programming: Lukas Ruschitzka
Videos: Nadja Demmler, Luka Swoboda, Lukas Ruschitzka, Jonathan Thomas, Jonas Schüsselin
Additional Content: Jonas Schüsselin, Luka Swoboda, Nicolai Patricio, Moritz Sasowski
Known Issues:
- High CPU usage, depending on the loaded Session.
- Various, minor UI bugs.
- Possible playback stops in Pro Tools when certain parameters in The Pulse get changed. The issue cannot be reproduced currently.