
MANUAL
Document Version 1.0.0
Product Version 1.0.0
© by SONUSCORE
SYSTEM REQUIREMENTS
For the latest system requirements, please visit www.sonuscore.com, or your trusted dealer's website.
Welcome to The Score Elements
Thank you very much for choosing Sonuscore software.
Congratulations on your brand-new instrument The Score Elements by Sonuscore. We hope you will enjoy this instrument as much as we do. This manual will help you to get started and explains the features and functions of your new software.
Best regards and enjoy,
Sonuscore
SETUP
Loading The Score Elements via Kontakt
The Score Elements is not an independent plug-in, so you will first need to open an instance of Native Instruments' free Kontakt Player before you can start playing.
- Make sure you have Native Access installed and set up.
- Download and install Native Instruments’ free Kontakt Player.
- Paste your serial number into Native Access and download The Score Elements via the Native Access interface.
- Open Kontakt Player as a plug-in in your host software (DAW), or as a stand-alone application and load The Score Elements instrument from the Kontakt library tab.
For more information about the Kontakt Sampler, visit the Kontakt Player Manual. (For Kontakt 7 Users you might find an older manual here.)
The Engine
The Ensemble Engine is the heart of the library. With its ten instrument slots, which can be transposed and even animated with their independent arpeggiators and envelopes, you can play the included Stories or change them to your liking. The Score Elements does not allow you to change the instruments loaded in the slots, but you can change all other parameters and settings.
The Score Elements engine works with a delay of 48ms so that received MIDI information can be processed. To precisely synchronize the audio output of The Score Elements with your DAW project, you can use a track delay of -48ms for the corresponding track.
Please refer to the relevant documentation for the necessary steps to set a track delay in your digital audio workstation.
FIND PAGE
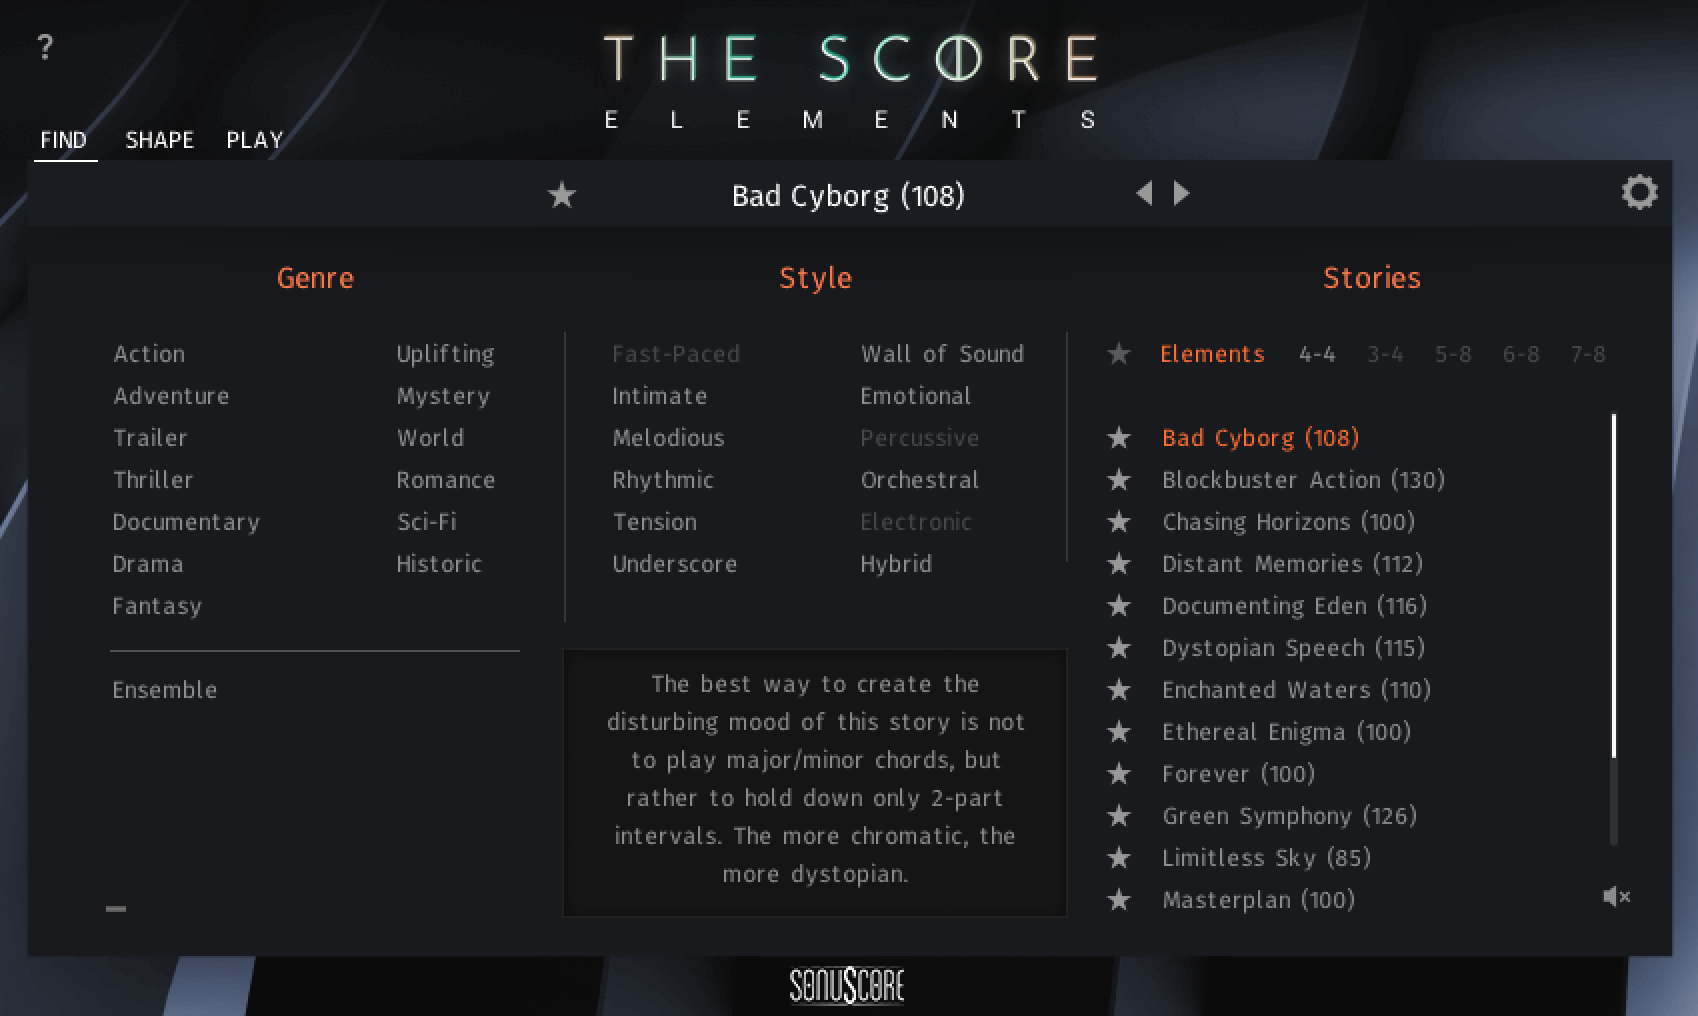
Positioned on the Find Page, you can access the Story Browser. Each Story is categorized into different Genres and Styles. Simply click the Genre and Style you are searching for and see all Stories that fall under these categories.
 1
3.1.1.1 Genre
2
3.1.1.2 Style
3
3.1.1.3 Ensemble
4
3.1.2.1 Favorites
5
3.1.2.2 Tempo
6
3.1.2.3 Meter
7
3.1.2.4 Description
8
3.1.2.5 Preview Volume
TAGS
The Story Browser page contains 25 tags to help you filter all stories by different characteristics and keywords as well as an option to scroll through the filtered selection.
To simplify the search the tags are organized into three categories:
GENRE
These tags can be used to search for stories in the context of the various genres, which are typically associated with a certain style of music. This category can be used to additively filter for multiple tags.
STYLE
In general, all stories in THE SCORE ELEMENTS are created with 11 styles in mind, applicable in different compositional scenarios.
ENSEMBLE
Utilizing the FREE MODE, these stories can be played freely without the engine (see 3.5.8).
STORIES
FAVORITES
The Favorites button lets you filter by your custom Story list. You can add Stories to this list by clicking the "star" icon next to each Story.
TEMPO
Each Story was designed with a specific tempo in mind. This is indicated in the brackets. You can however try each story at different tempos.
METER
If a Story is designed in an odd meter this is also written into the Story name. If there is nothing specifically written about the meter, the Story is in 4/4.
DESCRIPTION
You'll find a short description of the selected Story with helpful tips in the dark box in the middle of the Find Page.
PREVIEW VOLUME
At the bottom right you can see the speaker symbol. Clicking and dragging up will increase the Story preview volume and dragging down will lower the volume and at last mute the story preview function.
SETTINGS PAGE
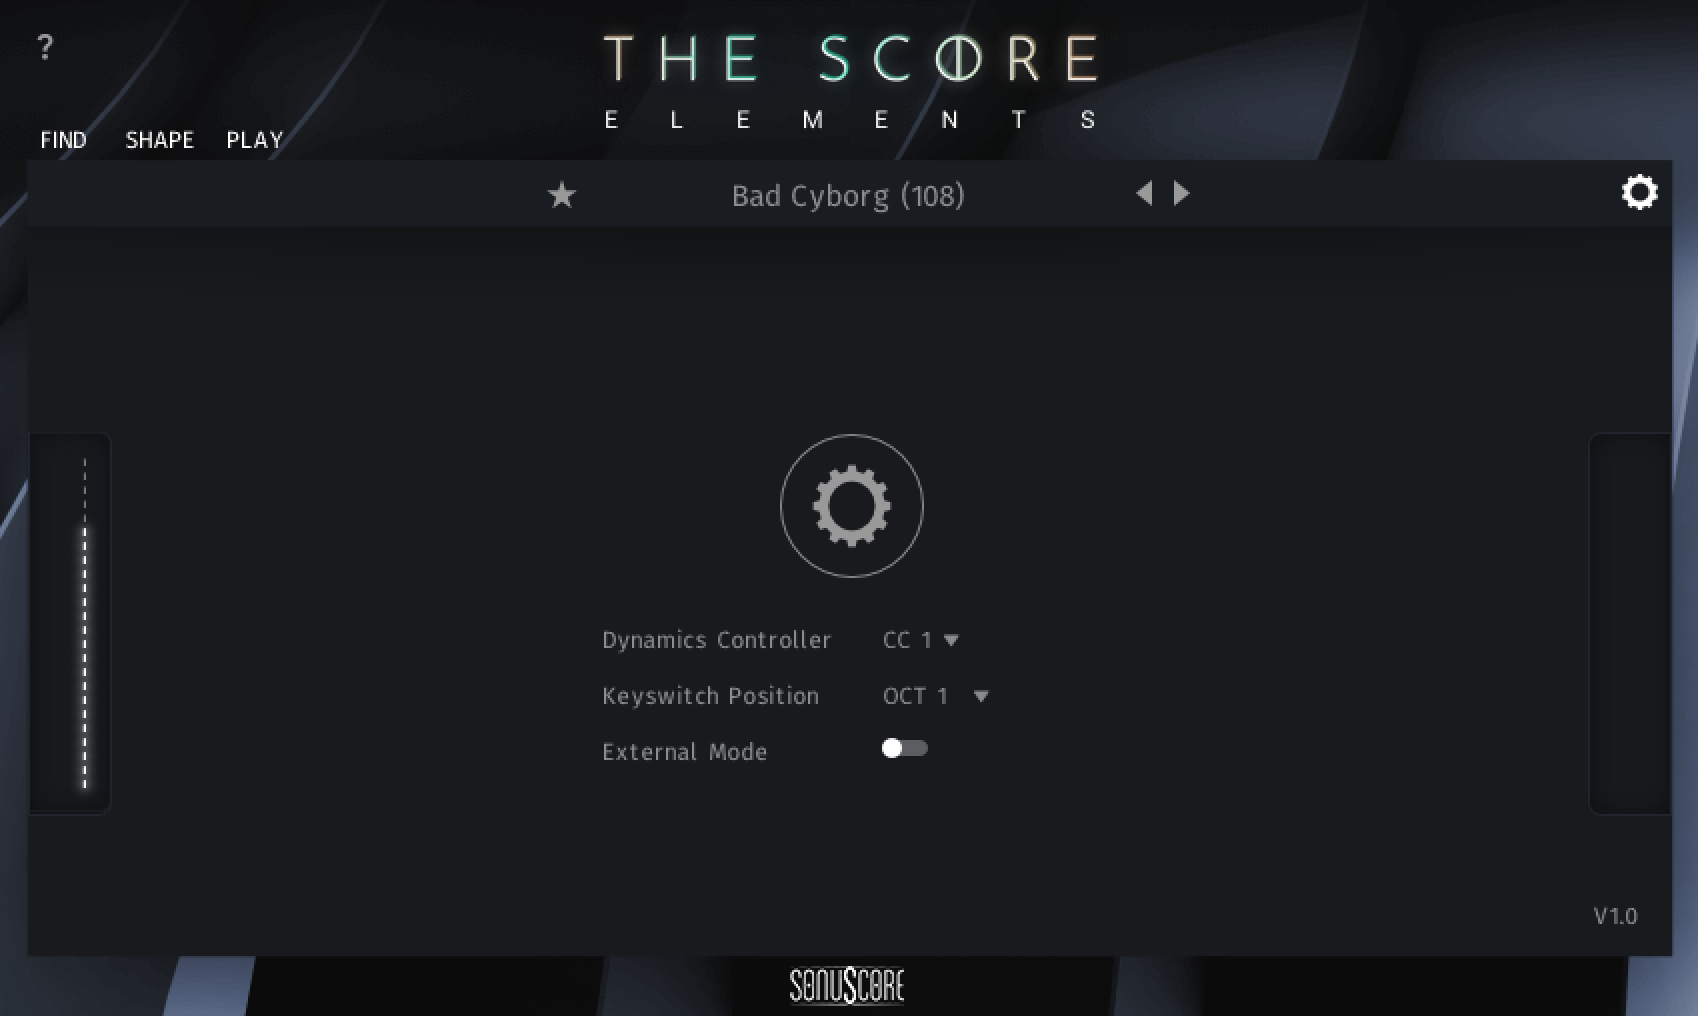
Click the gear icon in the top right corner to open the settings page.
DYNAMICS CONTROLLER
On the settings page the dynamics controller can be mapped to CC01 or CC02.
KEYSWITCH POSITION
You can also choose the octave where the key switches are located to better fit your MIDI hardware and playing style.
EXTERNAL MODE
With External Mode enabled, each slot of THE SCORE ELEMENTS can be addressed individually using different MIDI channels. The External Mode bypasses the internal engine. Additionally, the octave shifts for each slot are disabled. Each Track in the DAW has to be routed back to THE SCORE ELEMENTS Kontakt instance with each having a different MIDI channel corresponding with the slot number inside the engine (Track 1 = MIDI channel 1; Track 2 = MIDI channel 2; etc.).
SHAPE PAGE
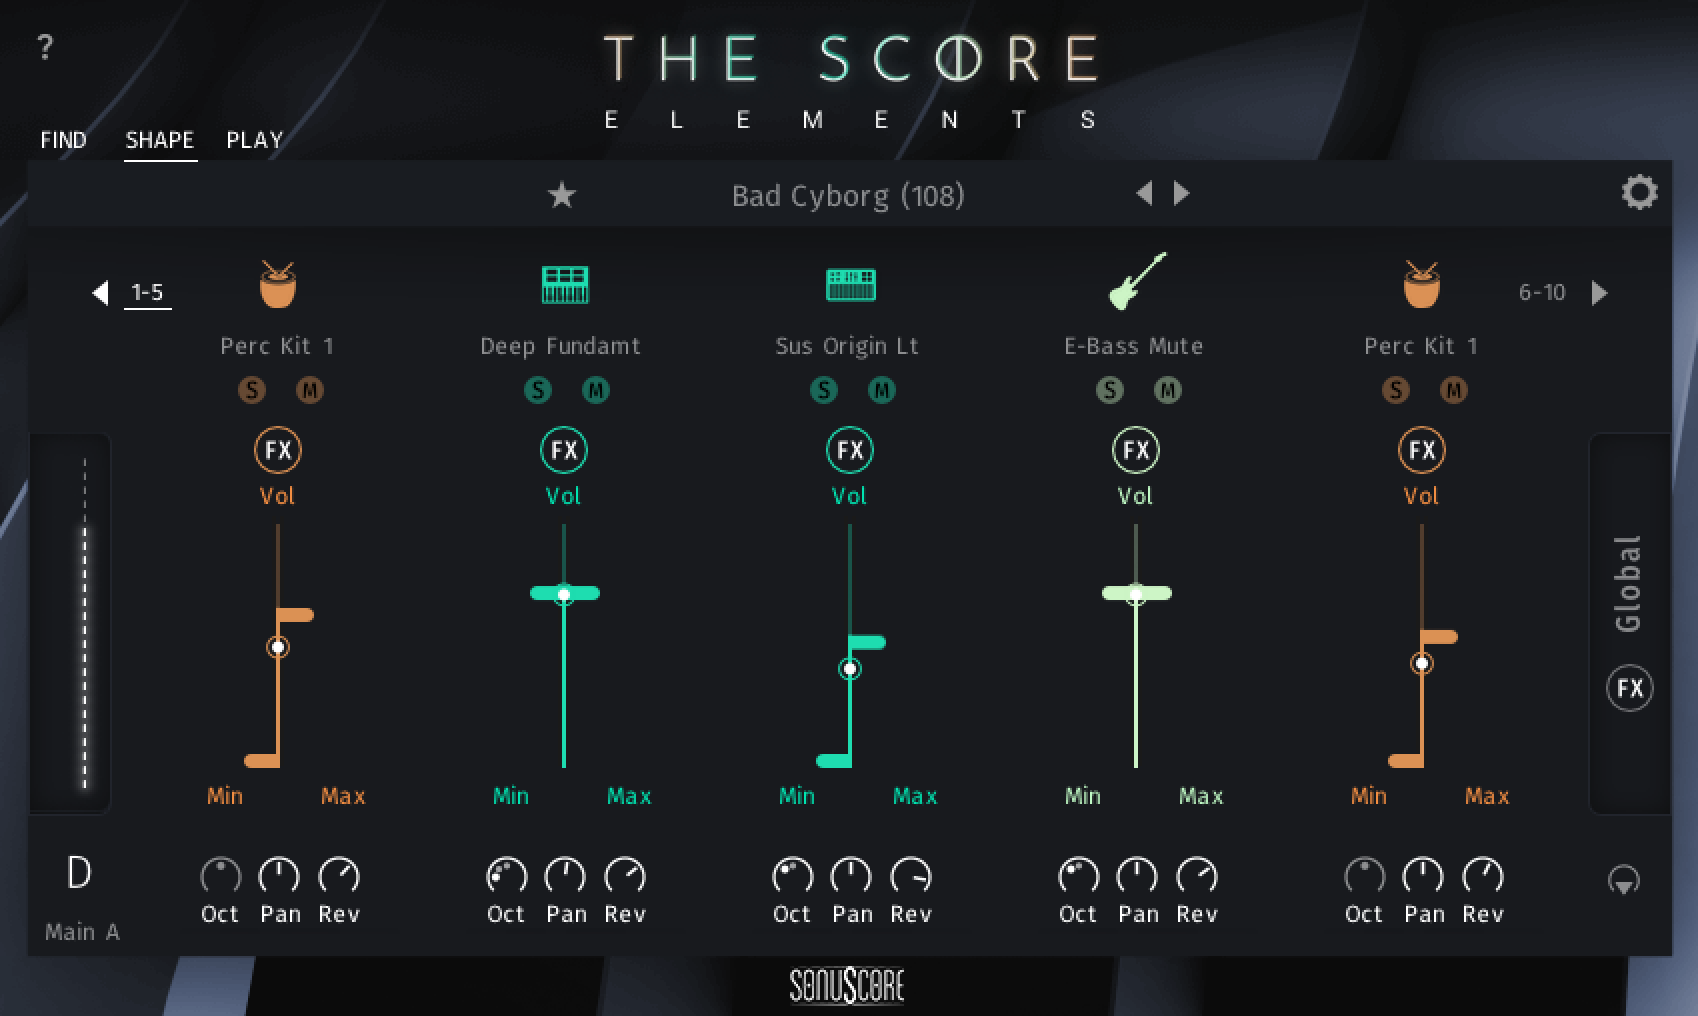
On the Shape Page you can adjust basic parameters for every slot as well as mix the overall sound. With the individual fader controls the balance between the layers is easily adjustable.
 1
3.3.1 Help
2
3.3.2 Instrument Slots
3
3.3.3 Mod Wheel
4
3.3.4 Solo, Mute and Slot FX
5
3.3.5 Volume Fader
6
3.3.6 Octave, Pan and Reverb
7
3.3.7 Global FX
8
3.3.8 Output Routing
HELP
Shows information about the currently visible page.
INSTRUMENT SLOTS
By clicking the arrows to the left and right of the five slots you get access to the other five slots. Meaning the engine consists of ten individual slots in total.
MOD WHEEL
You can see the current value of the mod wheel displayed here.
SOLO, MUTE AND SLOT FX
Solo and Mute functions for each slot as well as a specific FX Section for each slot (see 3.4).
You can automate the Solo/Mute buttons to create even more variety. To automate the Mute button, go to the list of automatable parameters in your DAW and find the Mute parameters for the different slots. Now you can add them to your track and add automation points.
Alternatively, you can also right-click on the mute buttons in THE SCORE ELEMENTS and select "Learn MIDI CC Automation". Then move a fader or knob on your MIDI controller or send a MIDI CC command from your DAW, for example CC2, and the button will be controlled by that MIDI CC.
VOLUME FADER
Volume fader for each slot with adjustable min and max setting to react to the mod wheel.
OCTAVE, PAN AND REVERB
You can independently set the octave, panorama and the global reverb as a send effect. (Global Reverb Settings can be adjusted in the Global FX Section, see 3.4.5.)
GLOBAL FX
Clicking here opens the Global FX Page (see 3.4.5).
OUTPUT ROUTING
Route the instrument slots to different Kontakt outputs.
SLOT FX
Clicking the FX button beneath an instrument slot opens the FX Section for this slot.
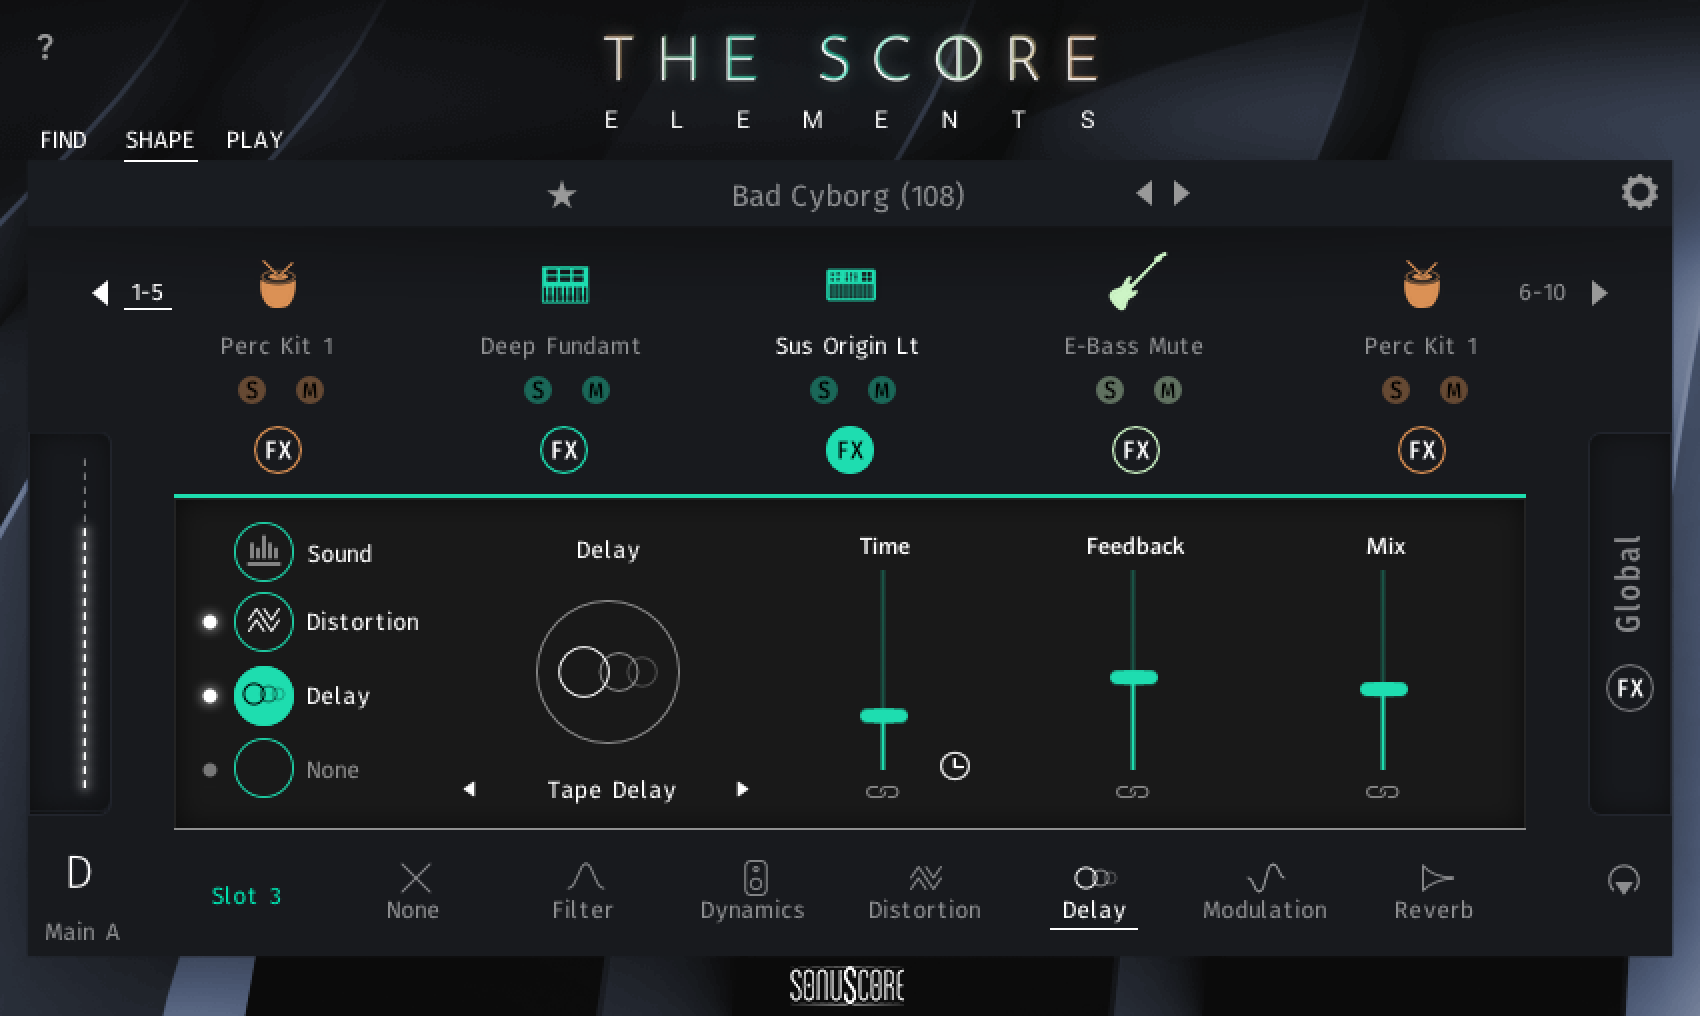
FX CHAIN
Overview of the FX chain for the slot. The first module is always Attack and Release as well as a three band Equalizer. The other three slots can be filled with numerous different FX modules (see 3.4.4).
LINK ICON
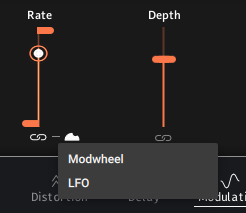
Clicking the link icon beneath a slider activates the link function and shows a drop-down menu next to the link button in which you choose the modulation source: the mod wheel or the LFO in the Global FX Section (see 3.4.5). By default, the mod wheel is selected, as it is the first entry in the menu.
When linked to the mod wheel, you can decide where the slider should be at the min value of the mod wheel and where at the max value.
The selected modulation source is remembered for each control. If you switch a slider to the LFO, deactivate the link and activate it again later, the LFO will still be selected.
FX TYPES
These are the different FX types that are available for each of the three slots.
You can also change the order of the three individual FX slots by dragging them to a different slot.
FX MODULES
SOUND MODULE
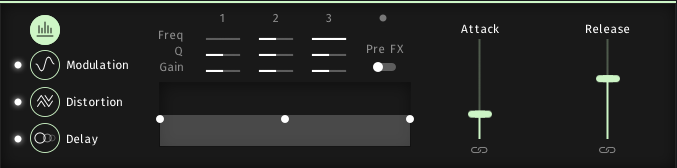
Attack: Adjusts the attack time for the loaded instrument.
Release: Adjusts the release time for the loaded instrument.
Please keep in mind that it is only possible to adjust the attack and release times in the first instance of any loaded instrument.
With the link button at the bottom you can link the attack and release sliders to the mod wheel or the LFO, selectable in the drop-down menu that appears (see 3.4.2). When linked to the mod wheel, the left handle represents the lowest position of the mod wheel while the right handle represents the highest position of the mod wheel.
Right next to the Attack and Release controls you’ll find a three band EQ. Each band comes with three controls for Frequency, Volume and Q Factor. Additionally, you can decide whether you want to have the EQ before or right after the Channel FX Chain with this drop-down menu.
You can also use the visualization to adjust the frequency and the volume of the three band EQ. Simply drag one of the handles to the desired frequency and adjust the volume by dragging up and down.
FILTER
This module lets you apply a filter to the instrument loaded to the slot.

You can choose between nine different filter types:
Low Pass -12dB
A clean 2-pole low-pass filter (12 dB/octave) that removes frequencies above the cutoff. It works well on all kinds of material.
Cutoff: Sets the frequency above which the sound is filtered out.
Resonance: Emphasizes the frequencies around the cutoff for a sharper, more resonant sound.
Low Pass -24dB
A steeper 4-pole low-pass filter (24 dB/octave) for stronger filtering above the cutoff.
Cutoff: Sets the frequency above which the sound is filtered out.
Resonance: Emphasizes the frequencies around the cutoff for a sharper, more resonant sound.
Low Pass Vintage
A low-pass filter modeled on a classic analog synthesizer. Similar to the 24 dB low-pass, but with more character.
Cutoff: Sets the frequency above which the sound is filtered out.
Resonance: Emphasizes the frequencies around the cutoff for a sharper, more resonant sound.
High Pass -12dB
A clean 2-pole high-pass filter (12 dB/octave) that removes frequencies below the cutoff.
Cutoff: Sets the frequency below which the sound is filtered out.
Resonance: Emphasizes the frequencies around the cutoff for a sharper, more resonant sound.
High Pass -24dB
A steeper 4-pole high-pass filter (24 dB/octave) for stronger filtering below the cutoff.
Cutoff: Sets the frequency below which the sound is filtered out.
Resonance: Emphasizes the frequencies around the cutoff for a sharper, more resonant sound.
Band Pass -12dB
A 2-pole band-pass filter (12 dB/octave) that only lets a band of frequencies around the cutoff pass.
Cutoff: Sets the center frequency of the band.
Resonance: Emphasizes the frequencies around the cutoff for a sharper, more resonant sound.
Band Pass -24dB
A steeper 4-pole band-pass filter (24 dB/octave) for a narrower band around the cutoff.
Cutoff: Sets the center frequency of the band.
Resonance: Emphasizes the frequencies around the cutoff for a sharper, more resonant sound.
Notch
A 4-pole notch filter that cuts out a narrow band of frequencies around the cutoff.
Cutoff: Sets the frequency that is cut out.
Resonance: Shapes the filter around the cutoff. Higher values give a more pronounced effect.
Talk
A formant filter that imitates the resonances of the human voice, for vowel-like “talk box” sounds.
Talk: Morphs between different vowel sounds.
Resonance: Makes the vowel character more or less pronounced.
Size: Shifts the frequency range of the formants up or down.
DYNAMICS
This module lets you process the dynamics of the instrument loaded to the slot.

Supercharger GT
A tube-style compressor with musical saturation, from subtle warmth to heavy, aggressive drive.
Input: Sets how hard the signal drives the compressor (in dB).
Saturation: Adds tube saturation. Turn right for more.
Output: Sets the output level (in dB), for example to make up for the level lost through compression.
Compressor
A bus compressor in classic analog style that evens out the loud parts of a signal.
Threshold: Sets the level above which compression starts. Quieter parts of the signal stay untouched.
Ratio: Sets how strongly the signal above the threshold is reduced. At 4:1, a level increase of 4 dB above the threshold results in only 1 dB more output. 1:1 means no compression.
Transient Master
Shapes the attack and sustain of a sound, independent of its level. It works best on percussive sounds such as drums, pianos or plucked instruments. Extreme settings can be quite drastic.
Input: Sets the input level.
Attack: Turn right for more punch, left to soften the attacks.
Sustain: Turn right for more body, left to shorten the tail.
Limiter
Catches peaks to keep the signal from clipping, without having to lower the overall volume.
Input: Drives the signal into the limiter. The higher the setting, the more peaks are caught.
Release: Sets how quickly the limiter recovers after a peak.
Output: Sets the output level.
DISTORTION
This module lets you saturate and distort the instrument loaded to the slot.

Tape Saturation
Recreates the soft compression and saturation of analog tape, from gentle warmth to clearly audible distortion.
Gain: Drives the tape harder for more saturation and compression.
Warmth: Boosts or cuts the low frequencies.
Output: Sets the output level.
Tube Saturation
Simulates an overdriven tube circuit that adds harmonics to the sound.
Drive: Sets the amount of distortion.
Damping: Tames the high frequencies to counter the brightness added by the distortion.
Output: Sets the output level. Since distortion makes the signal louder, you will often want to turn this down.
Black Distortion
A guitar pedal-style distortion for bluesy and rock sounds.
Distortion: Sets the amount of distortion.
Filter: Turn right for a darker, bass-heavy sound, left for a brighter, sharper one.
Volume: Sets the output level.
Clean Amp
Simulates a classic tube guitar amp, from clean tones with character to crunchy, saturated sounds.
Gain: Drives the amp. Higher values add saturation and distortion.
Bass & Treble: Adjust the low and high frequencies.
Bitcrusher
Adds lo-fi digital artifacts such as quantization noise and aliasing. Great for roughening up clean sounds.
Bits: Reduces the bit depth.
s. Rate (Sample Rate): Reduces the sample rate without any filtering, which creates strong aliasing.
Overdrive
Simulates a classic overdrive pedal.
Drive: Sets the amount of overdrive.
Tone: Turn right for more mids and less bass, left for a warmer sound with fewer highs.
Output: Sets the output level.
DELAY
This module lets you delay the signal of the loaded instrument in the slot.

Tape Delay
A warm delay modeled on vintage tape echo machines.
Time: Sets the delay time, either in milliseconds or, after clicking the clock/note symbol, in sync with the host tempo.
Feedback: Sets how many repeats you hear.
Mix: Balances the dry and the delayed signal.
Diffuse Delay
A delay that smears its repeats into a dense, reverb-like cloud. Ideal for ambient sounds and sound design.
Time: Sets the delay time, either in milliseconds or, after clicking the clock/note symbol, in sync with the host tempo.
Feedback: Sets how many repeats you hear.
Mix: Balances the dry and the delayed signal.
Analogue Delay
Recreates the dark, slightly gritty sound of analog bucket-brigade (BBD) delays.
Time: Sets the delay time, either in milliseconds or, after clicking the clock/note symbol, in sync with the host tempo.
Feedback: Sets how many repeats you hear.
Mix: Balances the dry and the delayed signal.
Digital Delay
A clean digital delay without coloration.
Time: Sets the delay time, either in milliseconds or, after clicking the clock/note symbol, in sync with the host tempo.
Feedback: Sets how many repeats you hear.
Mix: Balances the dry and the delayed signal.
Psyche Delay
A stereo delay for atmospheric echoes and reversed, “backwards tape” effects.
Time: Sets the delay time, either in milliseconds or, after clicking the clock/note symbol, in sync with the host tempo.
Feedback: Sets how many repeats you hear.
Detune: Detunes the repeats by up to ±50 cents.
Mix: Balances the dry and the delayed signal.
MODULATION
This module lets you modulate the signal of the loaded instrument in the slot.

Chorus
Thickens a sound by layering slightly detuned, delayed copies of it, as if several players were playing at once.
Rate: Sets the modulation speed.
Depth: Sets the amount of detuning.
Mix (Dry/Wet Knob): Balances the dry and the effect signal. The effect is strongest around the middle position.
Flanger
Creates the typical sweeping “whoosh” sound by mixing the signal with a slightly delayed, modulated copy.
Speed: Sets the modulation speed. Click the Sync button to follow the host tempo.
Depth: Sets how wide the sweep is.
Mix (Dry/Wet Knob): Balances the dry and the effect signal. The effect is strongest around the middle position.
Phaser
Creates a swirling sound by moving notches through the frequency spectrum.
Speed: Sets the modulation speed. Click the Sync button to follow the host tempo.
Depth: Sets how wide the sweep is.
Mix (Dry/Wet Knob): Balances the dry and the effect signal. The effect is strongest around the middle position.
Flutter
Emulates the pitch wobble, noise and dull highs of old tape machines. Perfect for lo-fi sounds, pads and melodies.
Scrape: Adds high-frequency scrape noise.
Wow: Adds slow pitch fluctuations.
Flutter: Adds fast pitch fluctuations.
Mix: Balances the dry and the effect signal.
Vibrato
Recreates the vibrato and chorus effect of a classic electric organ.
Speed: Sets the modulation speed.
Blend: Fades between vibrato and chorus.
Width: Sets the stereo width.
Mix: Balances the dry and the effect signal.
REVERB
This module lets you reverberate the signal of the loaded instrument in the slot.

Plate Reverb
A bright, dense reverb inspired by classic plate units. Its smooth tail adds length and shine to a sound without pushing it to the back of the mix.
Pre Delay: Sets a short gap between the dry sound and the start of the reverb.
Decay: Sets how long the reverb tail lasts.
Mix: Balances the dry and the reverb signal.
Reverb
A natural-sounding algorithmic hall reverb.
Time: Sets how long the reverb tail lasts.
Damping: Softens the reverb. Higher values make the room sound more absorbent and darker.
Mix: Balances the dry and the reverb signal.
Raum
A spacious reverb for airy, open halls.
Time: Sets how long the reverb tail lasts.
Modulation: Adds movement to the reverb tail, from a subtle shimmer to a clearly detuned sound.
Damping: Softens the reverb. Higher values make the room sound more absorbent and darker.
Mix: Balances the dry and the reverb signal.
GLOBAL FX SECTION
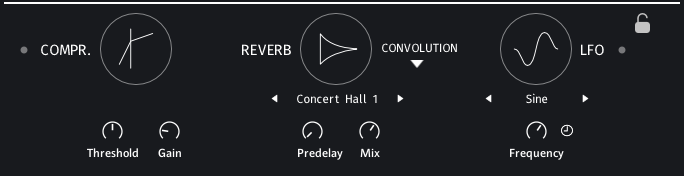
COMPRESSOR
A bus compressor in classic analog style that glues the overall sound together.
Threshold: Sets the level above which compression starts. Quieter parts of the signal stay untouched.
Gain: Raises the level after compression to make up for the reduced volume.
REVERB
Convolution
A reverb based on recordings of real spaces (impulse responses), for a very realistic sense of room.
Impulse Response: Chooses one of the ten included spaces.
Predelay: Sets a short gap between the dry sound and the start of the reverb.
Mix: Balances the dry and the reverb signal.
Plate Reverb
A bright, dense reverb inspired by classic plate units. Its smooth tail adds length and shine to a sound without pushing it to the back of the mix.
Time: Sets how long the reverb tail lasts.
Predelay: Sets a short gap between the dry sound and the start of the reverb.
Mix: Balances the dry and the reverb signal.
Raum
A spacious reverb for airy, open halls.
Time: Sets how long the reverb tail lasts.
Predelay: Sets a short gap between the dry sound and the start of the reverb.
Mix: Balances the dry and the reverb signal.
Hall
A warm, natural-sounding algorithmic hall reverb that works well on sustained, tonal sounds.
Time: Sets how long the reverb tail lasts.
Predelay: Sets a short gap between the dry sound and the start of the reverb.
Mix: Balances the dry and the reverb signal.
LFO
You can modulate the various slot FX sliders via this LFO.
You can choose between Sine, Rectangle, Triangle and Sawtooth waveforms and adjust the frequency either in ms or, by clicking the clock icon, in sync to the host tempo at a desired note value.
To link an effect parameter to the LFO, click the chain symbol beneath the slider you want to modulate to activate the link function. Then select LFO in the drop-down menu that appears. By default, the mod wheel is selected, but your choice is remembered for each control (see 3.4.2).
PLAY PAGE
On the Play Page you’ll find the heart of our ensemble engine. Here you can adjust everything concerning the arps and envelopes for each instrument.
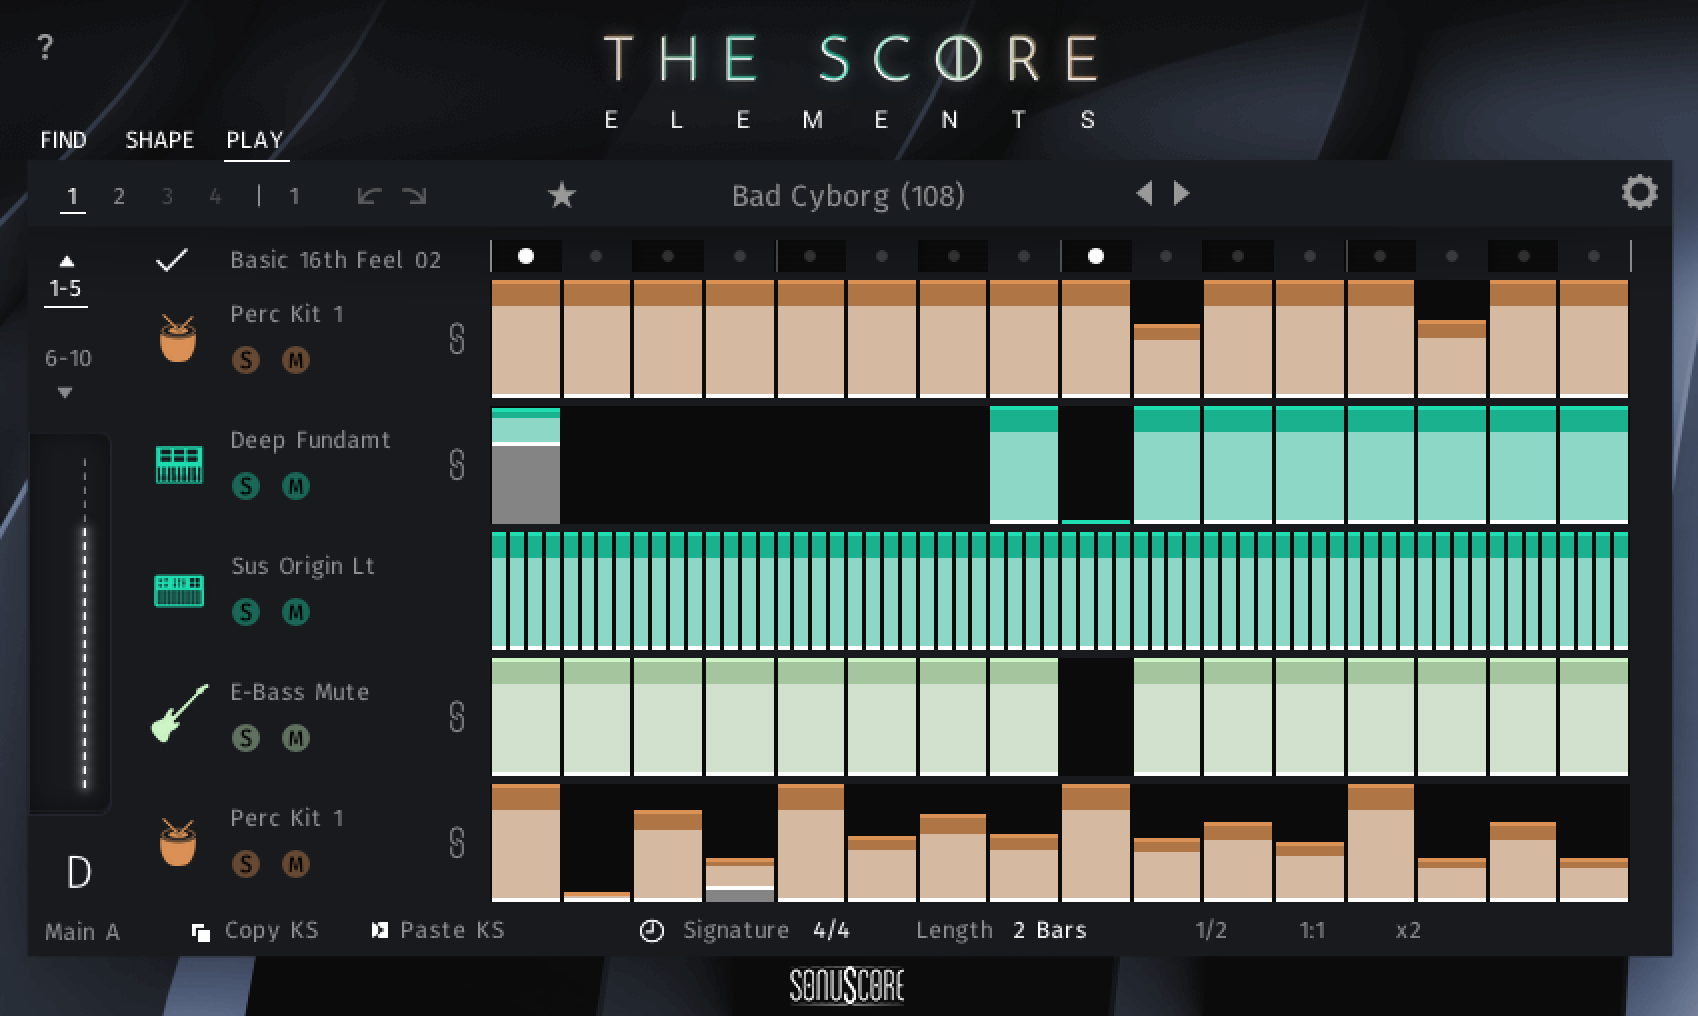 1
3.5.1 Bar Selection
2
3.5.2 Undo & Redo
3
3.5.3 Slot Navigation
4
3.5.4 Keyswitches
5
3.5.5 Copy & Paste Keyswitch
6
3.5.6 Global Length Settings
7
3.5.7 Global Accents
8
3.5.8 Arpeggiator
9
3.5.9 Envelope
BAR SELECTION
Indicates the currently shown bar and lets you switch to the other bars, if 1, 2 or 4 bars are chosen.
UNDO & REDO
Undo and redo your last changes.
SLOT NAVIGATION
Arrows to switch between slots 1-5 and 6-10.
KEYSWITCHES
Shows the currently selected key switch. Each Story contains 2 key switches: C0 Intro, D0 Main A. You can adjust the position of the key switches in the settings menu. The full 5 key switches including E0 Main B, F0 Outro, G0 Ending, are available in The Score.
COPY & PASTE KEYSWITCH
Copy and paste the content to the other keyswitch.
GLOBAL LENGTH SETTINGS
- The available meters are 4/4, 3/4, 6/8, 5/8, 7/8.
- Bar length can be chosen between 1 Bar, 2 Bars and 4 Bars.
- Half time, normal time and double time switch. Depending on the host tempo you can set the engine to play in half or double time. By default this is set to 1:1 so the engine plays exactly the chosen tempo in your DAW.
GLOBAL ACCENTS
The global accents can be switched on and off via the check button. If turned on each slot can be linked to the global accents via the chain link symbol right next to the solo/mute section beneath each instrument slot.
This handy tool can easily apply a cohesive rhythmic feel to an entire story. With the chain symbol right next to each instrument slot you can link the instruments to follow the global accents. The individual slot linked to the global accent will automatically have a slightly lower dynamic range, but the accents are added to the rhythm where they apply.
That way you can set two kinds of global accents.

With the first click into an empty circle you’ll get a more profound accent.

Clicking again will give you a softer accent and clicking once more will turn the accent off again.

ARPEGGIATOR
Short articulations always use the arpeggiator. Click on the slot with the loaded short articulation on the play page to enter the editor.
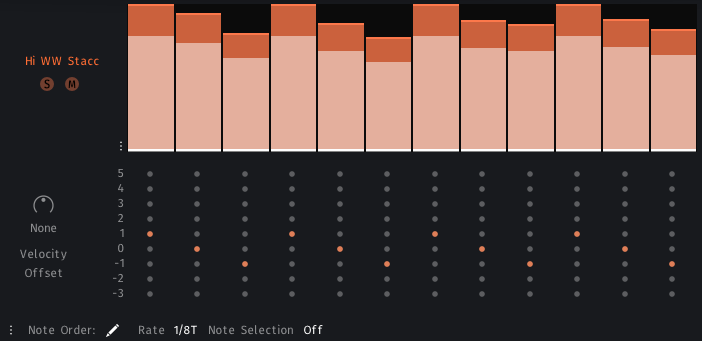
At the top of the arpeggiator module you can create your own rhythms or dynamic progression of the arpeggiation.
Click at the top of each step to drag the max value of each step (mod wheel at 127) to the desired dynamic level. Click at the bottom of each step to drag the min value of each step (mod wheel at 0) to the desired dynamic level.
Note that you can also inverse the dynamic behavior by dragging the min value above the max value. When the mod wheel is at 0 it will play at a louder dynamic than when the mod wheel is at 127. This way you can create interesting movements between different slots where one element is more present in a lower dynamic range as compared to when it is in a higher dynamic range.
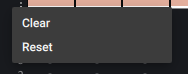
With the menu located at the bottom left of the velocity steps you can set all of the steps to zero with the clear function to easily mute a slot in a keyswitch. The Reset button sets all steps to the max velocity.
At the bottom of the arpeggiator module you can find the general controls:

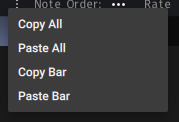
1. Click on the three dots to easily copy the entire slot or just the current bar to a different instrument or key switch.
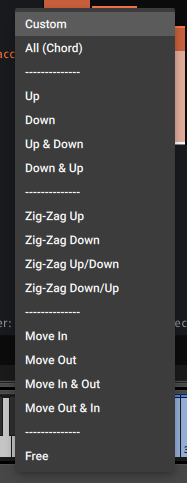
2. The Note Order determines how the arpeggiator works with the incoming MIDI data.
- Custom: The dot matrix becomes active and you can program a custom arpeggiation pattern. 0 represents the lowest pressed MIDI note, 1 represents the second lowest pressed MIDI note, and so on.
- All (Chord): All pressed MIDI notes are played simultaneously according to the set steps and their velocity.
- Arp Pattern: These 12 arp patterns are the basic patterns found in many arpeggiators.
- Free: The Free Mode bypasses the arpeggiator and the instrument will only be played whenever a new MIDI input is sent to this slot. This offers many possibilities in terms of orchestration.
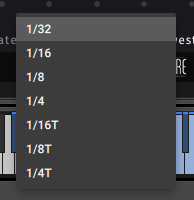
3. The rate determines the smallest rhythmic unit that the arpeggiator uses. You can choose between rates from 1/4T to 1/32.
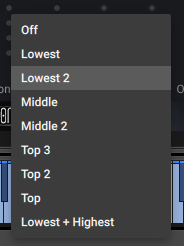
4. The Note Selection determines which notes will be passed on to this slot.

5. The depth of control is dependent on the other settings in the Arpeggiator.
Note Order = All (Chord) - only the Octave settings are available.
Octave: After playing a chord in the initial octave the chord will be played one octave higher. If set to +2 the chord will be played a third time again one octave higher, and so on. -1 will repeat the chord one octave lower etc.
Note Order = Up, Down, etc. - three settings are available:
Octave: You can also choose to repeat the sequence through the octaves, as explained above.
Repeat: You can also choose to repeat each note more than once. Repeat = 1 will repeat each step one additional time.
Reset: Reset will restart the sequence after one or two bars.
CUSTOM SEQUENCE MODE
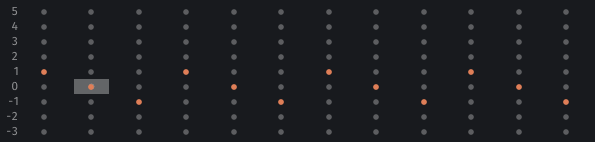
With the Custom Sequence Mode, you can even customize the pitch sequence of each step within a rhythmic sequence via clicking at the respective point within the matrix:
Rows: Numeric order of the played notes from bottom to top. The lowest note you play has the value 0, the second lowest note has the value 1 and so on. This also works in the negative direction. If you play a C major chord, for example, the pitch distribution within the Sequence Customizer would be as follows:
0 = C1, 1 = E1, 2 = G1, 3 = C2, 4 = E2, 5 = G2, -1 = G0, -2 = E0, -3 = C0
Columns: Display of the steps and their velocities. This allows you to precisely customize the sequences of notes within the played material and thus pre-design even more realistic passages.
It is also possible to select more than one note per step. This offers rich possibilities for your voicings and arrangements.
To better balance each step against the others you can adjust an offset for each step in the positive or negative way to either make a note louder compared to the other voices or quieter.
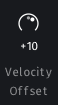
The step you want to edit must be selected, then you can set the offset for this step.
This especially comes in handy when programming more complex rhythms with the percussion instruments, because there are multiple instruments available combined in one slot. Keep in mind that absolute values are set in drum mode.
ENVELOPE
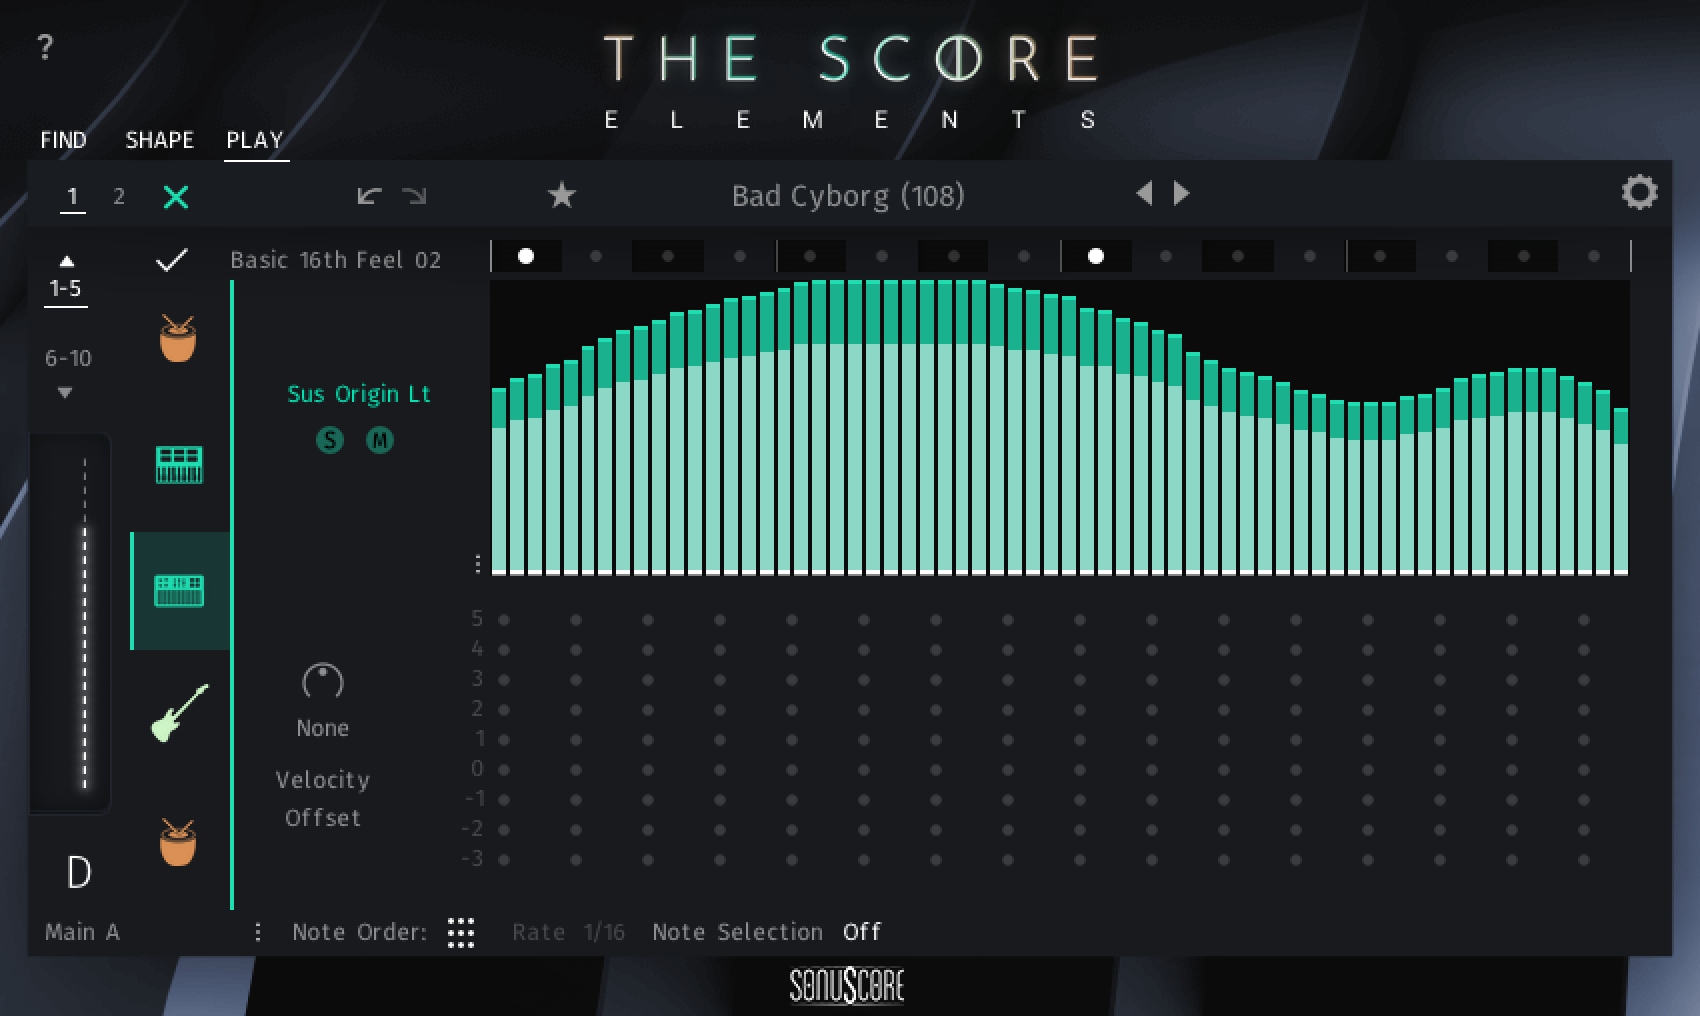
The Envelope allows you to set a recurring dynamic shape to sustained notes. The centerpiece is the envelope shape, which can be drawn freely by left-clicking and dragging the mouse. By holding “alt” while doing so you can delete steps. Holding “shift” allows you to scale all min or max values of the envelope by dragging the mouse up and down.
At the top of the envelope module you can create your own dynamic progression of the envelope.
Click at the top of each step to drag the max value of each step (mod wheel at 127) to the desired dynamic level. Clicking and dragging horizontally lets you edit an envelope quite well.
Click at the bottom of each step to drag the min value of each step (mod wheel at 0) to the desired dynamic level. (Note that you can also inverse the dynamic behavior by dragging the min value above the max value. When the mod wheel is at 0 it will play at a louder dynamic than when the mod wheel is at 127. This way you can create interesting movements between different slots where one element is more present in a lower dynamic range as compared to when it is in a higher dynamic range.)
At the bottom of the envelope module you can find the general controls for several functions.
Note Selection: Selects whether or not all played notes should be heard in this particular module. The different options allow you to play only specific notes of a played chord. This can be used to prevent a muddy bass section and orchestrate chords carefully with multiple instruments.
The following options are available:
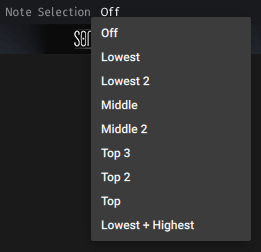
- Off: No note selection is applied, so all played notes will be routed to the envelope.
- Lowest: Only the lowest note will be played.
- Lowest 2: Only the two lowest notes will be played.
- Middle: In a three-voiced chord, only the middle note will be played. If you only play two voices at a time, the lower note will be played instead.
- Middle 2: In a four-voiced chord, the two middle notes will be played. If you play a three-voiced chord, the highest and the middle note will be played.
- Top 3: Only the three highest notes will be played.
- Top 2: Only the two highest notes will be played.
- Top: Only the highest note will be played.
- Lowest + Highest: Only the lowest and the highest note will be played.
Note Order - Two options are available:
- All (Chord): All notes depending on the Note Selection are routed to the envelope.
- Free: In the free mode the dynamics of the sustained notes are controlled by the modwheel. The envelope with its settings is bypassed, but the Note Selection is still applied.
You can use key modifiers to make your life easier editing the envelope:
- ALT+click - To reset an envelope step.
- SHIFT+click - To alter all steps of the current bar.
- CMD/CTRL+click - To have stepped values for each envelope step.
TIPS & TRICKS
GENERAL TIPS
- Play Simple Chords for Maximum Impact: Like with THE SCORE, all stories are optimized for simple chord progressions that you can play with your right hand only. Hold chords or single notes long enough to unlock the full potential of the multi-layered arrangements, ensuring a rich and dynamic sound.
- Use the Mod Wheel: The mod wheel is your key not only to dynamic expression, but to explore the nuances and different stages of the predesigned arrangements. Keep your left hand on the mod wheel for fluid transitions while playing with your right hand.
- Switch Song Parts Seamlessly with Key Switches: Use key switches to jump between Intro and the Main A section on the fly. This functionality is perfect when you’re sketching ideas for a new composition.
- Combine Stories and the Ensemble Stories: For ultimate versatility and detailed results, blend the multi-layered Stories with the Ensemble Stories. This approach lets you layer custom elements on top of the preset arrangements, providing both speed and precision in your workflow.
- Adjust Parameters for Unique Sounds: Dive into the individual parameter controls to tweak the Stories and make the arrangements your own. Change octaves and effects on the Shape page, experiment with the predesigned steps, arpeggios, and other functions of the individual slots on the Play page. Enjoy how quickly and easily you can change whole arrangements and soundscapes with only a few adjustments.
CREDITS
Product Concept and Design: SONUSCORE: Tilman Sillescu, Andreas Hammann, Jonas Meyer, Stefan Kemler, Lukas Ruschitzka, Simon Schrenk
Project Lead: Tilman Sillescu, Stefan Kemler
Recording: David Christiansen, Christian Wirtz, Simon Schrenk, Olajide Paris
KONTAKT Scripting: Jonas Meyer, Stefan Kemler, Mathias Vatter, Nico Dilz
NKS Integration: Stefan Kemler
Preset Design: Tilman Sillescu, Jonas Schüsselin, Jonas Hausotter, Matthias Meeh, Christian Wirtz, Simon Schrenk, Lukas Ruschitzka
Marketing: Benedikt Huster, Tobias Kunz, Felix Moebius, Louisa Wolf, Nadja Demmler, Zoé Friedbacher, Russ Hughes
Web Programming: Lukas Ruschitzka
Videos: Nadja Demmler, Tilman Sillescu
Additional Content: Tilman Sillescu, Nicolai Patricio, Simon Schrenk